In ecommerce, about 80% of all Google Ads spend goes to Google Shopping Ads.
Consumers love them because they can see at a glance if you have the product you’re looking for. So when they do click, there is a good chance you’ll make the sale.
So if you want to join the fun, here are 2 ways you can get your products showing as a Shopping Ad. Those are Standard Shopping or Performance Max campaigns.
In this guide, I’ll show you what to pay attention to when you’re getting started, how to decide which campaign type you should pick, and what you can do to get better results;
I’ll cover everything from setup to optimization and share additional resources that allow you to refine your Google Shopping campaigns even further.
Let’s get started!
Table of Contents
What Are Google Shopping Ads?
Google Shopping Ads allows retailers to advertise their products to searchers in a visually appealing way.
So when someone searches for a product, Google will look at all retailers that want to show Shopping Ads and show a relevant selection of specific products.
If the user clicks on an ad, Google will point them straight to the product page.
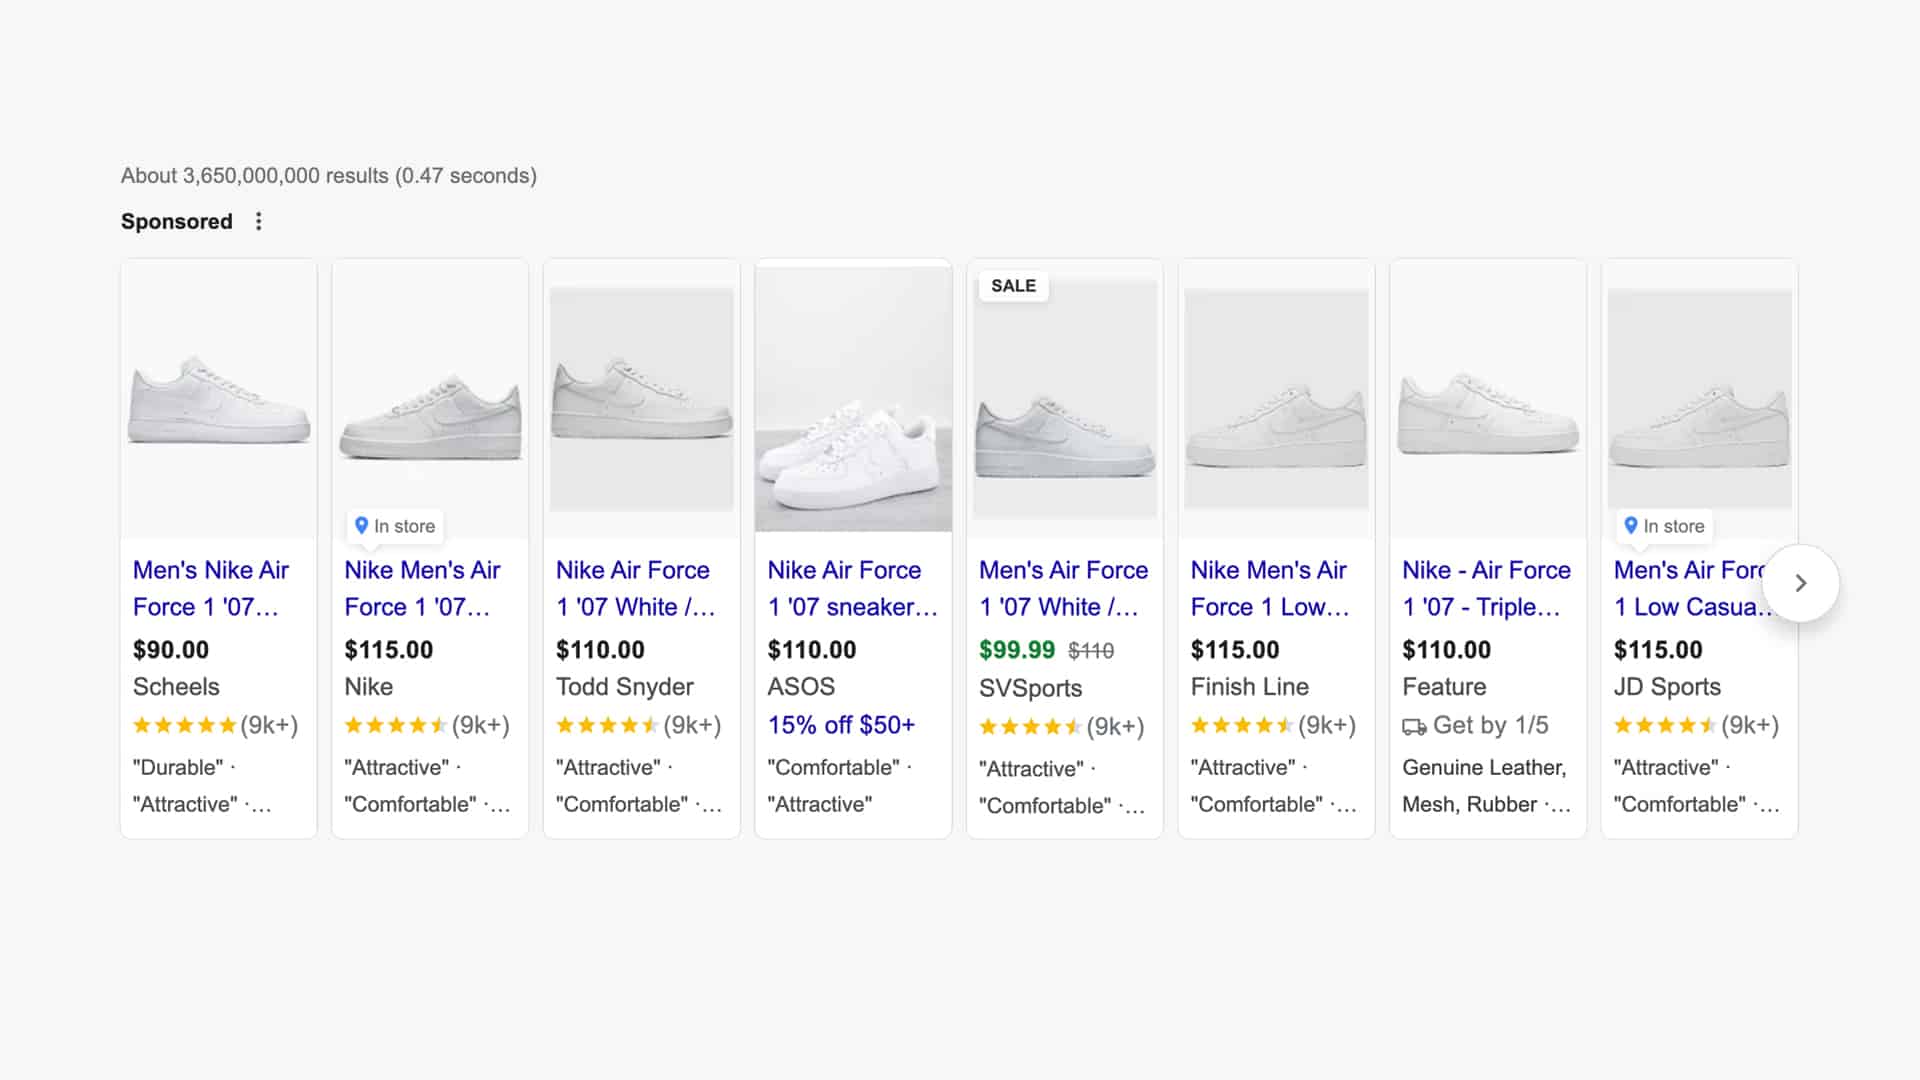
The image above shows product ads (also known as product listings or PLAs) for the Google search query “jordan one white” on the top of the page.
A Google Shopping ad includes an image, the product title, the price, the name of the retailer, and sometimes some retailer-specific information like shipping costs or reviews.
Why You Should Use Google Shopping Ads
Google offers many different ad formats, so let’s look at why Shopping Ads are so effective.
If you were looking to buy new Nike Air Max shoes, which ad would you click on: the Shopping or Search Ad?
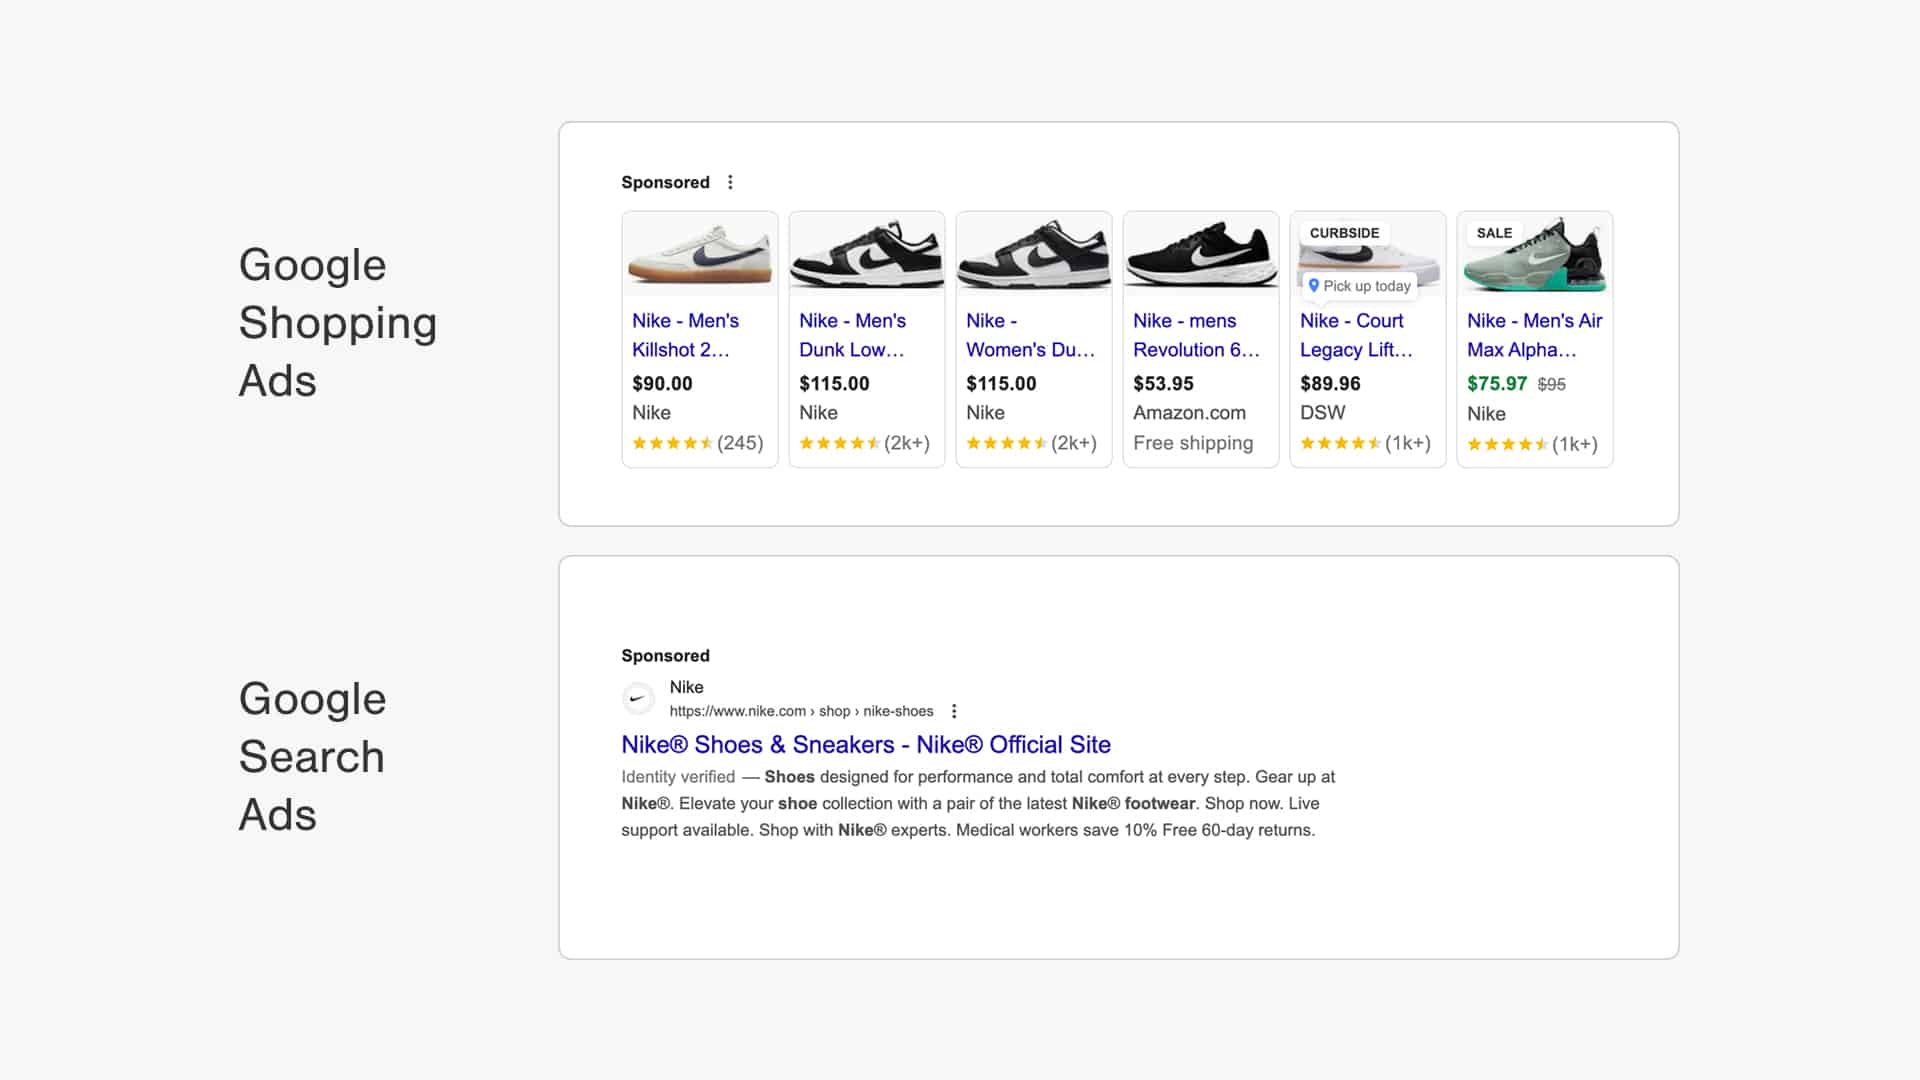
While Nike did a good job with the Search Ad, it has a hard time communicating all of the info that the Shopping Ads show.
Consumers can immediately see different product types, models, colors, and prices, as well as the stores they can purchase them from.
This results in more people clicking on Shopping Ads, which means more ad dollars for Google!
How Do Google Shopping Ads Work?
Unlike Search Ads, Shopping Ads don’t use keywords or ad text.
Instead, Google uses a file that you provide called a product feed (more on this later) which contains all of your store’s product data (things like titles, descriptions, images, prices, etc.), to automatically create the advertisement.
2 Campaign Types That Power Google Shopping Ads
Inside Google Ads, 2 campaign types allow you to show Shopping Ads:
- Standard Shopping
- Performance Max campaigns
(Before Performance Max there was another campaign type called Smart Shopping, which could also run Shopping Ads, but this isn’t available anymore.)
Even though both campaigns are very different, the Shopping Ads part is very similar.
Both campaigns use the product feed to match your products with relevant search queries as well as to create the actual ads.
If a potential customer like what they see, they click on your ad which will take them to your website.
In return, Google charges you for that click.
How Much Do Google Shopping Ads Cost?
Similar to Search Ads, you pay each time someone clicks on a Google Shopping Ad.
The average Google Shopping Cost Per Click is $0.66, which is significantly lower than the Search Ad CPC, which costs $2.69 per click.
While clicks cost much less, the average conversion rate of Google Shopping (1.91%) is also lower than the Google Ads average for the ecommerce industry (2.81%).
As Shopping Ads clicks are cheaper, the Cost Per Action (CPA) is also lower, $38.87, compared to $45.27 for all Google Ads clicks.
While these statistics here show the averages for all advertisers that run Shopping Ads, the REAL performance of your Shopping ads campaign is in your hands.
How to Add Your Products to Google Shopping?
To get started with Google Shopping, you need to have 4 pieces in place:
- Your ecommerce platform: product pages and checkout functionality
- Your product feed: how you tell Google about your products
- Google Merchant Center: free tool to sync your products with Google Ads
- Google Ads account: where you’ll create your campaigns
I like to call this the “Google Shopping Puzzle” as it can be a puzzle for someone going through this the first time.
The part that creates the most problems is the product feed. Especially if you haven’t worked with feeds before, it can be confusing how this exactly works.
So in the next sections, I’ll show you how to add your products to Google Shopping.
Pro tip: If you need more detailed instructions, check out our in-depth tutorial on Google Shopping setup.
Step 1 – How to Create Your Product Feed
The product feed is the heart of your Shopping Ads campaign. In essence, it is a big spreadsheet that contains your product data.
Google is pretty strict about what information to include and what format to put it in. That’s why it is pretty easy to mess up something when creating it.
When that happens, Google can disapprove of those products and you’ll not be able to advertise them. But if you fix the errors by adjusting your product information, you’ll be able to advertise again.
There are two main approaches to creating a Google product feed:
- Generate it automatically using an app, extension, plugin or tool
- Manually create a feed using a spreadsheet
I highly recommend to go with option #1. Especially if you’re using a popular ecommerce platform (Shopify, WooCommerce, Magento, etc.), you have plenty of options to choose from.
Some of the tools linked below are paid, but in most cases, it’s only a small amount that far outweighs the trouble if you decide to get with the manual (free) option!
Let me share with you the best apps for each platform:
Product feed apps for Shopify
There is no shortage of Shopify apps to help you manage your product feed:
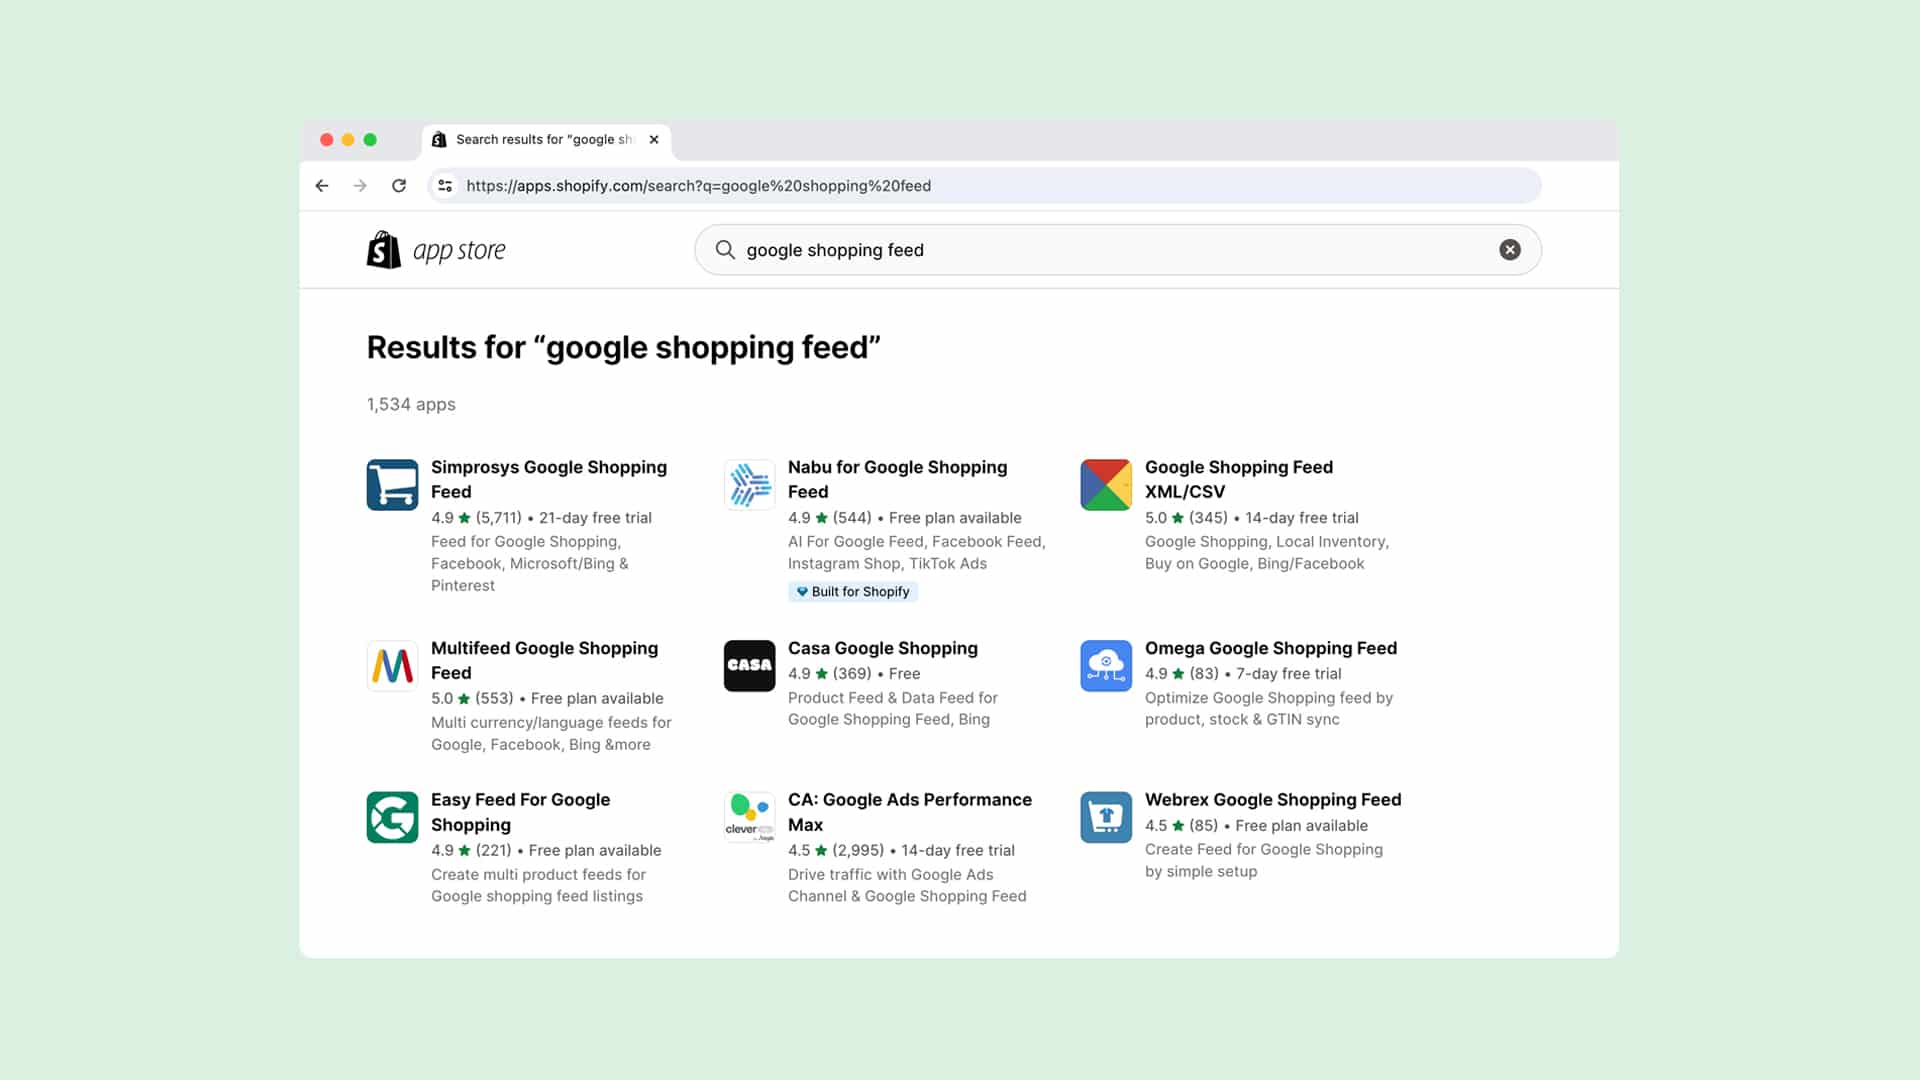
Here are our favorites:
- Google & YouTube app – link: the official Google channel on Shopify. Syncs your products and configures Google Analytics 4
- Simprosys Google Shopping Feed – link: manage all your products in a single feed
- Multifeeds for Google Shopping – link: easily manage your products with multiple feeds
Product feed apps for WooCommerce
- API Feed for Google Shopping – link
- WooCommerce Product Feed PRO – link
- WooCommerce Google Feed Manager – link
Product feed apps for Magento
Product feed apps for BigCommerce
While Google automates a lot of the work, all the tools listed above will help you troubleshoot and fix problems with your feed.
Data feed tools
If the product feed you get from your ecommerce back-end isn’t in great shape, you might need to make some extra changes before uploading it to Google Merchant Center.
This in-between zone is covered by product feed management tools. Here are a few examples:
Step 2 – Setting up Google Merchant Center Account
After your feed is ready, you can create a Google Merchant Center account.
When you are done with that, you need to claim and verify your store’s domain to prove that you own it. You can do this using Google Analytics, Google Tag Manager, or adding a meta tag to your website.
Uploading Your Product Feed to Google Merchant Center Account
You’re now ready to upload your product feed to Google Merchant Center.
In the left-hand menu of your Google Merchant Center account, click “Products“, then, click “Feeds“
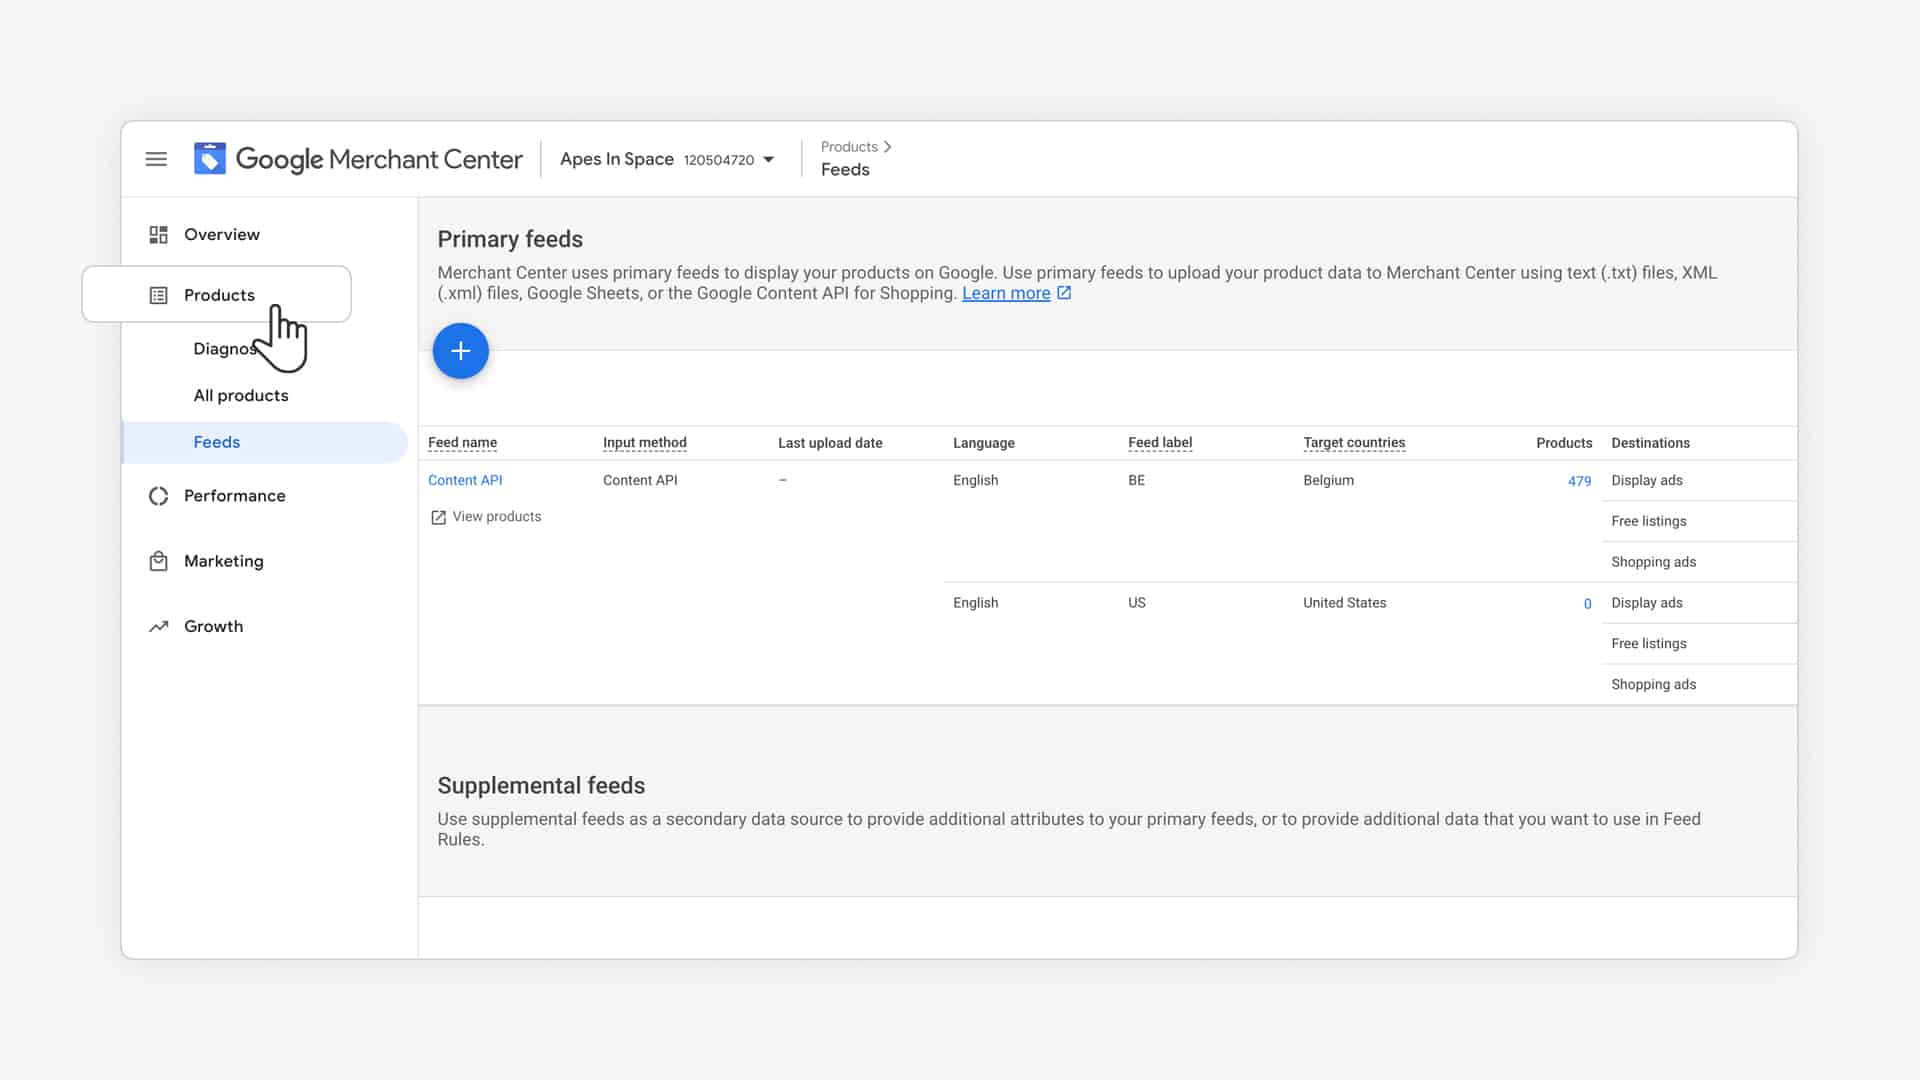
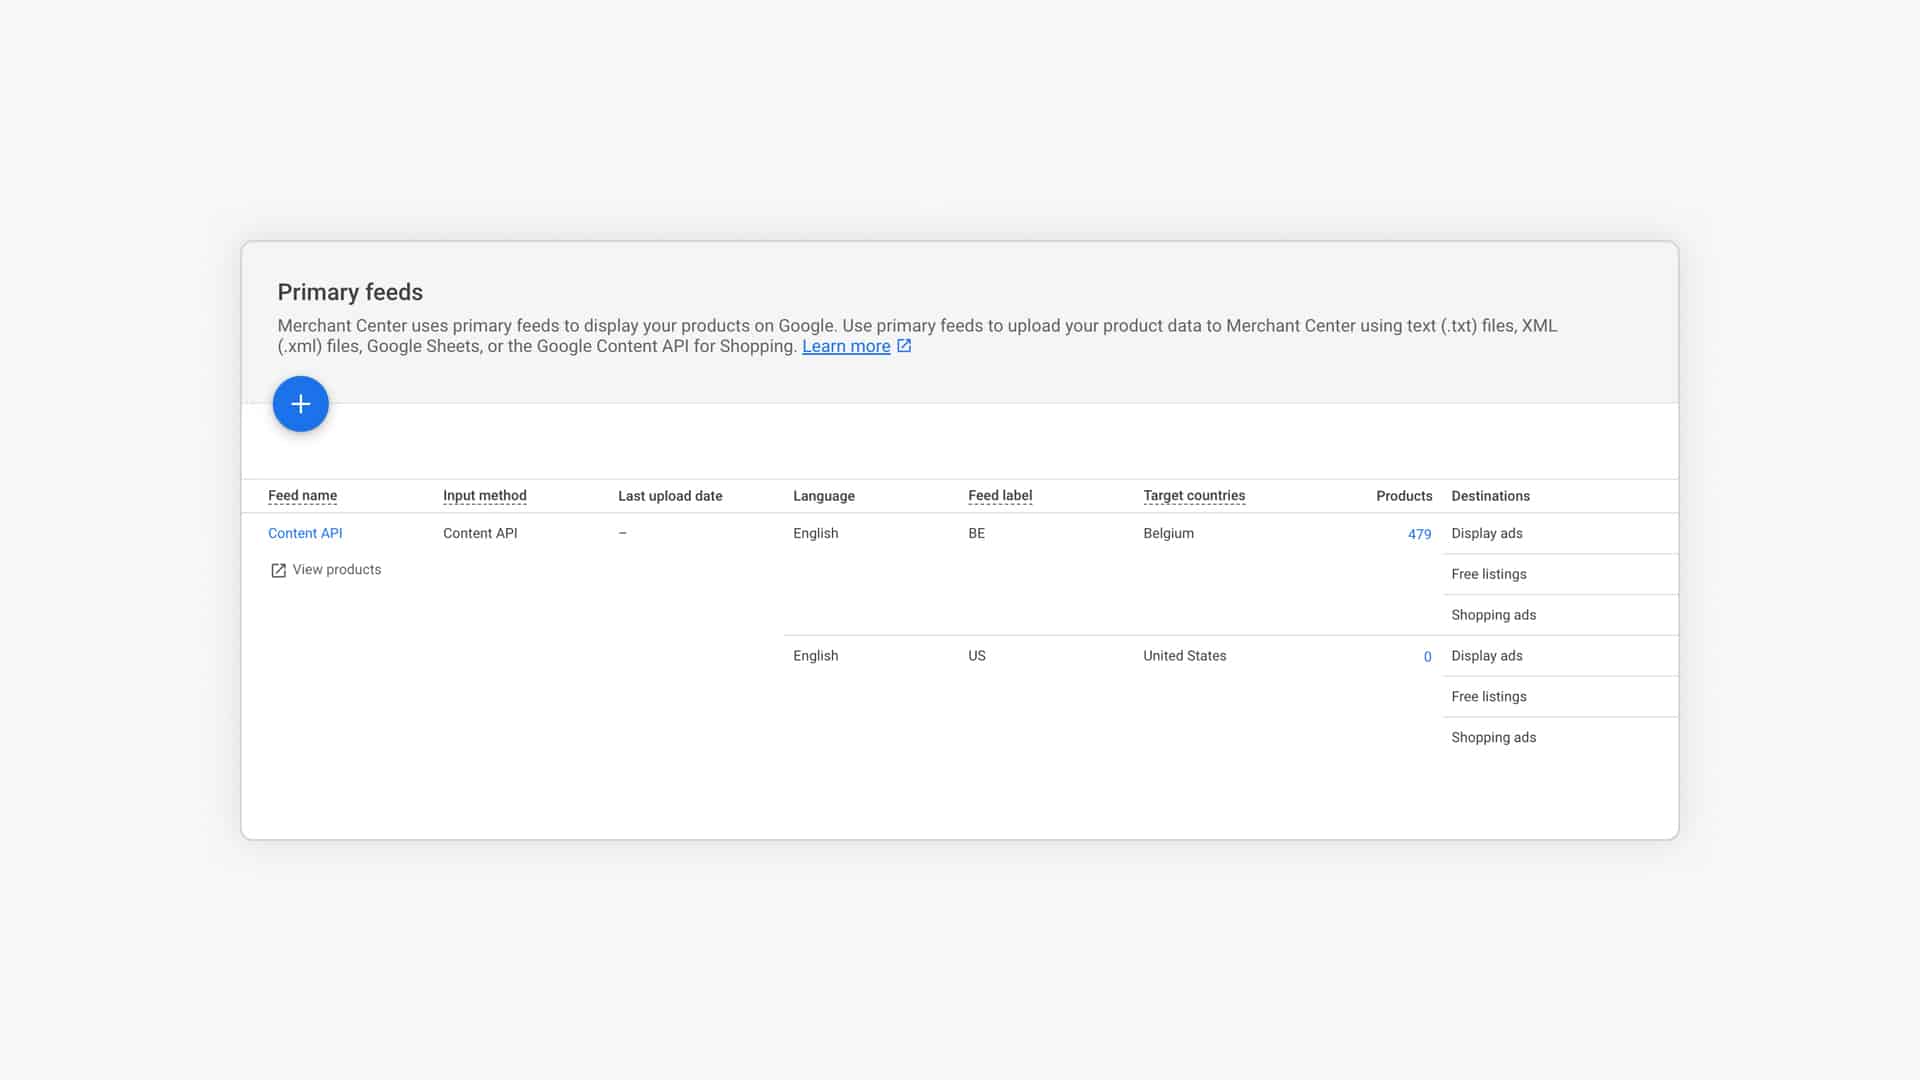
This will show you the overview of all the product feeds that are connected to your Google Merchant Center account:
Next, we’ll check if your ecommerce platform is already connected to Google Merchant Center.
If the product feed is called “Content API“, it means that your ecommerce platform is already connected with GMC. In that case, your product data will be automatically sent and updated, so you don’t need to add any product feeds.
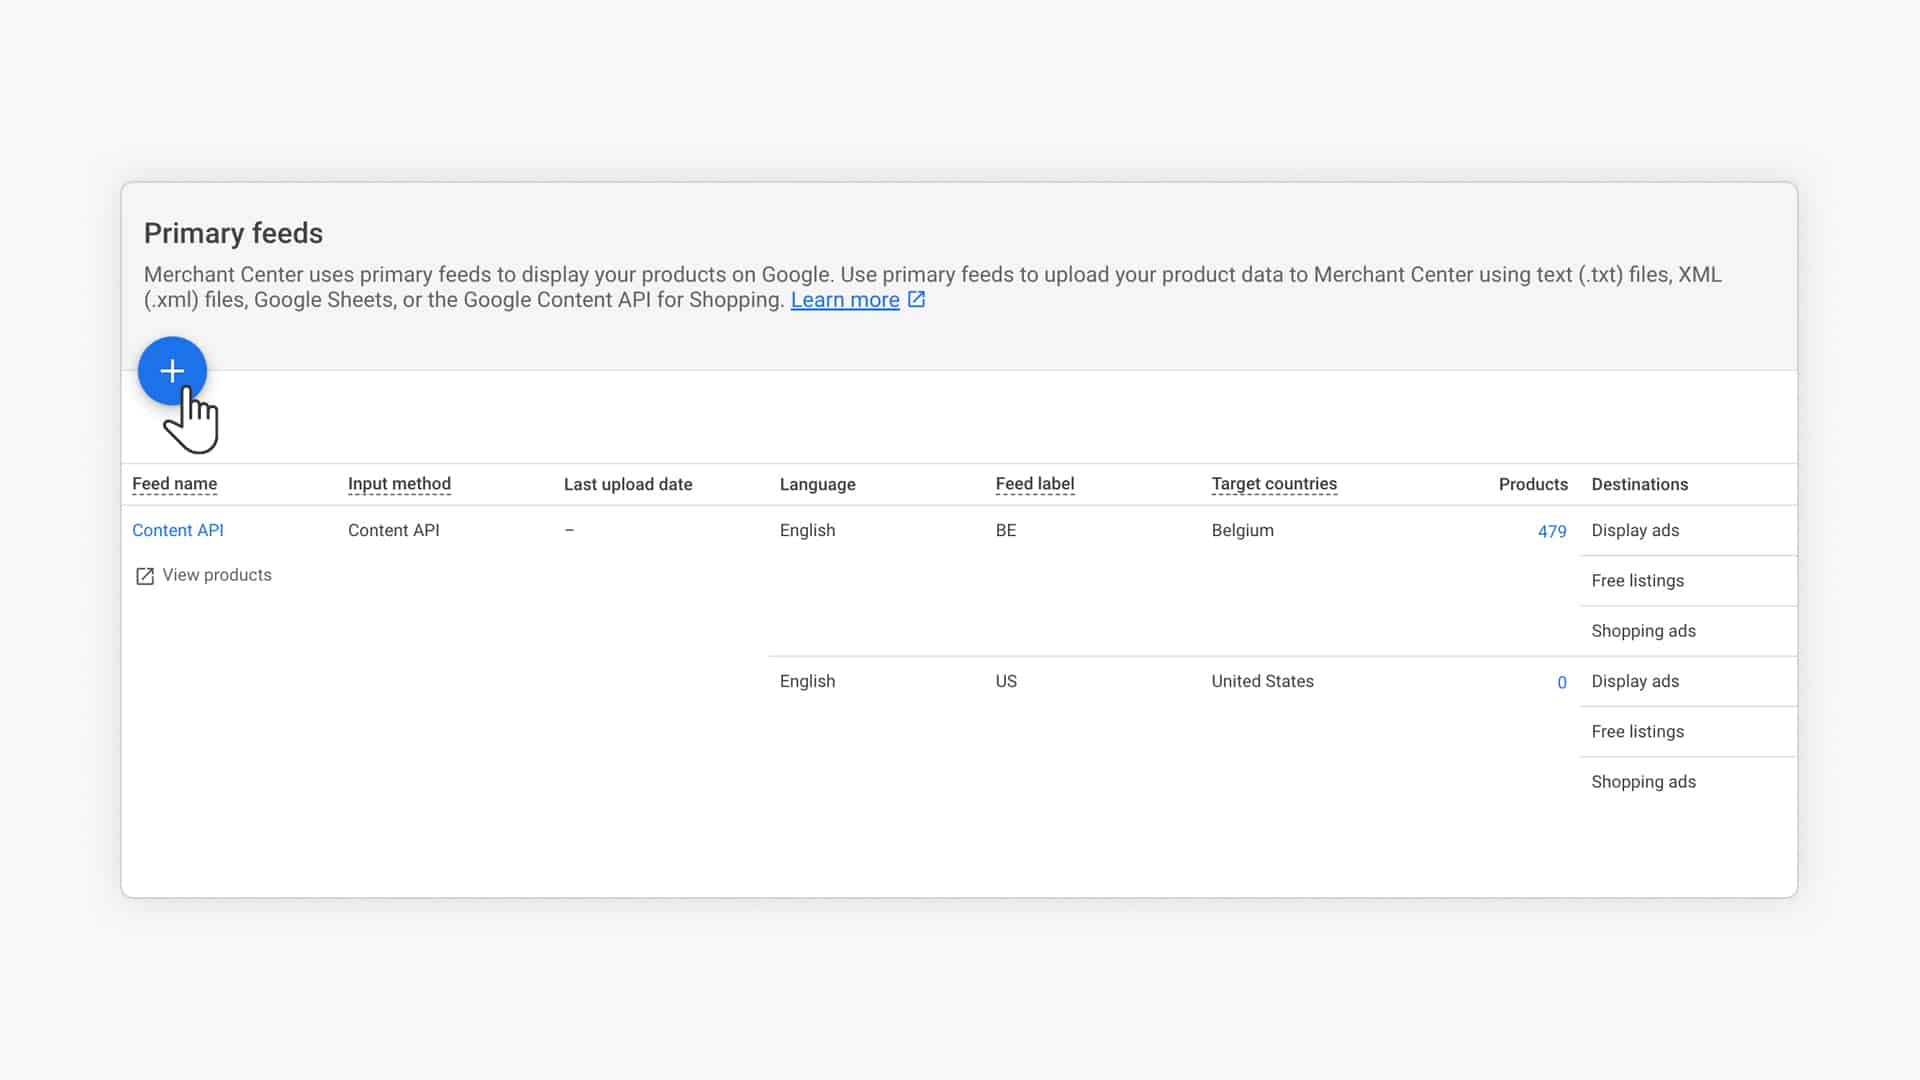
If you don’t have any API-powered feeds connected yet, you’ll have to manually add the feed:
To do that, click the big blue + button:
Next, Google will guide you through the whole process. (If you’d like more detailed help, check out this tutorial)
When you’re done and Google has processed your feed, head over to Diagnostics to see its health:
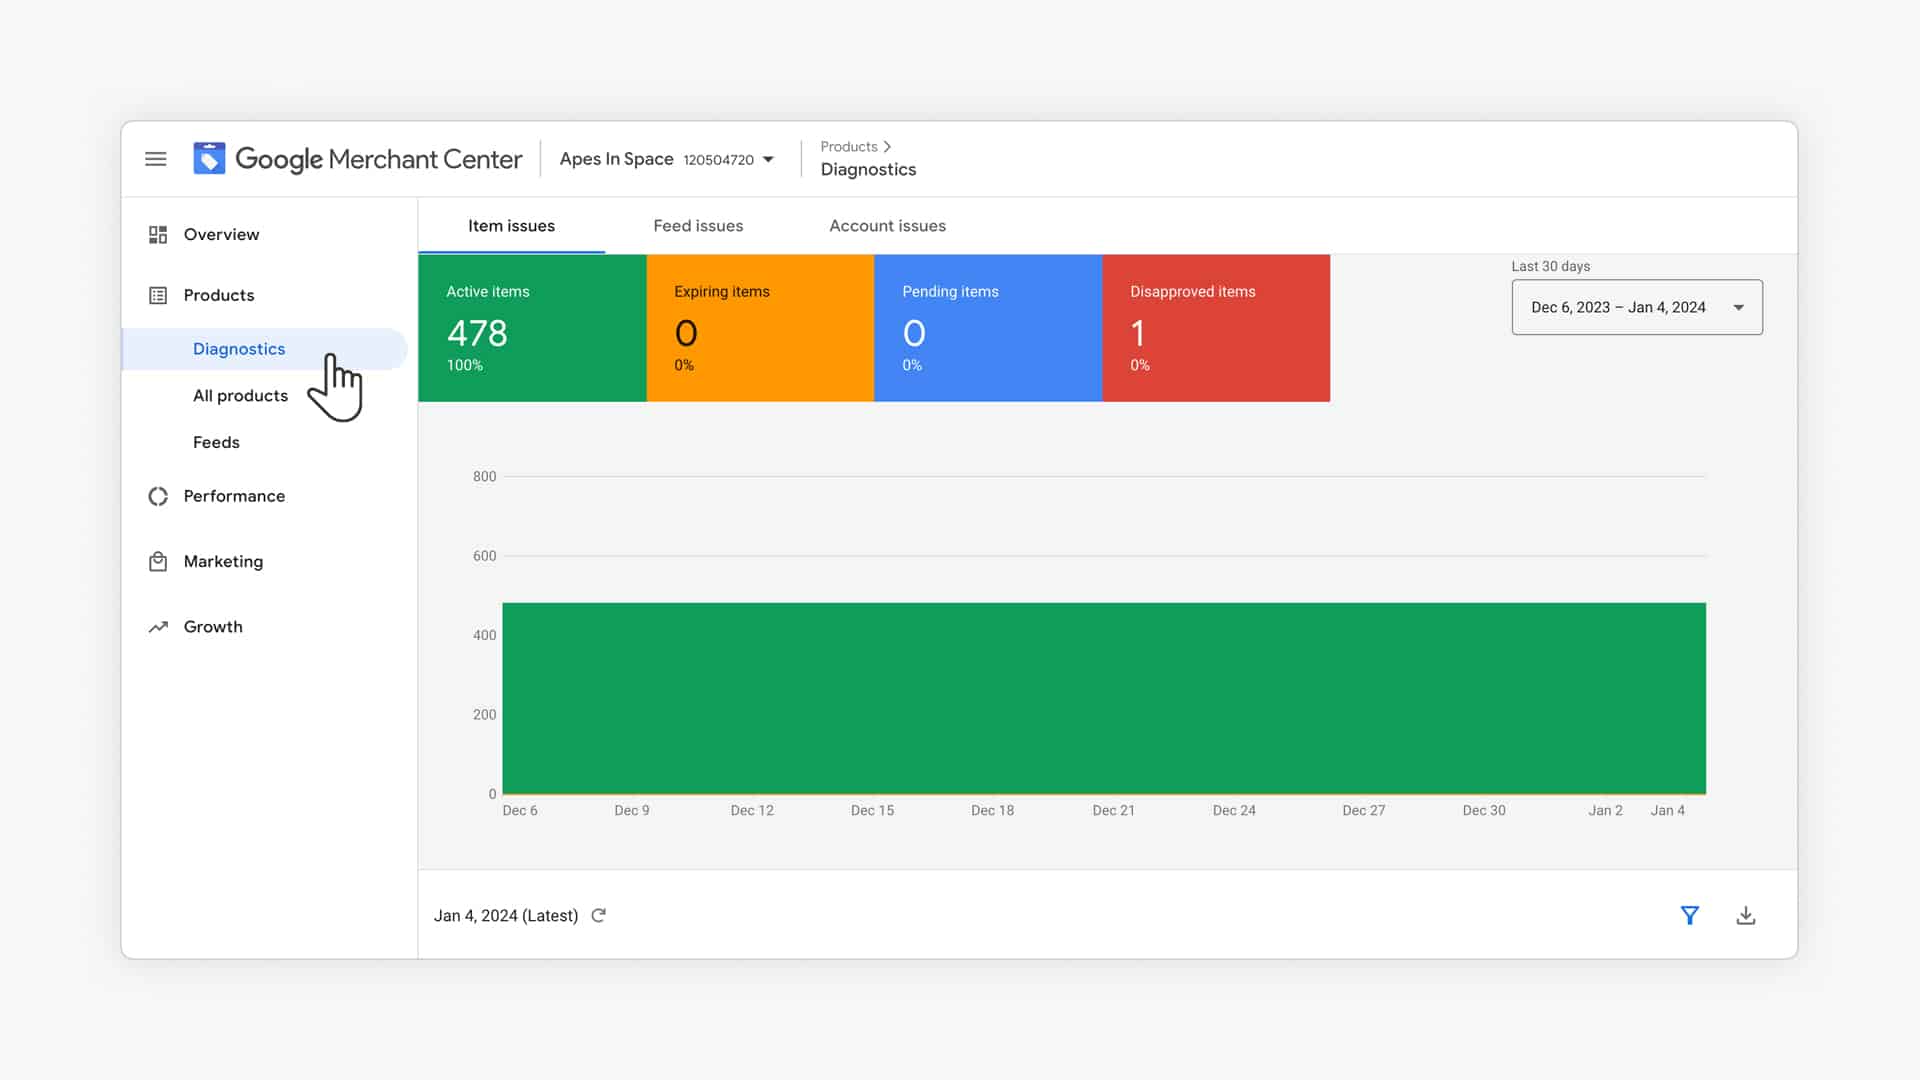
When you first upload your feed, it’s normal that there are errors or disapproved items.
Don’t be discouraged if this looks intimidating. Just follow the instructions to fix the most urgent ones (the red ones).
Start fixing things right away. Don’t postpone this because neglecting to provide any fixes could result in Google Merchant Center account suspension.
To guide you through clearing those errors, I’ve created an in-depth guide to fix Google Shopping product feed errors efficiently you can check here.
In addition to uploading your product feed, you have to supply Google with your shipping and/or tax details.
Configuring Shipping Settings
Google needs to know the shipping costs to make an accurate price comparison with other vendors.
You can configure the exact shipping details in Google Merchant Center Account.
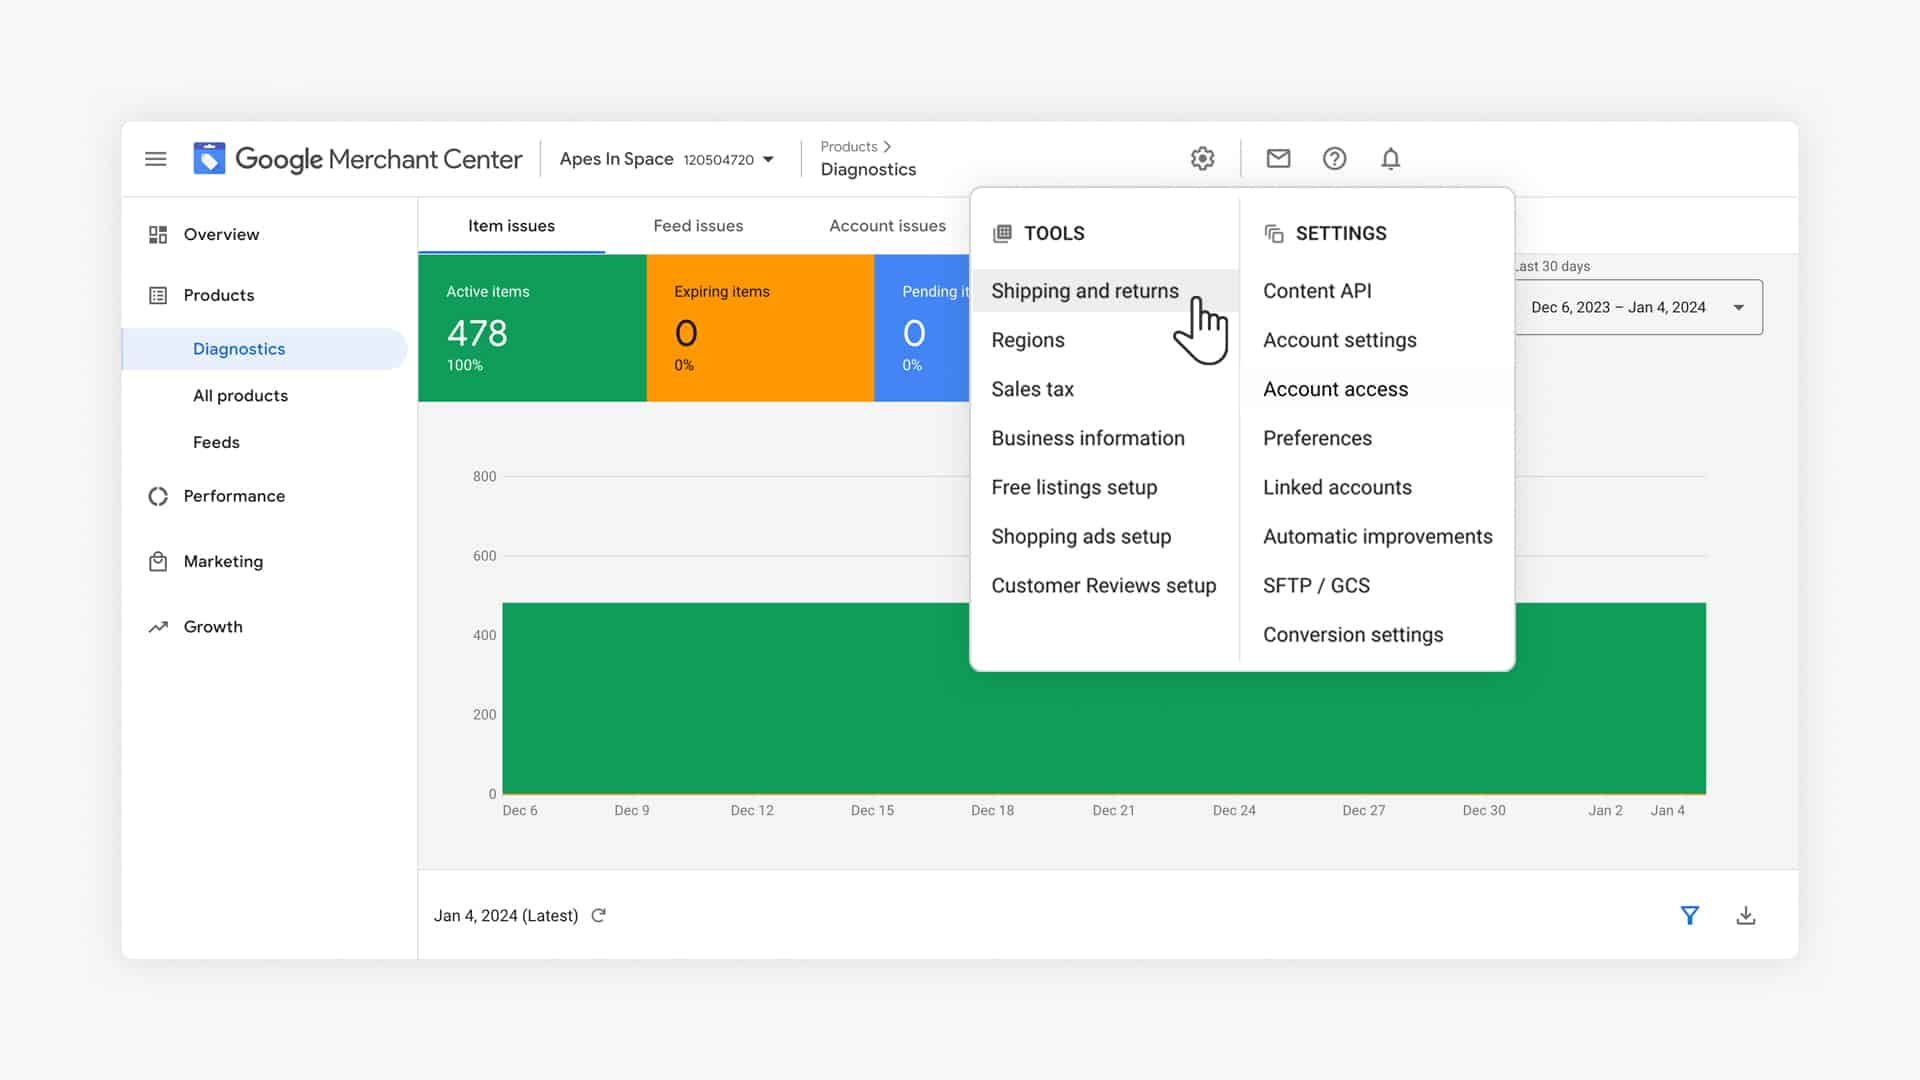
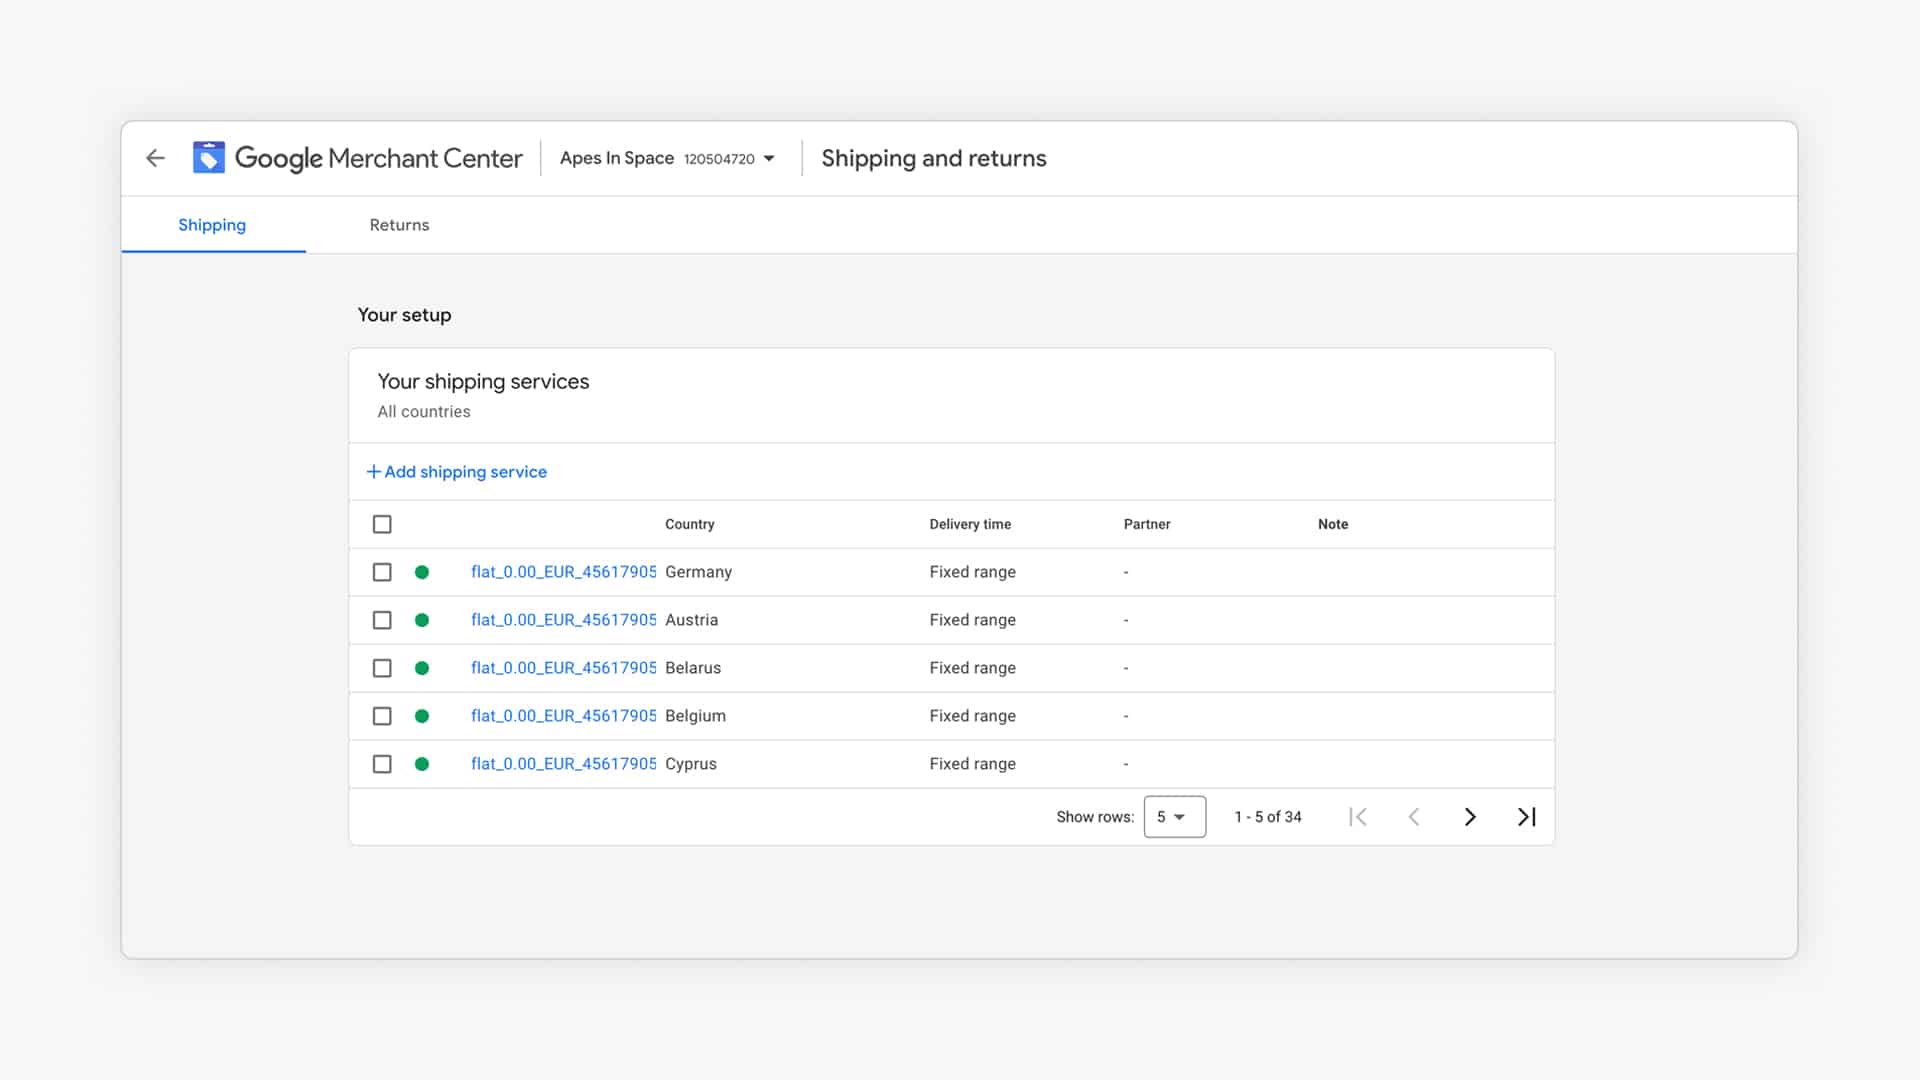
To do that, click the gear icon in the top bar, inside select “Shipping and returns“:
Then, create a new shipping service where you can define your shipping costs. Anywhere from a flat rate, depending on the order size, or integrate with carrier pricing like FedEx or UPS:
Configuring Tax Settings (US Only)
If you are selling to the United States, you need to configure the sales tax settings. If you’re not targeting the US, you can skip this section.
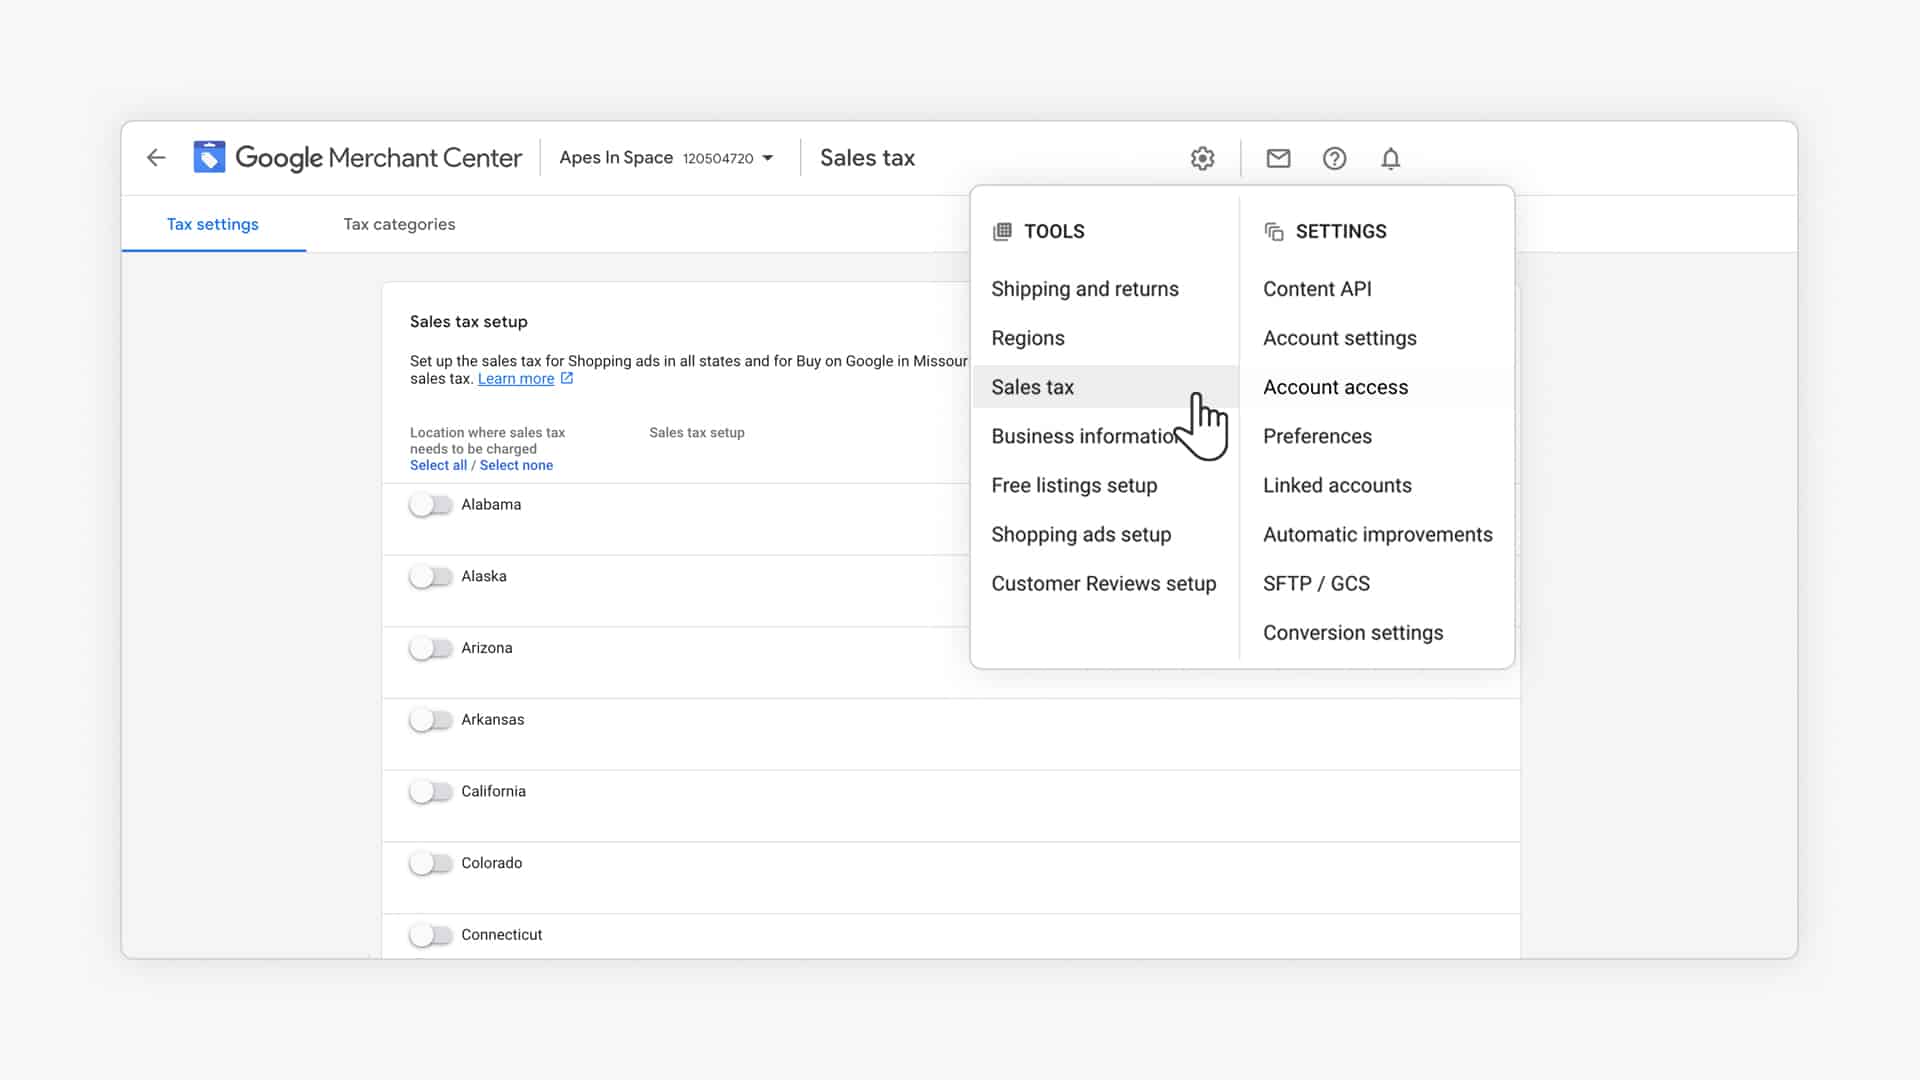
To start this menu, click the gear icon in the top bar, and select “Sales tax”, this will bring you to the menu where you can set up different tax rates depending on the state you’re located in and selling to.
I’m no tax expert, so be sure to check the local sales tax regulations in the states you’re doing business in!
Step 3 – Create a Google Shopping Campaign
Over the last few years, Google has added new campaign types, removed others, and changed the names of how campaigns are called, so let me start this section by breaking it down as simply as I can:
There is no such thing as a “Google Shopping campaign”.
Instead, there are 2 campaign types that can show Shopping Ads:
- Standard Shopping campaigns
- Performance Max campaigns
These are very different campaigns, so let’s start by looking at the difference between the two.
Standard Shopping vs. Performance Max
| Performance Max | Standard Shopping | |
| Placements | Search Network, Display Network, YouTube, Gmail, Discovery & Maps | Search Network (with Search Partners) |
| Reach | Very wide | Limited |
| Bid strategy | Maximize Conversions or Maximize Conversion Value (with optional targets) | Target ROAS, Maximize Clicks, Manual CPC |
| Level of control | Low | Very high |
| Conversion volume requirements | Impact on Search Campaigns | None |
| Campaign transparency | Low | High |
| Optimization potential | Medium | Very high |
| Dynamic Remarketing included | Yes | No |
| Impact on Search campaigns | Yes | None |
As you can see from the table, each campaign type has its own pros and cons. That also means that there is no single best approach for every situation.
For the sake of this article, the most important difference between Standard Shopping and Performance Max is that the latter isn’t just limited to Shopping Ads. It includes a bunch of other ad formats.
In what follows, I’ll create a Standard Shopping campaign.
But be sure to read our Performance Max guide if you’d like to learn the foundations. If you’re already familiar, you can also check out our detailed article on how to optimize Performance Max campaigns.
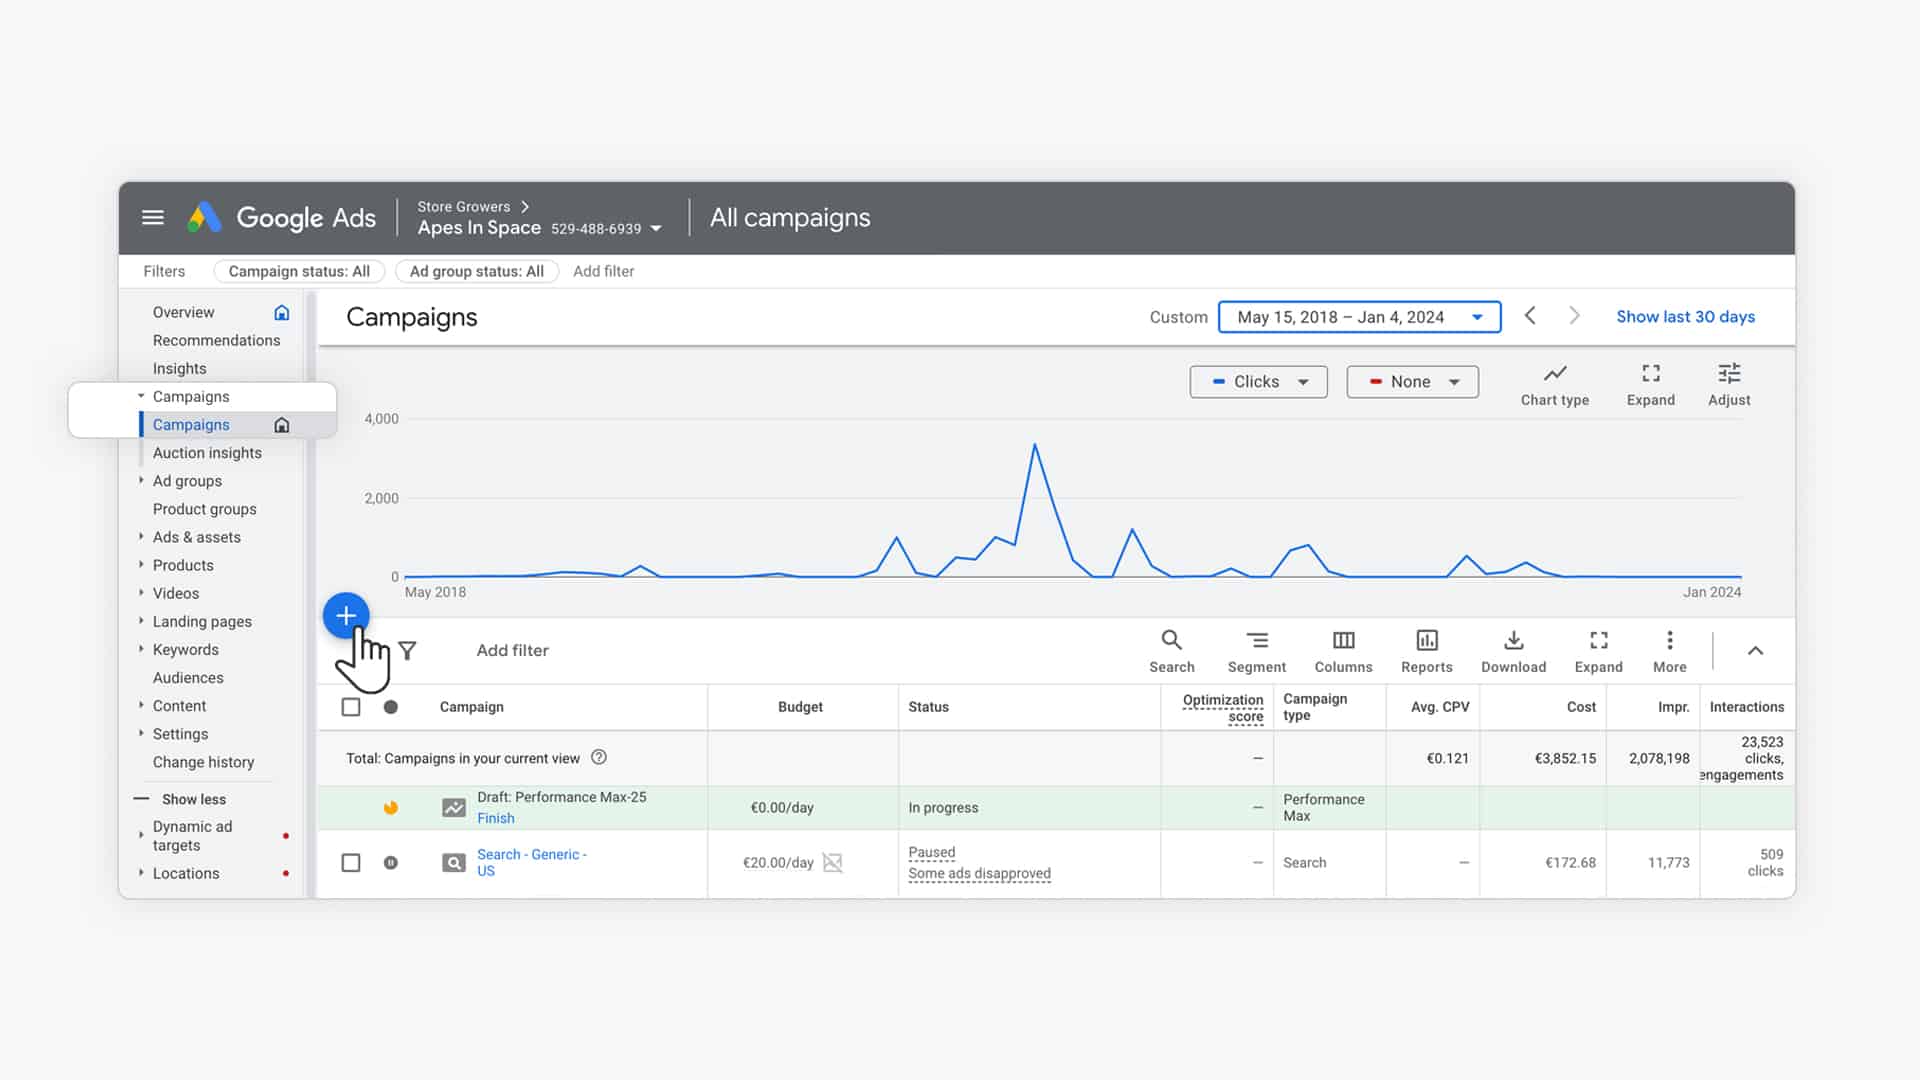
Here is how you create a Standard Shopping campaign from the Campaigns tab:
First, click the big blue plus sign:
Select “Create a campaign without a goal’s guidance“, then select “Shopping” as the campaign type:
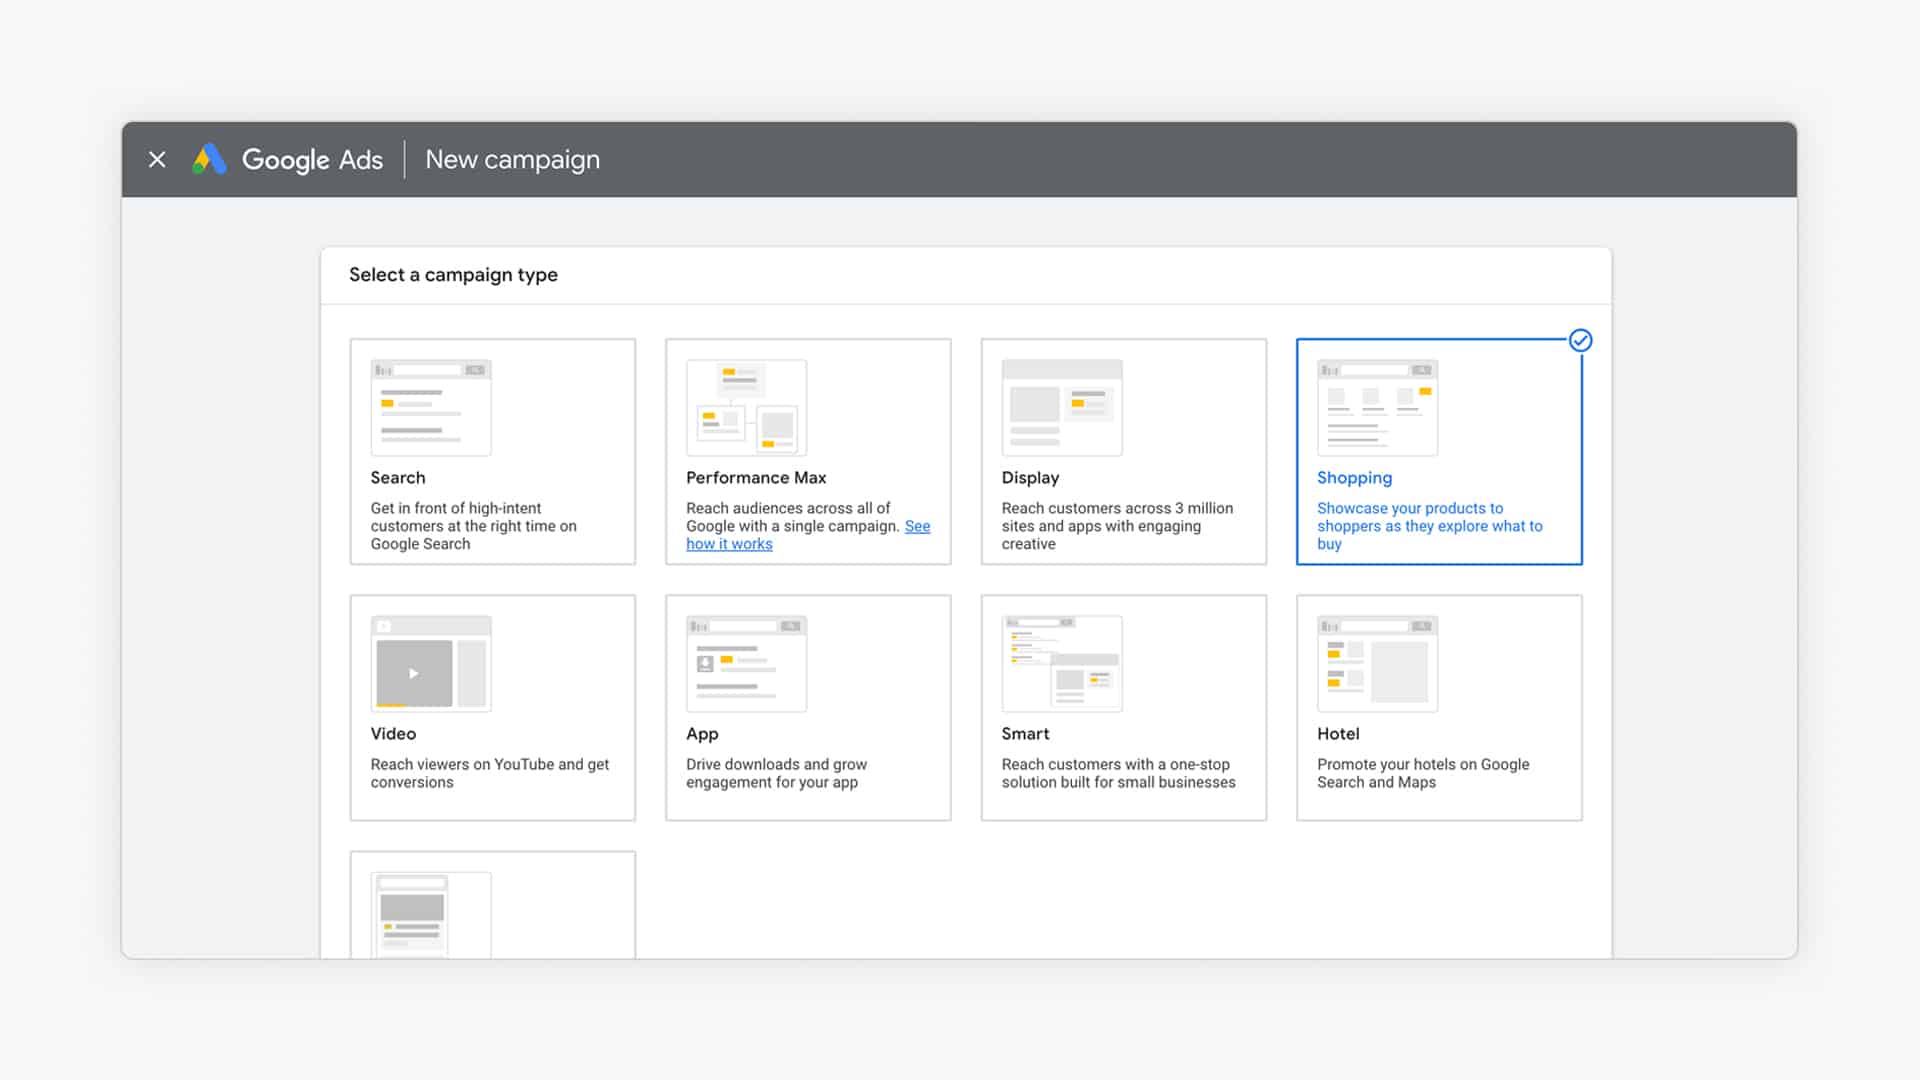
Follow the different steps listed on the page.
Then at the bottom of the page, switch “Performance Max” back to “Standard Shopping campaign“:
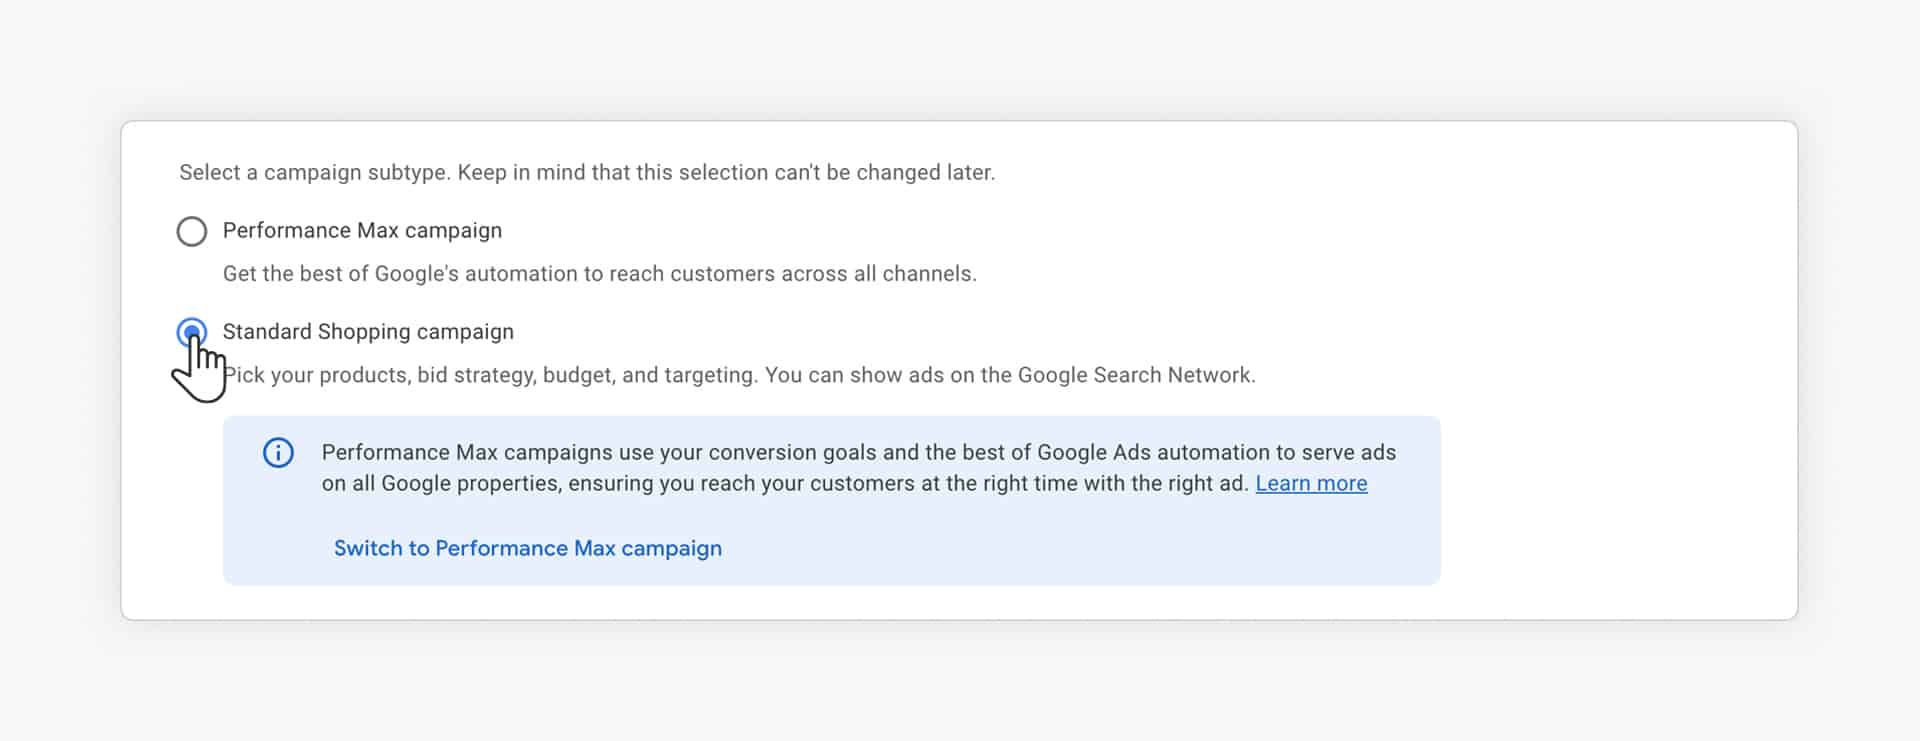
Follow the steps in the setup and adjust all the other settings for your Standard Shopping campaign.
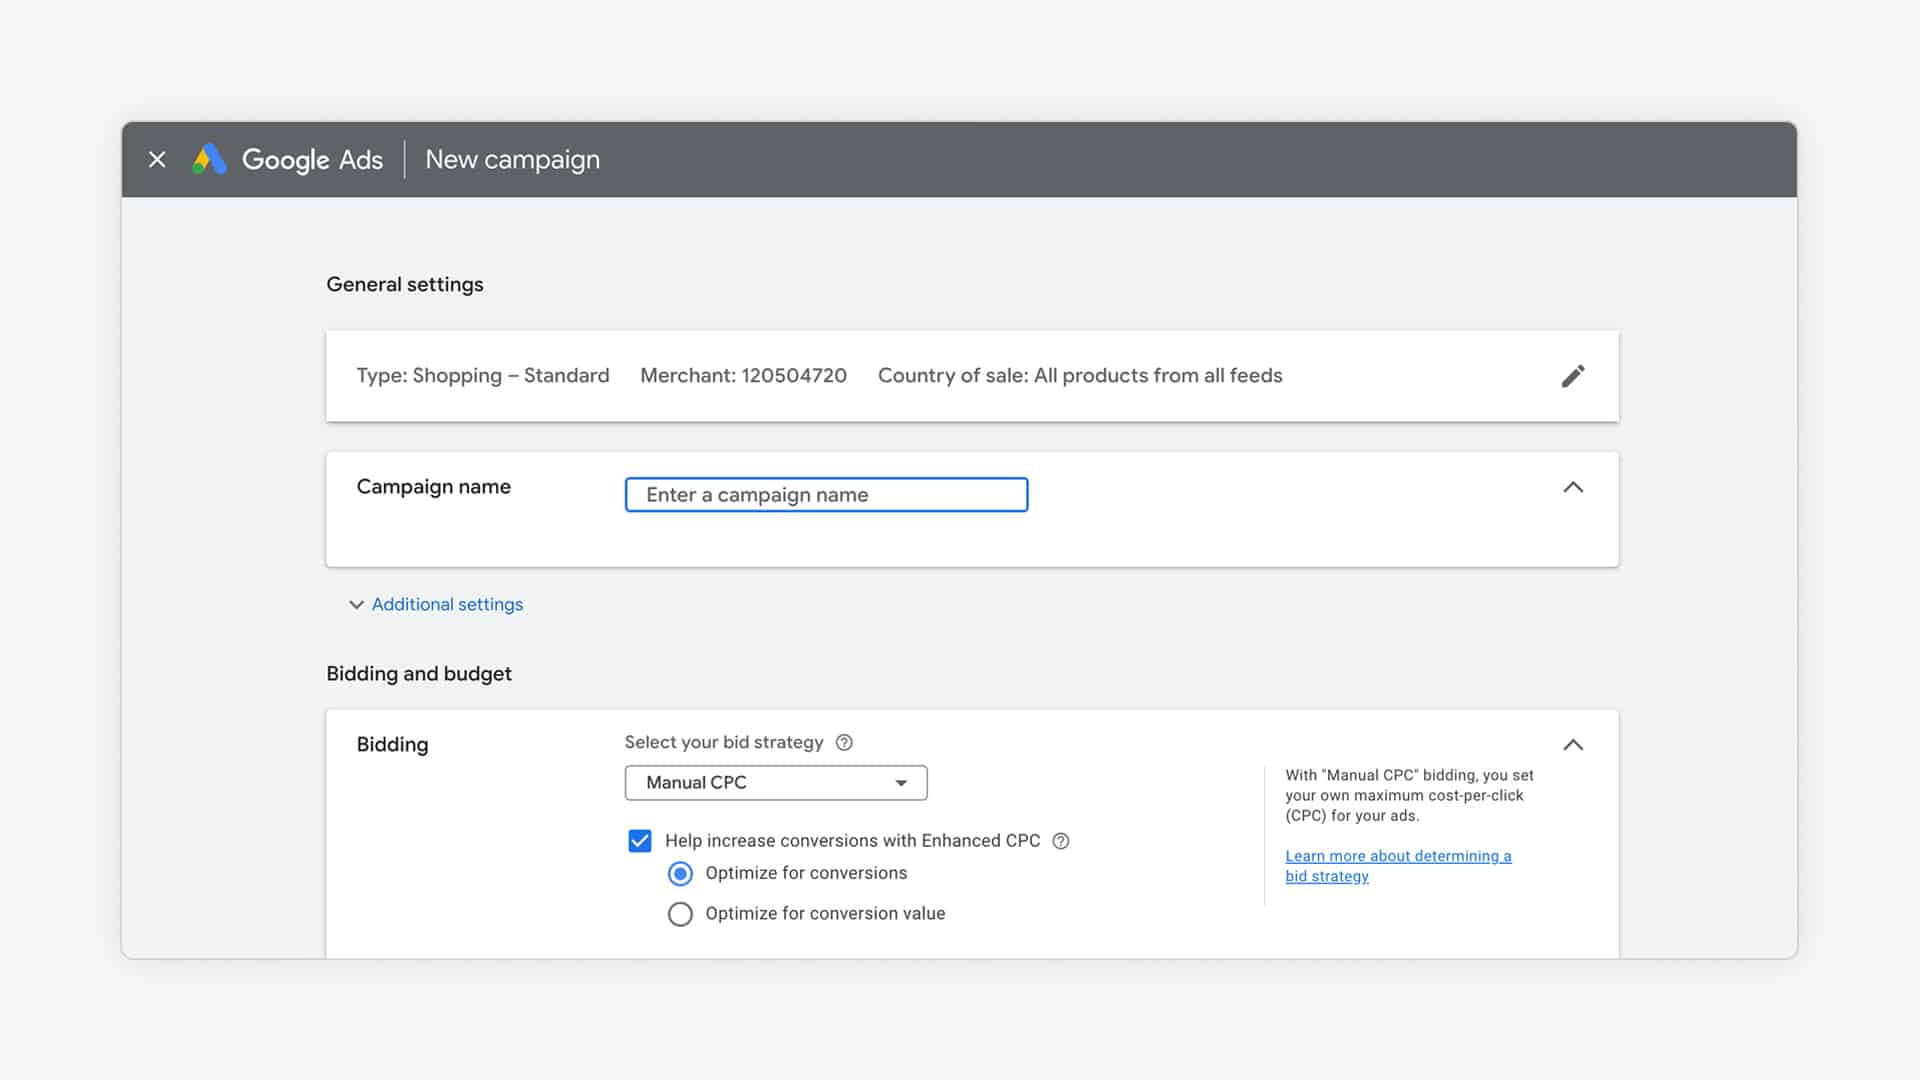
This includes giving your campaign a name as well as a budget ($10/day is a good start), bid strategy (pick Manual CPC for now), and the locations where you want to show your ads.
To learn more about each setting in detail, have a look at this article I wrote on Google Shopping setup.
After you’ve configured the ad group, fill out the additional settings and hit “Save” at the bottom of the page to create your campaign.
Now that your new Standard Shopping campaign is created, you’ll have one campaign, one ad group, and one product group.
That’s a solid start, but to get great results, you’ll need to do more. Read on to discover the best practices.
But before we do that, I want to clear up something that confuses a lot of people.
Going Deeper on Shopping Campaigns
While this guide is a big one, it barely scratches the surface of what it takes to win with Google Shopping.
That’s exactly why I developed our Google Ads Success course.
It covers everything I’ve learned from running these campaigns for the past 12 years and much more.
If you want to learn more, I’d love for you to check it out!
On with the article 👇
Google Shopping Best Practices
To get profitable results from your Google Shopping campaigns, you need to do more than just set them up.
You need to discover the parts that work and put more budget behind them while cutting back ad budget in the parts that aren’t generating results.
So, in this section, we’ll explore different best practices for Google Shopping that can take your Google Shopping from losing to making money.
Because there are now 2 campaign types that can serve Shopping Ads, I’ll make it clear if certain optimization tactics are specific to either campaign type.
Google Shopping Campaign Structure
Using a good Google Shopping campaign structure is one of the biggest optimizations you can make.
Improving the structure sounds a bit abstract, so let’s take a look at what this means.
Continuing the example from before, we have set up a Standard Shopping campaign that looks like this:
- One campaign
- One ad group
- One product group
This means that we’re bidding the same amount per click no matter the product or search query.
So the first step to increasing control over your bids is to create new product groups using product attributes.
Google Ads gives you a bunch of default criteria you can use like brand, product type, or even the Item ID.
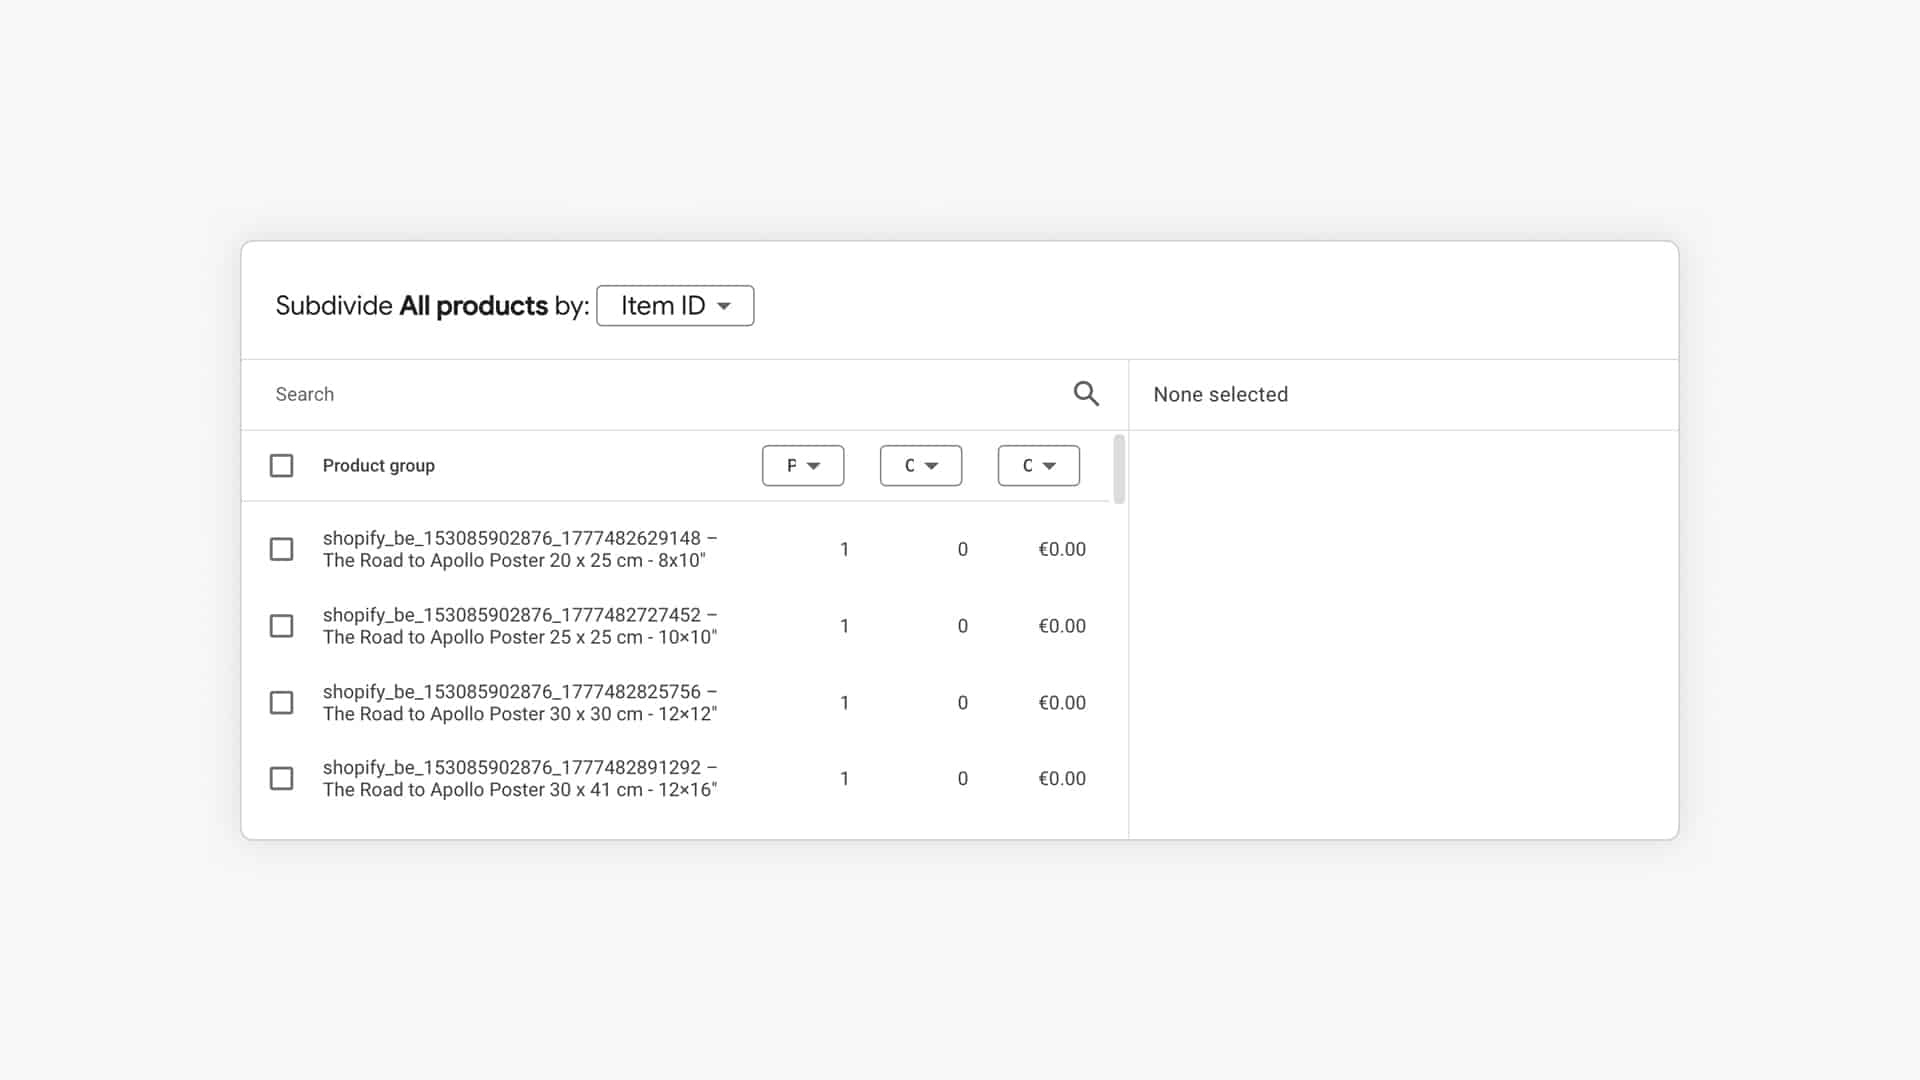
This is a good start. But it becomes really interesting when you start to manage your campaigns based on information like sales volume or margin. You can add that information to your campaigns through custom labels.
You can also use those same product attributes as inventory filters to set up different campaigns for a specific brand or product type. Mimicking your website’s structure is often a good way to organize your campaigns.
When that’s done, you’re ready to implement one of the most effective Google Ads best practices, something called search query level bidding.
With this approach, you run multiple campaigns with the same products that allow you to target specific search terms with your Shopping campaigns.

In the screenshot above, you can see two Google Shopping campaigns. One targets branded search queries, while the other one only shows generic search queries. This allows you to have separate bids.
Notice the difference in CPC, number of conversions, and the conversion value in that screenshot.
Pro tip: You need to tweak your Google Shopping campaign priority settings for keyword filtering to work efficiently with the Search Query Level Bidding structure.
Improving the structure of your Shopping will increase control.
But increased control comes at a price. More granular campaigns will take more time and make it a little more complex to set up and manage.
If you’re running Performance Max campaigns, the words might be different: listing group vs product group, asset group vs ad group, but many of the underlying choices are the same:
- Do you create one or more Performance Max campaigns
- How many asset groups do you have? What targeting are you using for each one?
- How are you subdividing your listing groups?
- Etc.
Google Shopping and Negative Keywords
If you use negative keywords, you prevent your ads from showing up for irrelevant and low-quality traffic that hurts the performance of your campaigns.
By doing this, you can increase your CTRs, conversion rates, and eventually your ROAS.
If you’re using Standard Shopping campaigns, you can find negative keywords. The easiest of those is to sift through your Search Terms Report.
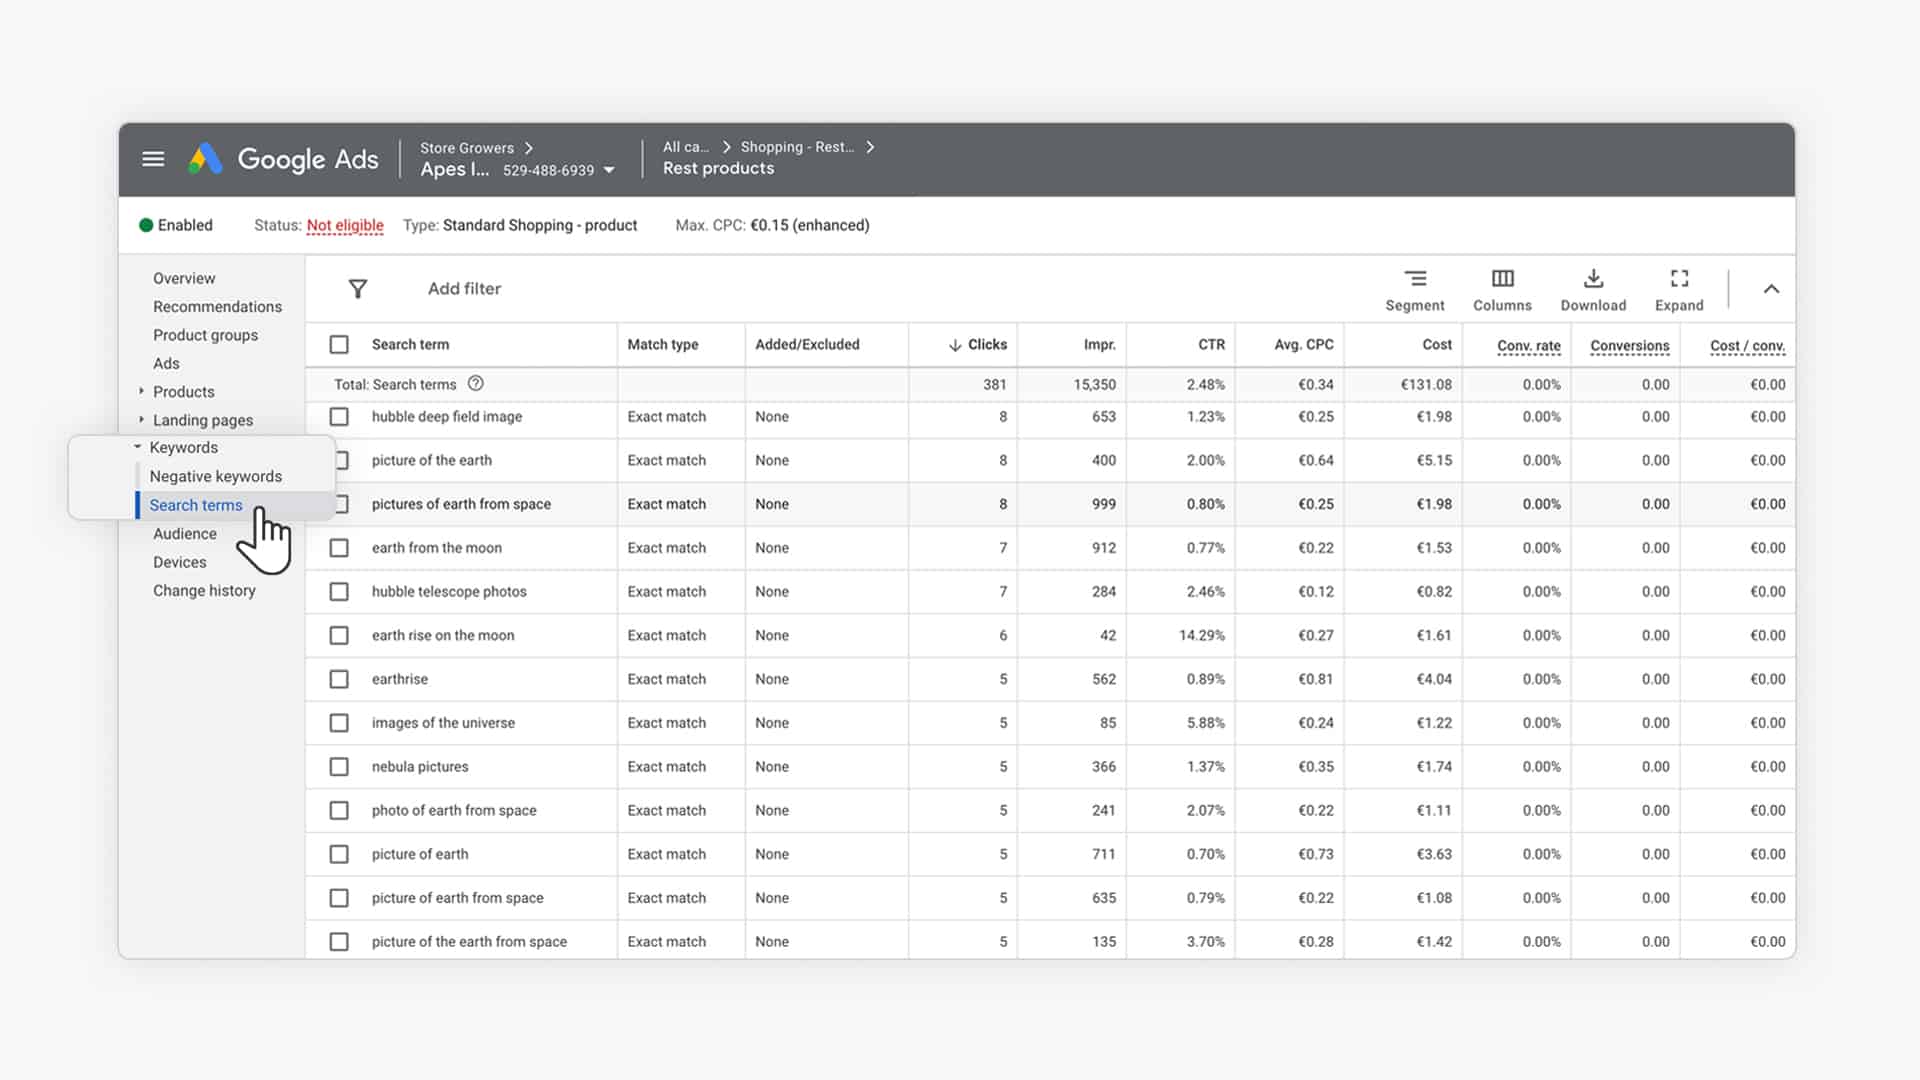
This Search Terms Report shows you all of the search queries your ads have appeared for including their performance.
When going through this report, you’ll want to look out for types of negative keywords.
- Irrelevant terms: Search queries that are a waste of money.
- Competitor terms: Branded search queries that include your competitors’ names. It may be tempting to try and outrank them at first. But these ads often are ineffective and drag down your performance instead. Either add them as negative keywords or analyze whether it is profitable for you to rank for these terms.
- Products not sold: these are searches for products you aren’t selling (yet). You can either exclude these keywords or use them for market research.
- Very generic terms: This group contains very generic terms (e.g., shoes) that usually have very low CTRs and conversion rates. If you want to improve your profitability, I recommend excluding them as negative exact match keywords. Otherwise, feel free to (carefully) experiment with these queries.
If you’re using Performance Max campaigns, you can use the Search terms insights to see what kind of search queries you’re ads are showing for:
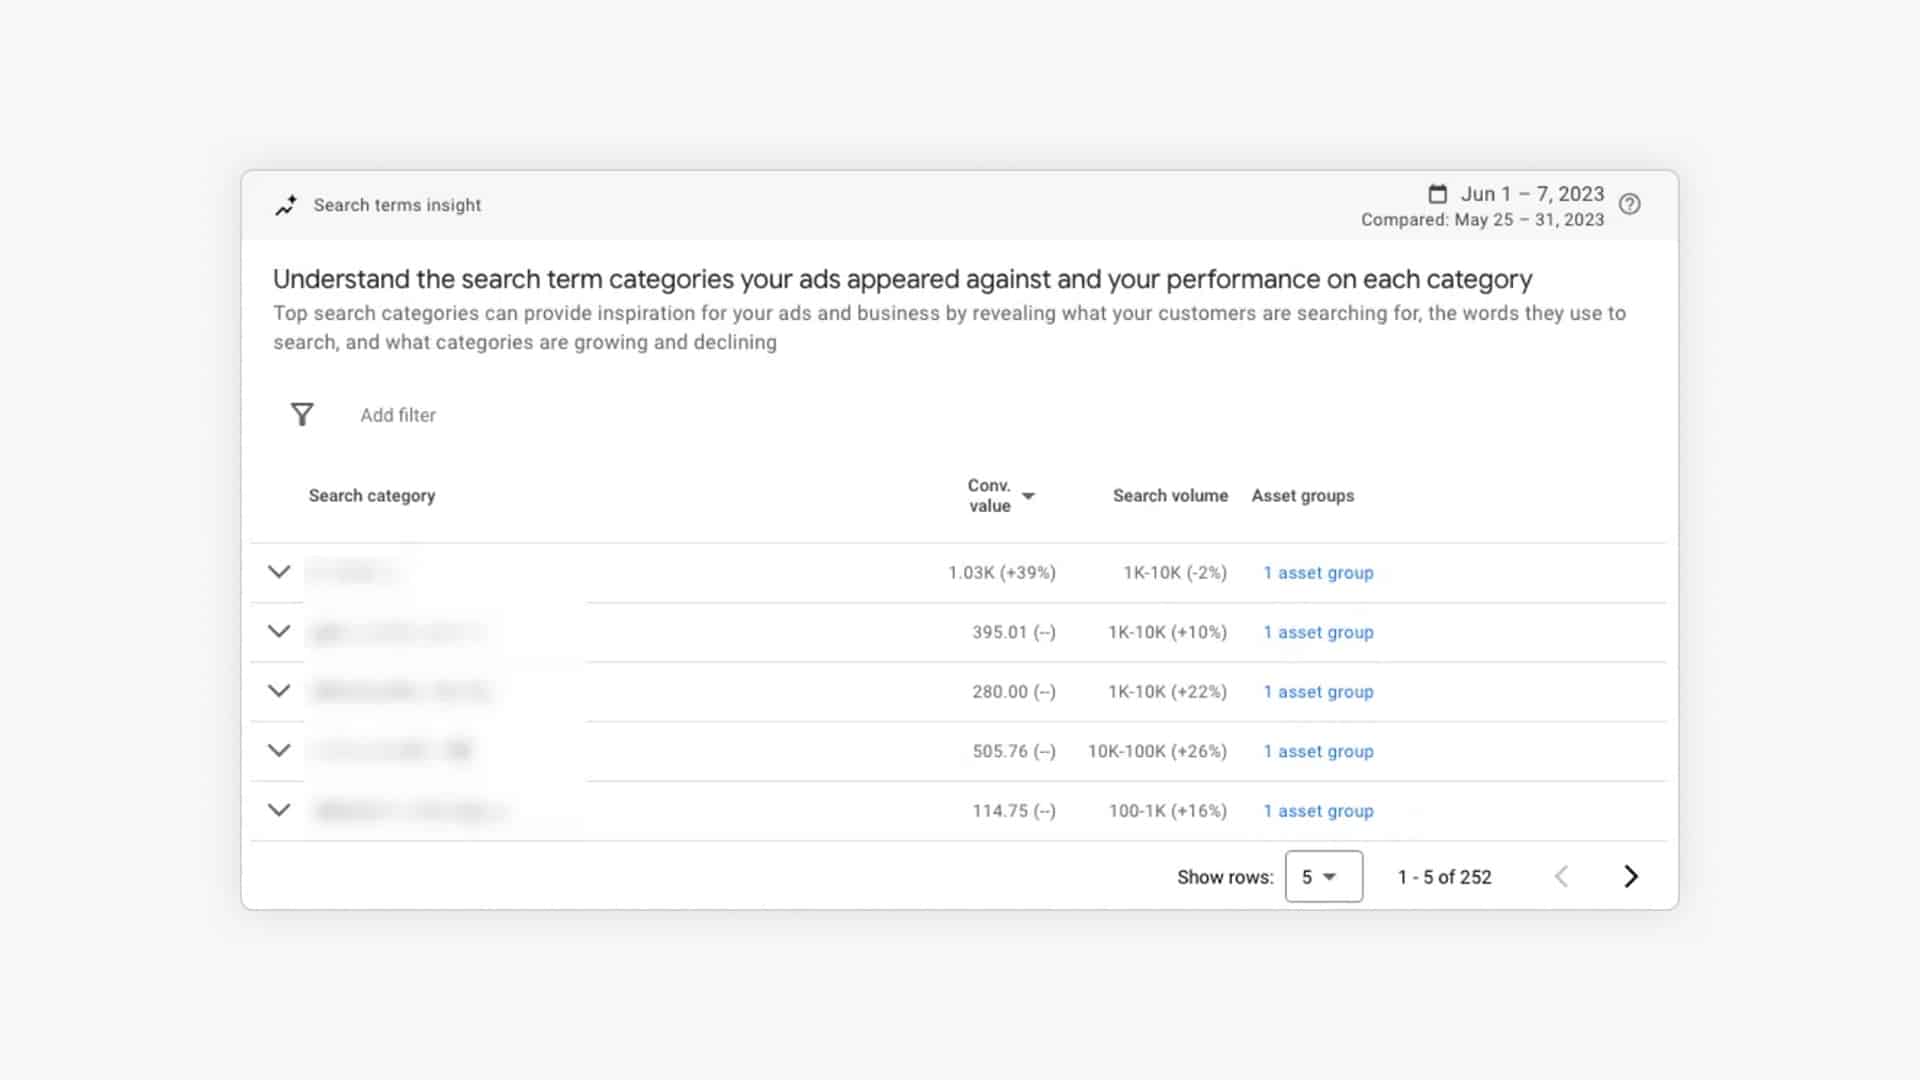
Then you can add negative keywords using brand exclusions for Performance Max.
If you want to know more about how to find and organize negative keywords, check out my in-depth guide on negative keywords.
Google Shopping Bid Strategies
There are two ways to decide how much you want to pay for each click:
- Manual CPC
- Automated bidding
Automated bidding strategies are available for both Shopping campaign types, while the manual CPC is only available for Standard Shopping.
Manual CPC in Google Shopping
Manual CPC is a great bid strategy to get started.
You get to decide how much you want to pay for each click. This extra control is both a blessing and a curse.
It’s great because it lets you set a specific maximum cost per click for a product group or even a specific product.
But if you have hundreds of products, keeping track and changing of individual bids can be a time-consuming process.
So if you’re starting, what should you set your bids to?
If you’re new to Google Ads, or you’re launching your first Standard Shopping campaign, I always recommend starting with very low bids.
The reason for this is simple.
When starting, you will always make mistakes, and since every mistake costs you, it’s better to keep your ad budget in check.
While starting with a low bid can’t really hurt your campaign, an initial high bid could spend the budget you had set aside for testing.
To ensure that your Standard Shopping campaign is profitable, you need to first focus on the QUALITY of your traffic, not the QUANTITY.
High-quality traffic means good CTRs, low bounce rates, decent conversion rates, and better profit margins.
Once you are sure that your Google Shopping Ads traffic is high-quality, then you can scale your campaign by increasing your bids and budget.
Pro tip: Start with Manual CPC and gather baseline data. If later you want to switch to automated bidding, you can compare your results to this baseline.
Automated bidding in Google Shopping
At some point, you might want to try out one of Google’s automated bid strategies. These use algorithms and machine learning to automatically adjust your bids based on your goals and historical data.
Here are the automated bid strategies you can use for Google Shopping campaigns:
- Maximize Clicks: Use your budget to set bids automatically to get as many clicks as possible on your ads. (Standard Shopping only)
- Maximize Conversions with optional target
- Maximize Conversion value with optional target
- Target Return On Ad Spend (Target ROAS): The goal of this strategy is to maximize your conversion value while reaching your desired target ROAS.
When talking about automated bidding, I find it important to mention the obvious conflict of interest that Google has.
On the one hand, they claim that they will get you the best possible results from your ad budget.
But on the other hand, they are a business looking to make as much money as possible.
So it’s up to you as an advertiser to keep this trade-off in mind as you go along and do things that are suggested by Google.
Bidding strategy can become a complex topic, so if you’d like to learn more, check out my in-depth guide on bid strategies in Google Ads.
Using Remarketing Audiences with Google Shopping Ads
Retargeting visitors that have already seen your site can be really effective.
So when it comes to Google Shopping Ads, you want to be sure that your campaigns leverage the Remarketing audiences in your account.
When it comes to adding those audiences to your campaigns, there is a big difference at how Standard Shopping and Performance Max use them.
Audiences in Standard Shopping
In Standard Shopping, you can add audiences segments to your campaigns.
To see these for yourself go to your Google Ads dashboard, and navigate to the “Audiences” tab in the middle menu:
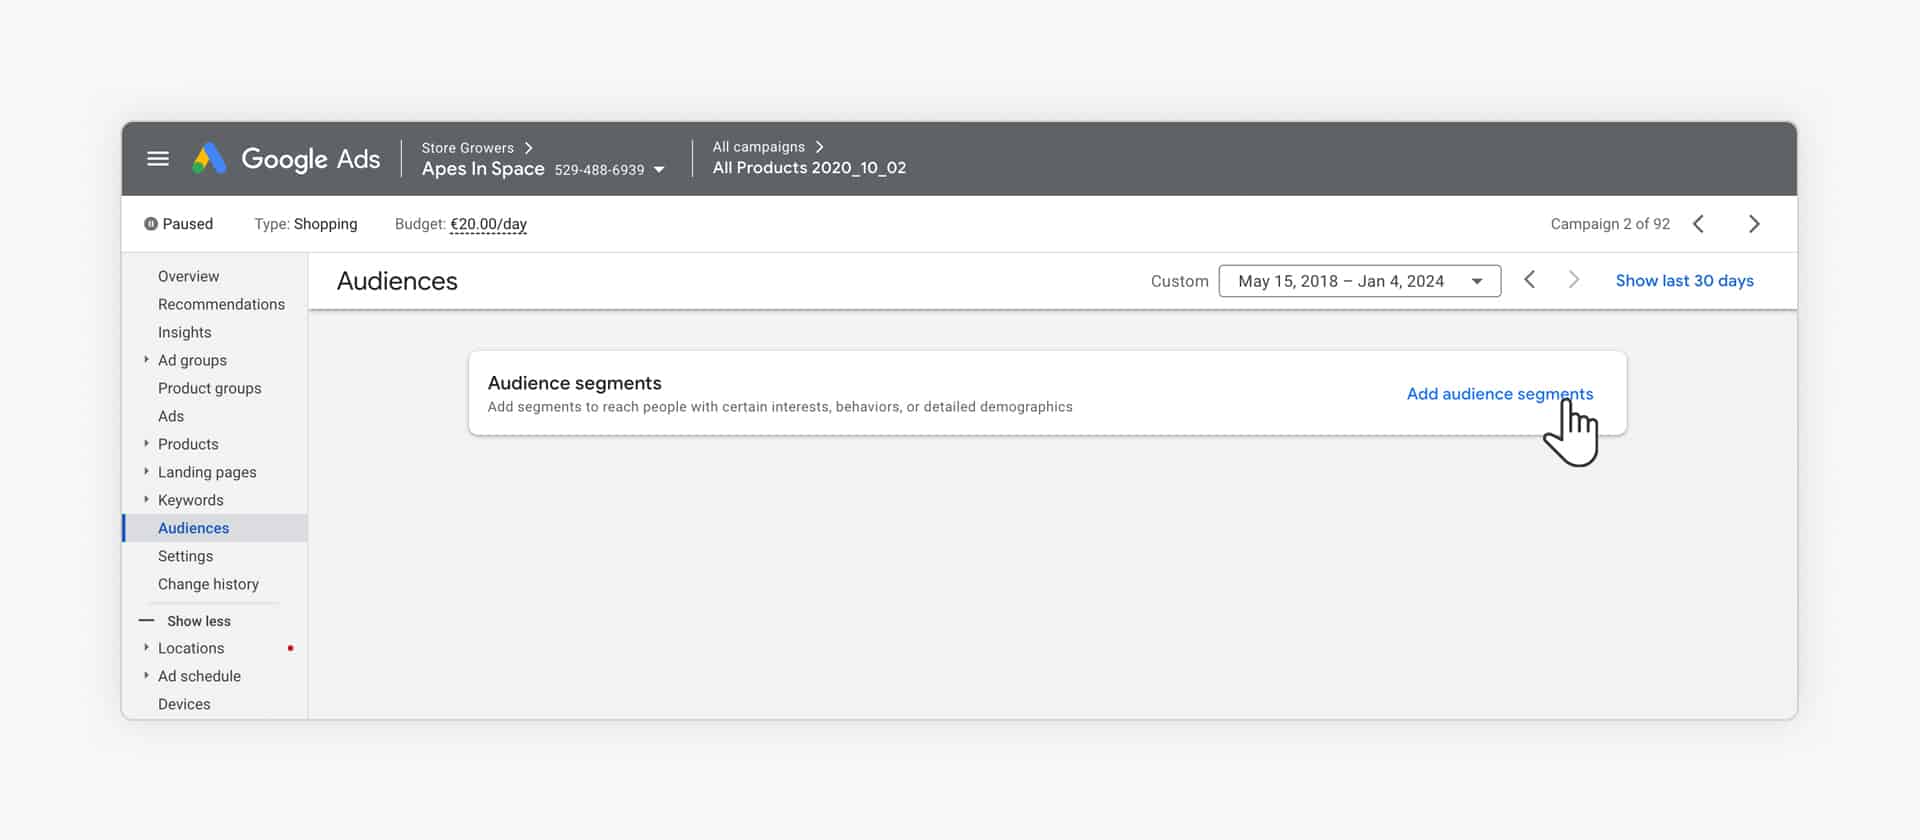
In case you don’t have any audiences yet, click the plus icon in the middle to add a new one.
When adding new audience segments, you can add them in two ways: targeting or observation mode.
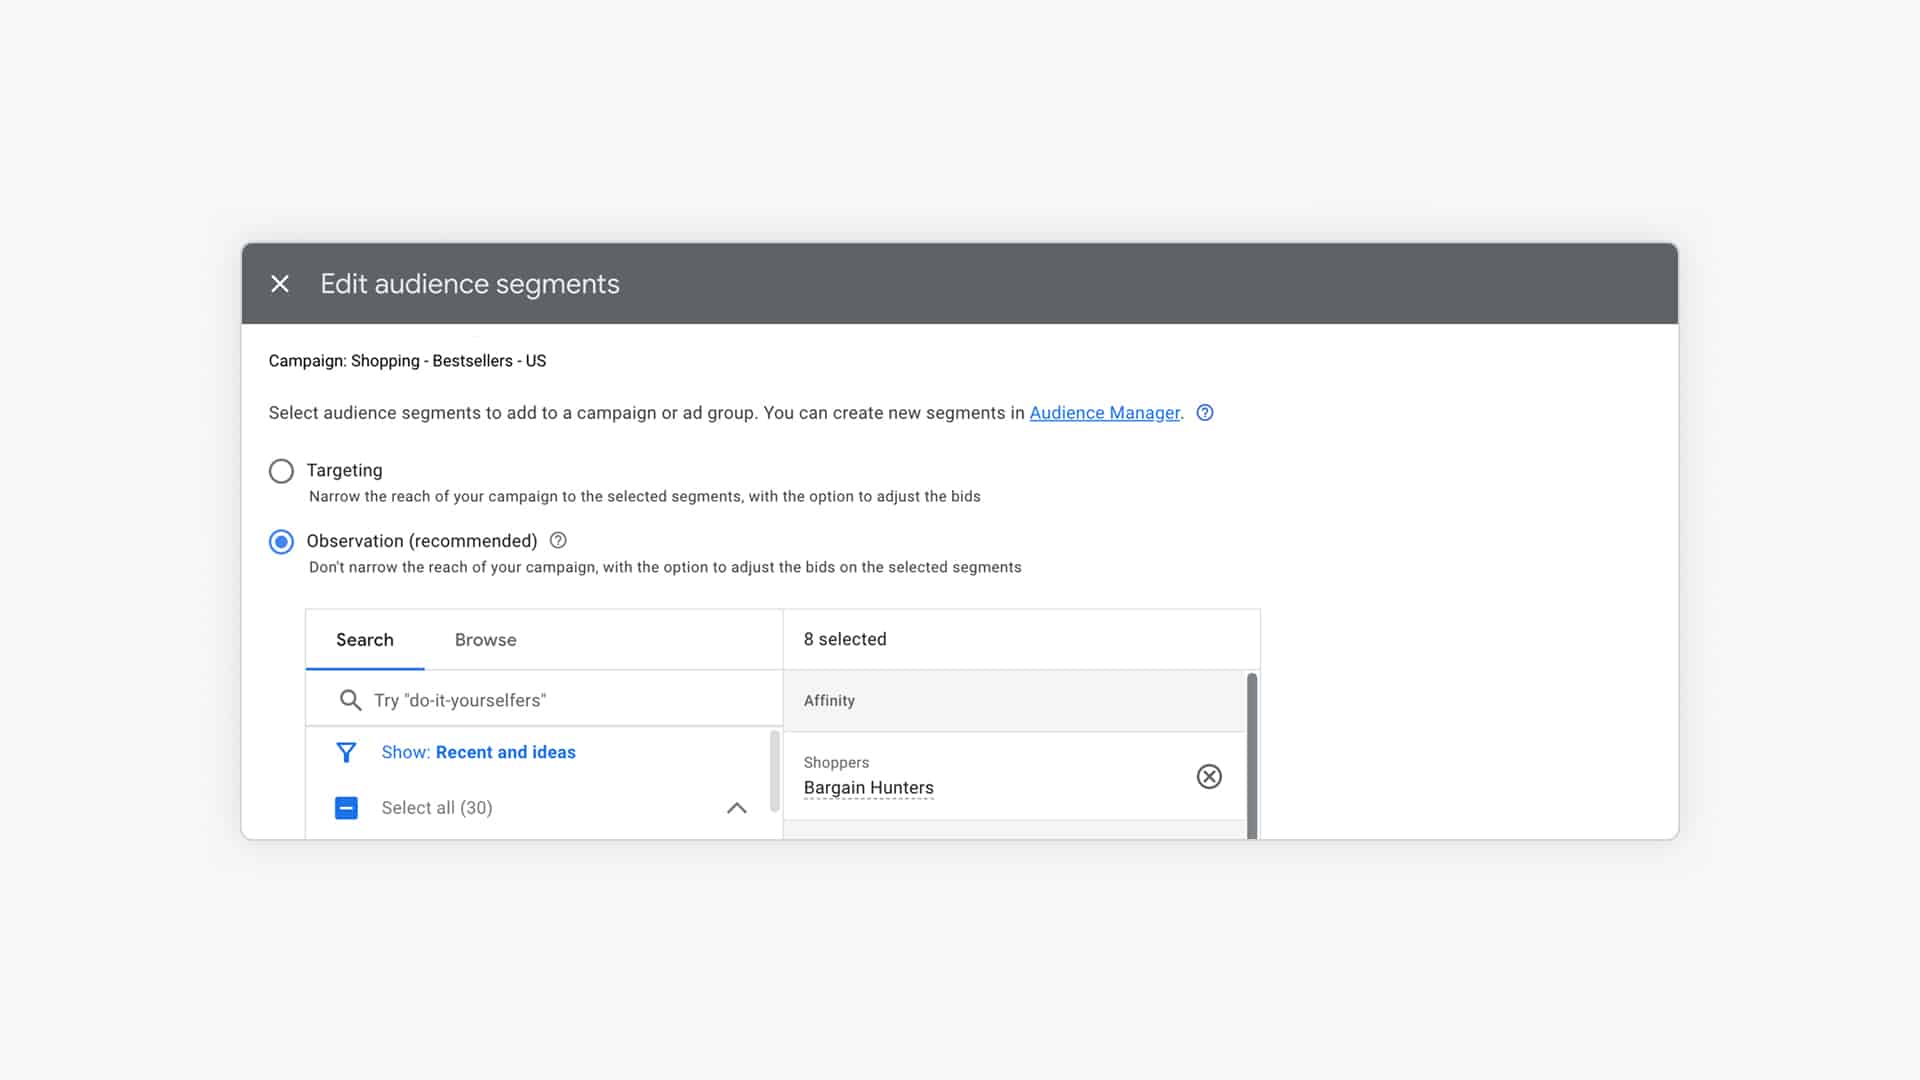
- Targeting: only targets people that are part of the audience that you select. You’ll only use this option if you’re creating a specific campaign to target these audiences.
- Observation (recommended): this is the right option in almost all cases. It doesn’t limit the reach of your campaigns, but you’re able to increase or decrease the max CPC based on people being part of this audience.
If you’re using manual bidding, you’re able to increase (or decrease) your max. CPC is based on what other information you have about a certain visitor. (This feature is called Remarketing Lists for Search Ads or RLSA).
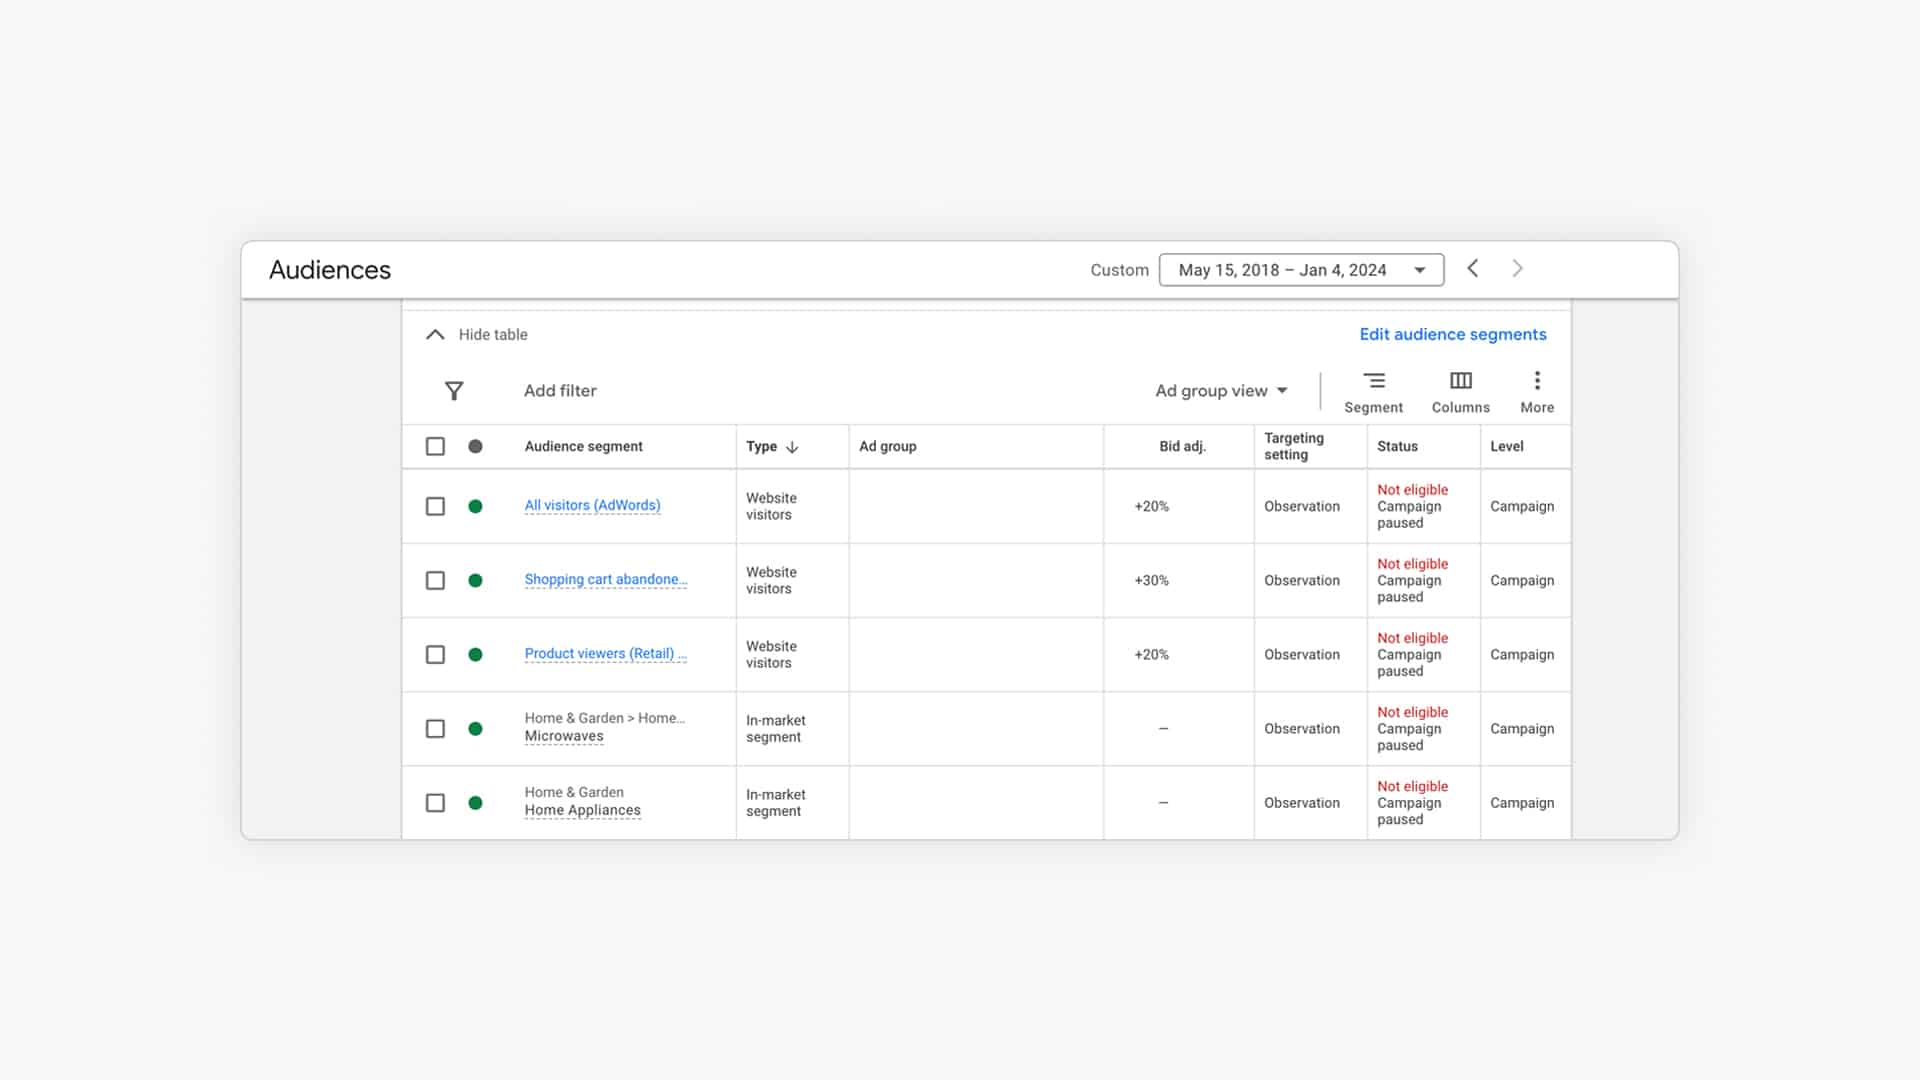
If you’re using an automated bidding strategy, Google will automate the process of bidding more or less for certain visitors automatically.
So no need to make bid adjustments, or even add these audience segments to your campaigns.
because by default, automated bidding also called Smart bidding will use all of the audiences in your account to improve results.
Audiences in Performance Max campaigns
Performance Max also uses Smart bidding, which means that Google will automatically use all audiences available in the audience manager.
But can steer Google’s efforts. When you’re creating an asset group, you can also add an Audience Signal.
This is an audience that is a combination of multiple audience segments:
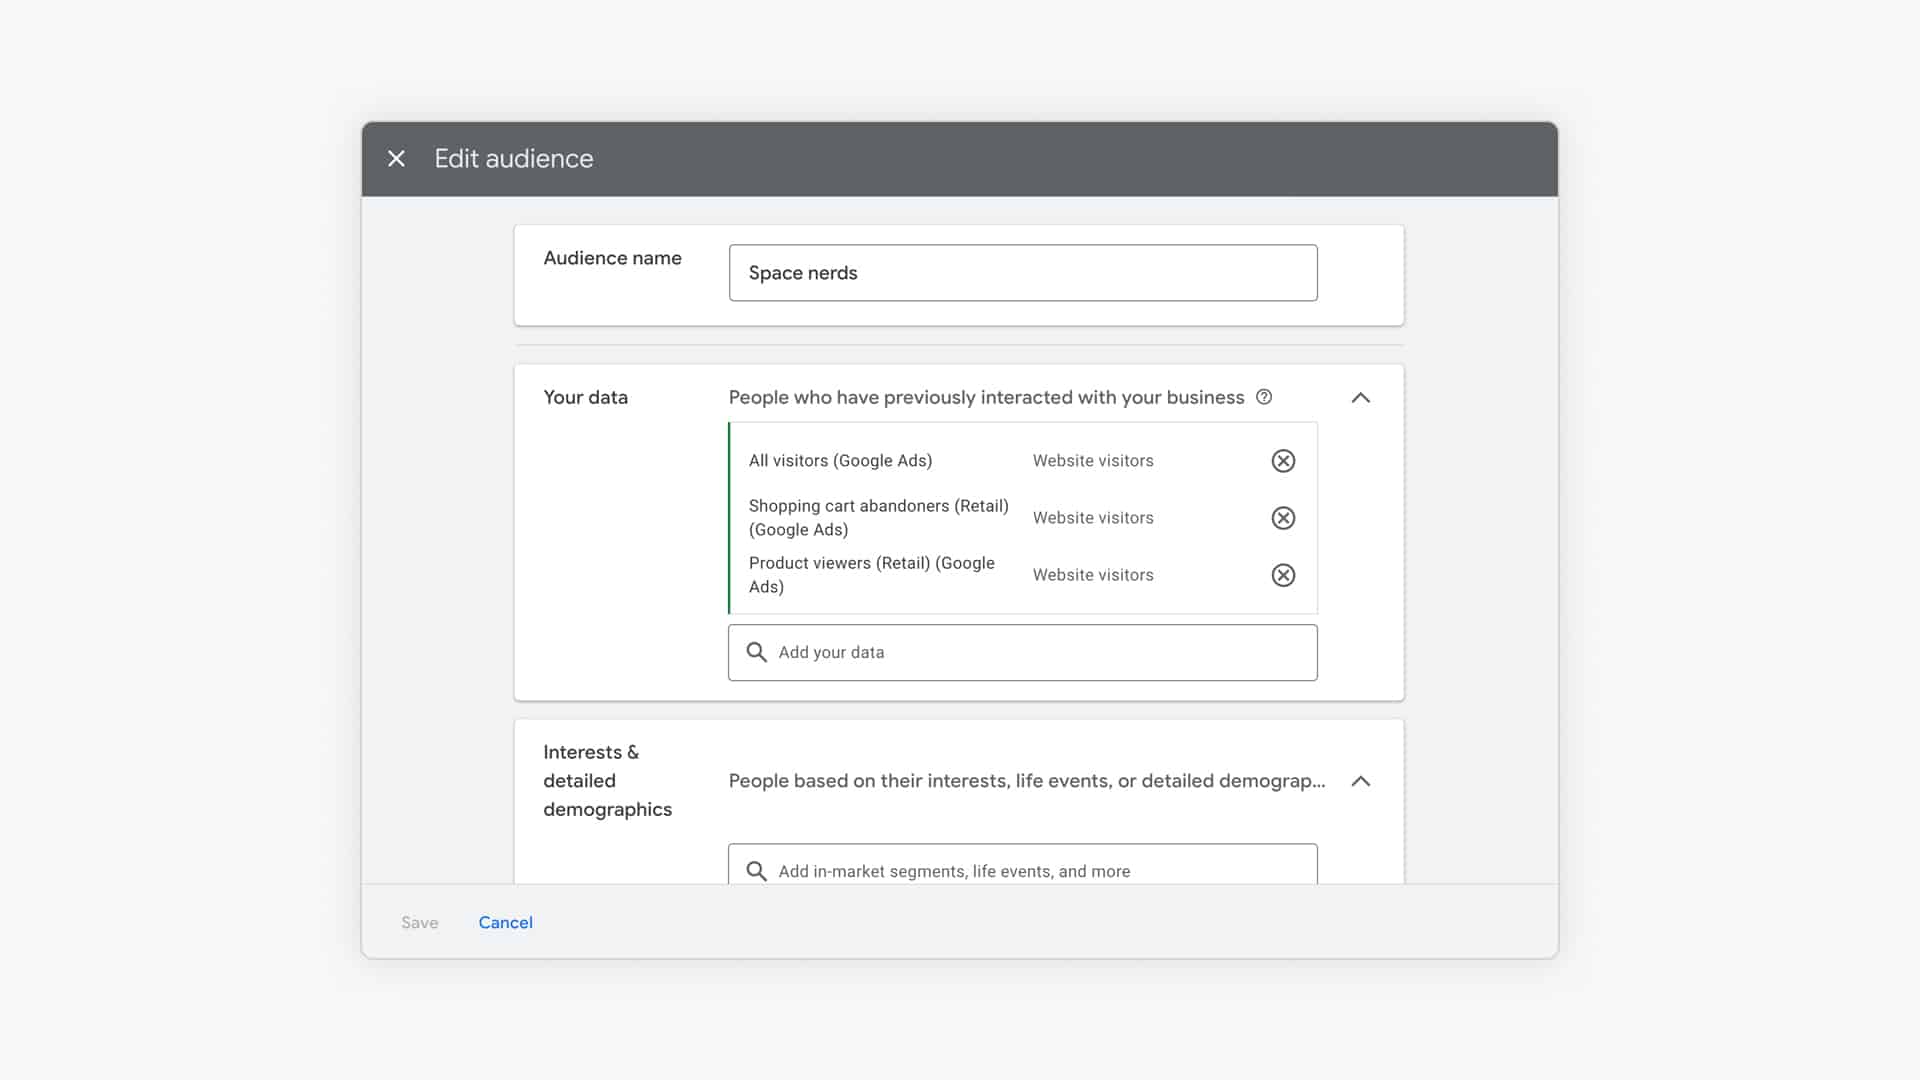
Many advertisers mix up audiences and audience segments. That’s kind of Google’s fault for switching names a bunch of times.
But in the image above, you can see that an Audience combines custom segments, your own data, and other characteristics.
The interesting thing about Performance Max is that this audience selection indicates where Google will start with its optimization efforts.
As time goes on, and your campaign has more data, Google will go beyond these audiences to find more relevant buyers.
Optimize Your Product Titles
As mentioned before, your Google product feed is the heart of your Google Shopping Ads. No matter which campaign type you use, product data feed optimization works like magic for both!
This also means that any improvements you make by providing more relevant information will increase the CTR and improve your campaign performance.
Fortunately, there are plenty of optimization techniques you can use to improve results.
You could, for example, increase your ad click-through rate by including the most popular product-related search queries in your product titles.
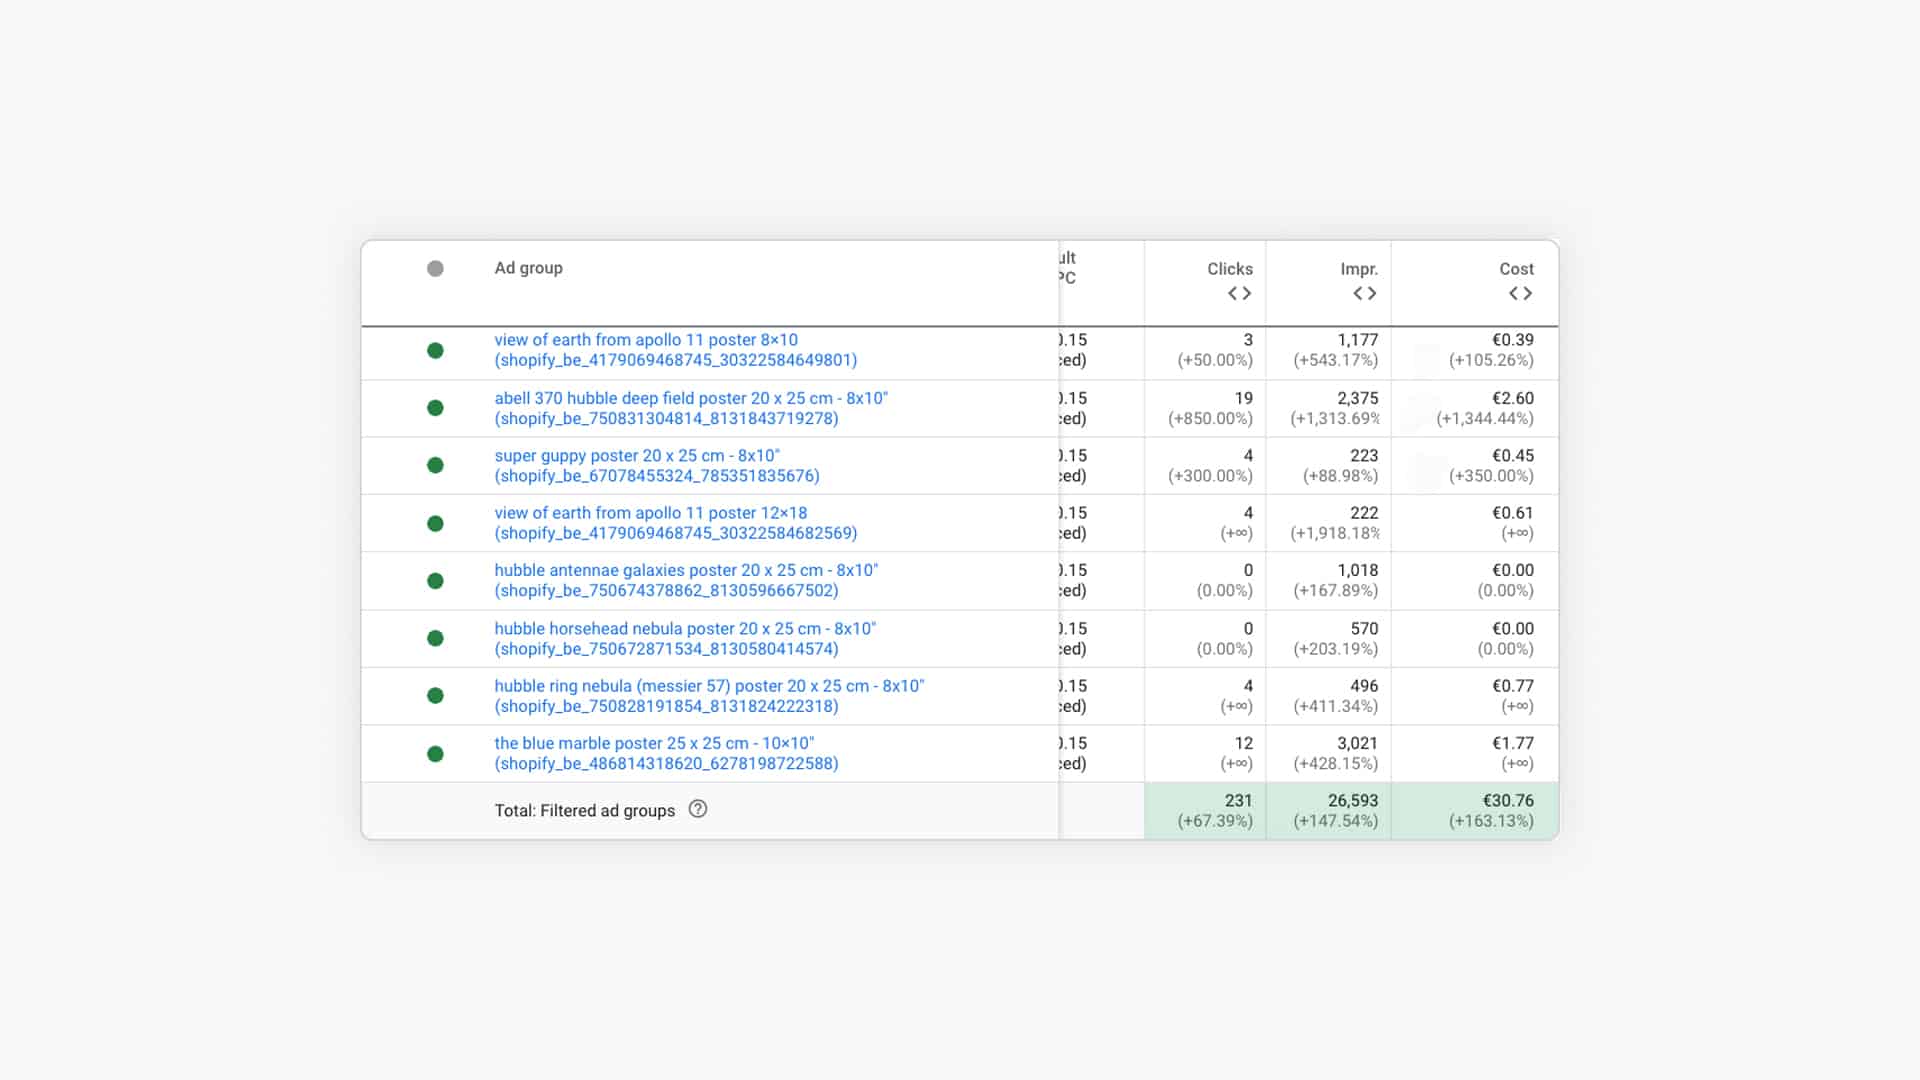
In our own research, we found a 147% increase in impressions, and a 67% increase in clicks, just from optimizing our product titles!
Discover more tips in this video:
Optimize the Price of Your Products
In case you’re getting low CTRs and low click shares on some of your products, it could mean that their pricing isn’t as competitive as what other stores offer.
If you’re advertising the exact same products, it’s not hard to imagine that people will click on the ad with the lowest product price.
The easiest solution is to drop your prices. But not all of us can afford, want or even are allowed to do so.
Instead, here are things you can do to make better use of product pricing in Google Shopping.
- Identify the products that perform poorly (CTRs, conversion rates, impression shares, etc.) and check if the price might be an issue.
- Take a look at the prices of your competitors for those products and see whether there are big differences in the pricing
- If there is a significant gap, are you able to bridge it in any way?
- If not, consider lowering your max CPC for this item as it will be hard to compete and advertising on it might be wasteful
Pro tip: Google considers the total purchase cost, so if you can’t lower the actual product prices, make sure to check whether you can do something to decrease or eliminate the shipping costs.
Optimize Your Product Images
Product images are a crucial part of your ads.
Some stores come up with slight variations of a product image, allowing them to stand out and increase the CTRs of their Google Shopping Ads:
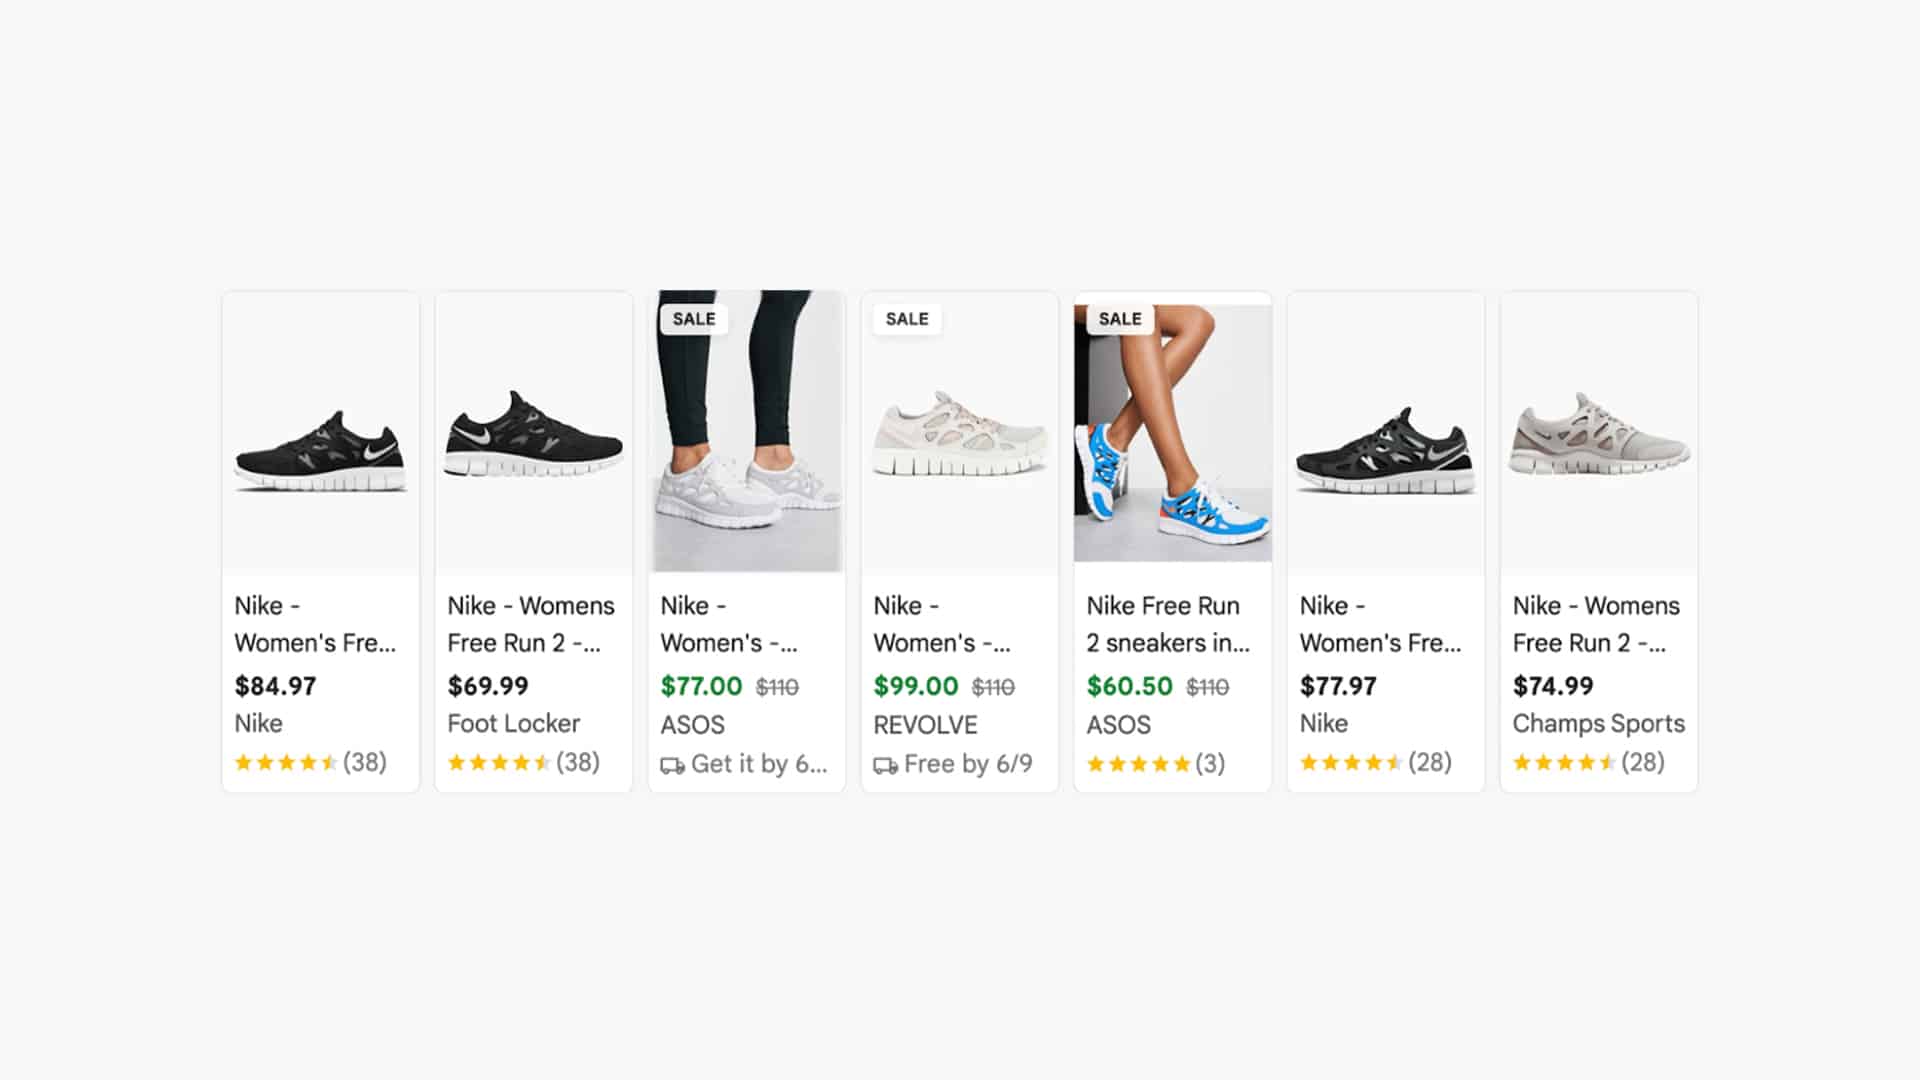
While this can be a rather expensive process (especially if you have hundreds of products), sometimes doing simple things using a different type of image (like in the screenshot above) can already make a difference.
Pro tip: this section has covered the basics, to learn more check out my guide on Google Shopping optimization.
What to Expect From Google Shopping Ads?
If you’re new to Google Shopping, it’s always hard to know what to expect.
So, in this section, I’ll show you what to expect when starting, what is possible, and how to get there.
What To Expect
When you are starting with Google Shopping Ads, you won’t get the best results with your campaigns out of the gate.
But that’s perfectly fine as there’s always more room for improvement.
With time, you’ll have access to more data, which you can use to optimize your Shopping campaigns.
But before doing that, let me show you what you can expect from Google Shopping Ads when you are just starting.
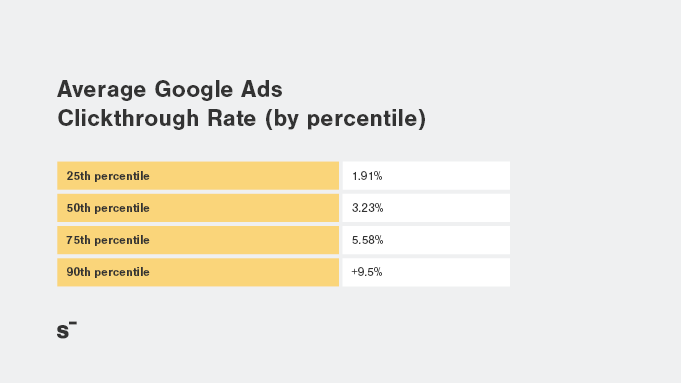
As you can see in the image above, there’s a HUGE difference between how the campaigns of various advertisers perform in Google Ads.
While low-performing advertisers have an average CTR of 1.91%, the best ones (in the 90th percentile) have nearly 5x their click-through rates.
As you are just getting to know Google Shopping, you should expect your CTR to be somewhere near the 25th percentile, use > 2% as a rule of thumb.
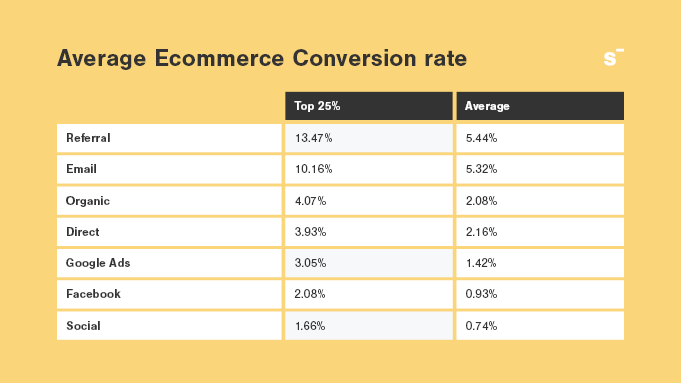
In the screenshot above, you can see that the average advertiser has a conversion rate of 1.42% for Google Ads while top performers are hitting over 3%.
So what do these metrics mean for you? Let’s see through an example.
Let’s say you are selling $50 sunglasses with Shopping Ads.
As you’ve just started out, let’s take the lowest-performing metrics that I’ve mentioned above as well as the average Shopping CPC.
This means that you’ll have a 1.91% CTR, a 1.42% conversion rate, and you pay $0.66 per click (Google Shopping Ads average).
Let’s say that 50,000 people have seen your ad in the first month, of which 955 have clicked through to your website.
That means a total ad cost of $630.3 as well as 14 conversions resulting in $700 in revenue.
If you factor in the product cost, $20 per pair of sunglasses or $280 in total, you’re selling at a loss.
$700 in revenue minus $280 in product cost and $630.3 in ad budget, means a loss of $210.3.
This shows the importance of having the fundamentals in place before starting with ads. (To see if your store has potential with Google Ads, check our quiz!).
Let’s see how you can turn this around.
What Is Possible With Google Shopping Ads
After a while, you’ll get better at running ads. You might have learned new techniques, followed a great course, and learned which parts are performing well.
We’ve used the lowest benchmarks to start with, but let’s say that your results have improved, and you’re now at the upper end of the benchmarks.
That means a 9.5% CTR, and a 3.05% conversion rate with the average CPC staying at $0.66.
Continuing with the $50 sunglasses example and 50,000 ad impressions a month, 4,750 people have now clicked on your ad, resulting in a total ad cost of $3,135.
Due to the increased CTR and conversion rate, you’ve netted 145 sales through Google Shopping Ads, which means a revenue of $7,250 as well as a product cost of $2,900.
But, in this case, your revenue outweighs your expenses with your gross profit being $1,215 ($7,250-$2,900-$3,135=$1,215), a profit margin of 17%.
There is not a lot of room, but you can see that these improvements can really move the needle.
Benchmark Against Competitors
Another way to figure out what’s possible is to see how your Standard Shopping campaigns are performing compared to those of your competitors. (You can’t see this info for Performance Max)
You can find part of that information in the Competitive Metrics columns in Google Ads:

If you’re looking at your Google Shopping Ads campaign, you can add the “Benchmark CTR“, “Benchmark Max. CPC”, “Benchmark product price difference“, and the “Average product price” columns from the “Product Groups” overview.
Don’t focus blindly on these metrics, rather use them as indicators to see how you’re doing.
The great thing about Google’s benchmark metrics is that they are available for every product group you have in your Shopping campaign, so you can get insights for each.
What Does it Take to Achieve Success With Google Shopping Ads?
To achieve what I’ve described above, you need two essential resources: time and an advertising budget.
You need time to set up Google Shopping Ads (converting your products into product ads), as well as to maintain and optimize your Shopping campaigns.
And don’t forget the more granular you go with your campaign, the more time you need to spend managing them.
As we’ve discussed before, Google Shopping Ads cost you money. So you should have some money allocated to run Shopping Ads. If it’s your first time around, try to set aside at least $300-$500 as your learning budget.
You’ll use this money to learn how Google ads work, as well as see what the visitors from Google Shopping Ads do on your website.
Mastering Google Shopping Ads
My goal with this article was to provide you with a detailed overview of what Google Shopping Ads are and what it takes to make them work for your business.
By learning how Google Shopping Ads work, how to set them up, and optimize them, you have taken your first steps toward launching your product ads.
However, your Shopping journey doesn’t need to stop there.
I’ve included further resources for all essential parts of Google Shopping Ads in this article (all the links and downloads sprinkled throughout this article), which you can use to learn more about each topic.
If you’d like to learn even more, check out Google Shopping Success: our premium course on Google Shopping Ads.
In a series of video lessons, the course will take you through the exact steps you need to create a Shopping campaign from scratch right to having your first sale coming in via product ads.
Our main goal with the course is not only to answer the questions of “what”, and “how,” but also the “why” too, explaining the real reasons behind each step you need to take in your Google Shopping Ads journey.
