Google makes it very easy to run your first ad.
Fill in your business details, link a credit card, add some text and maybe an image, and boom, your ad goes in front of thousands or millions of people.
But after a while, you realize that Google is charging you for each click, but you’re not seeing any returns. Maybe some traffic, but no sales and certainly no revenue to pay for those ads.
The reason for that is simple: you’re making mistakes that make it hard, if not impossible for you to make any money.
So in this beginner’s guide to Google Ads, I’ll look at how to avoid mistakes, and how to run campaigns that actually benefit your business!
Table of Contents
The Cold Hard Truth About Getting Started With Google Ads
Before we jump into the details of what to do and what to avoid, let’s set the right expectations.
Google Ads is expensive, it’s also overwhelming and there are a TON of settings and options you need to get right.
For the last 12 years, I’ve made it my mission to help advertisers use Google Ads to make money for their business.
And here is something I’ve realized: even with the best intentions, highest quality training and support, you WILL make mistakes when you’re starting out.
So instead of overloading you with every tiny bit of information to avoid making ANY mistakes, I now teach an approach to Google Ads that reduces the impact of any mistakes.
The Optimal Path For Google Ads Beginners
The overarching summary of the approach I’ll lay out in this article is to keep things simple.
Make sure it’s clear where your ads will show and how much you’ll pay.
That means avoiding most automation and campaign types that do multiple things at the same time.
Which campaign types to use?
Picking the right campaign type probably is the most important thing you can do.
Get this right and you immediately cut the most important mistakes.
Here is the list of different campaign types, ranked by how suitable they are for beginners:
- Standard Shopping campaigns
- Branded Search Ads campaigns
- Dynamic Remarketing campaigns
- Dynamic Search Ads campaigns
- Performance Max campaigns
- Generic Search campaigns
- YouTube campaigns
- Demand Gen campaigns
- Display campaigns
If you’re just starting out, I recommend you stick with the campaign types that are bolded.
This doesn’t mean that you should never use any of the other campaign types, but using only the bolded ones makes things a lot simpler.
You know exactly where your ads will show and who will see them.
In the following sections, I’ll cover more details about the 3 highlighted campaign types.
You might notice that “Smart campaigns” are missing from the list above. That’s because there literally is no situation when you should be using them.
You can recognize Smart campaigns in your account by the “magic wand” icon:

Standard Shopping For Beginners
With Standard Shopping campaigns (also commonly referred to as Google Shopping), you can show ads that feature your product photo, title & price.
You can often find them at the top of any Google search results:
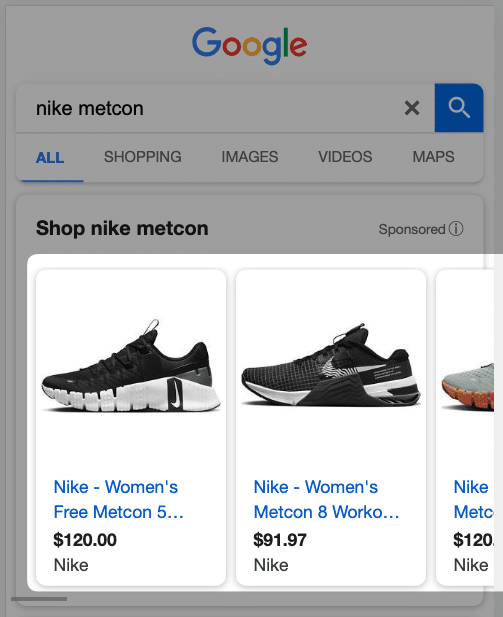
In order to run these Shopping Ads, you need a product data feed. This is a big spreadsheet with all of your product information:

The challenge with this is that you have to provide all of the different attributes that Google wants AND provide it in the format that Google wants.
If you’re on one of the big ecommerce platforms, there is usually an app or plugin to take care of this. But on occasion, those won’t work and you’ll have to find a different solution.
For this, you’ll need to use Google Merchant Center, a free tool where you’ll connect your feed and manage all of your product information.
When you run Standard Shopping campaigns, you know that the search results are the only place where your ads will show. Google will even tell you for which search queries your products showed.
Here is what the search terms report looks like:
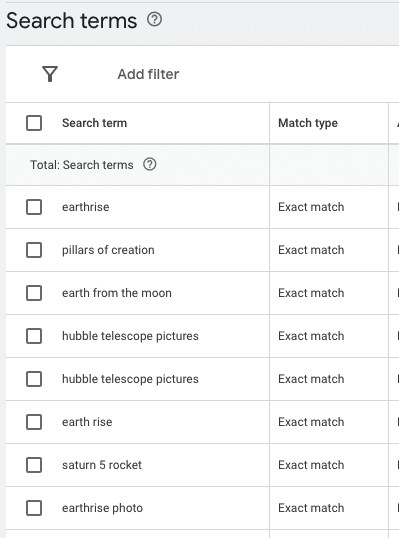
if you spot any search queries that are not relevant, you’re able to add them as negative keywords. (More on this later in this article)
Branded Search Ads For Beginners
The second campaign type is a specific type of Search campaign, and that’s one that focuses on your store brand.
You know exactly where your ads show, in the search results, and for which search queries, ones that include your brand.
This campaign usually is the most profitable campaign in your account. And that makes sense. People searching for your brand already know you, so there is a good chance they’ll buy what you have to sell.
Search campaigns in general are complex, there are lots of moving parts, which means lots of opportunities for mistakes.
Moving parts:
- Keyword research
- Keyword selection
- Match types
- Writing ads
- Assets (ad extensions)
- Landing pages
A Branded Search Ads campaign reduces that complexity by taking out the keyword research and selection parts.
Instead of trying to find out which keywords will convert, you just use your own brand.
There are 2 reasons why you need this campaign in your account:
- Capture warm traffic
- Learn the ropes of how Search campaigns work
So it doesn’t matter if they’re not 100% right from the start. You have time to course correct.
Display Remarketing For Beginners
Remarketing means that you’re going to show ads to people who have already visited your website but didn’t take action.
For most businesses, that’s the case for 98% of their visitors.
By showing ads to people who already know you, you’ll usually see better results than targeting people who haven’t visited your site before. (This is called “cold” traffic).
There are 2 types of Display Remarketing:
- Static: shows the same ad to everyone
- Dynamic: shows the actual products someone was looking at
Like this example from Yeti:

The main difference between the two is in the setup. For Remarketing to work effectively, you need to have a specific Google tracking code on your site.
That way Google can see which visitors have visited which pages, but also which exact products they’ve looked at.
Adding this code to your site is pretty technical and can be challenging.
So if you’re not a developer, my #1 recommendation would be NOT to mess around with the actual code.
Either ask your developer or even better, use a plugin or app that takes care of this for you.
In case you do decide to mess around with code, I’ve created an in-depth guide on how to add Google Ads Remarketing tracking to your site.
Building Blocks for Success
The 3 campaign types I’ve described above can already get you far.
So in the rest of this article, I’m going to tackle different elements of Google Ads that will support and improve the campaigns you’ve just set up.
If you’re more knowledgeable about Google Ads, you might see certain parts are missing.
That’s exactly what I want to do here. Reduce the complexity and only talk about the things you need at the start of your journey.
The learning curve is already steep, so you don’t need to add stuff you’re not going to use for months.
Conversion tracking
Conversion tracking probably is the most important part to get right.
You need to be able to trust the numbers that you see inside Google Ads.
The most common problem is that you’re not correctly recording the number of conversions or the conversion value.
Try and take the easiest route. Either use an app or plugin or have a developer help you out.
This stuff is important, so don’t cheap out at this stage.
The second most common problem is that there are multiple goals (called conversion actions) that are tracking the same thing.
That leads to double counting of conversions which makes it impossible to make good decisions.
If you are tracking the same thing, but with different methods, make sure that only one conversion is set to “Primary”.

Recommendations
Inside the Google Ads interface, Google will give you recommendations to improve your performance.
On the “Recommendations” tab you can see them all in one place:
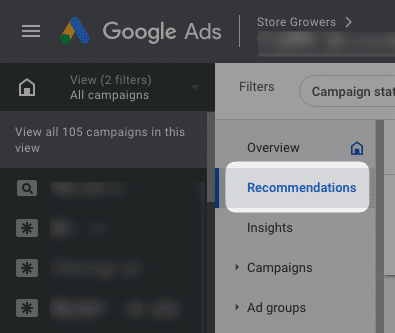
They’re not all bad suggestions, but some of them are really harmful to your results.
So before you apply a recommendation to your account, make sure you understand what will happen next.
Also, the Optimization Score isn’t something that you should pay much attention to. A poor score doesn’t mean that you’ll have bad results. A perfect score doesn’t mean that you will have great results.
One special shoutout is the Auto Apply Recommendations. These are changes that Google will make automatically to your campaigns.
These can be really harmful for your campaigns, and you won’t have a clue that something changed.
Google is pushing hard on these, so there is a good chance you’ll have these turned on in your account automatically.
You can find them here:

Make sure they are all turned OFF.
Negative Keywords
Negative keywords are a way to prevent your ads from showing up for search queries that are not a good fit for your business.
They can either be:
- Completely irrelevant queries
- Searches for competitors
- Non-converting search queries
When you’re starting out, focus on identifying the keyword in group 1.
These are searches that will never result in any sales, things like free, manual, refund, job, discount, etc.
To find these, look at your Search terms report.
Killer Settings
Every campaign type has a ton of settings.
I don’t want to go through every single option, but I do want to address the ones that are most important if you want to stand a chance.
First up are the networks, these are places where your ads can appear. By default, Google has Search Partners and Display Network enabled. But you want to make sure these are switched off:
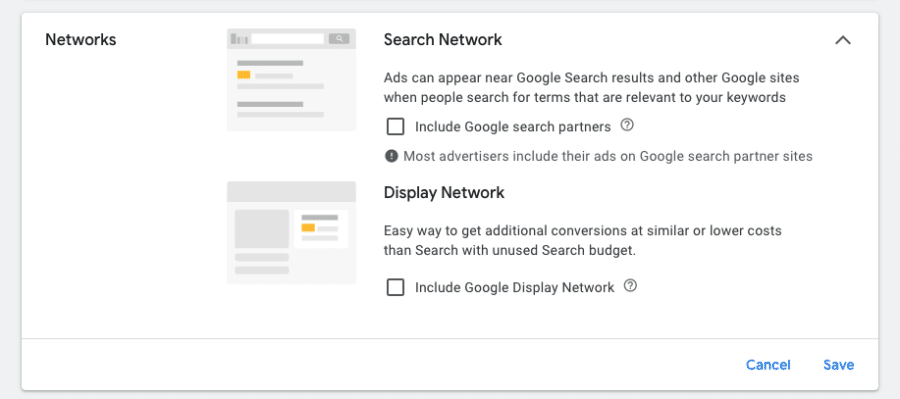
The second option to turn off is the “Customer Acquisition”:

This is a pretty advanced feature, but just trust me that it’s in your best interest to keep it off!
The last setting I want to call out is the “Automatically created assets”:
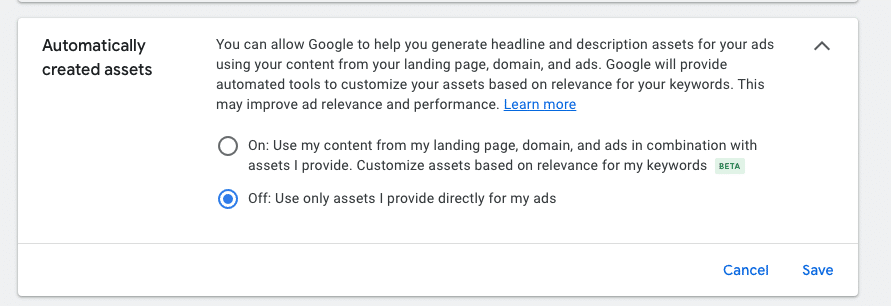
The “Automatically created assets” allows Google to make changes to your ads without you knowing.
This again is not what you want so, turn it off as well.
Next, let’s look at the bidding strategy!
Bidding strategy
Another common mistake is the selection of the wrong bid strategy.
People new to Google Ads don’t really know what’s going on. So they trust Google’s recommendation.
But that’s not always the best decision.
When you’re setting up a new campaign, Google is also abstracting away the actual bidding strategies:
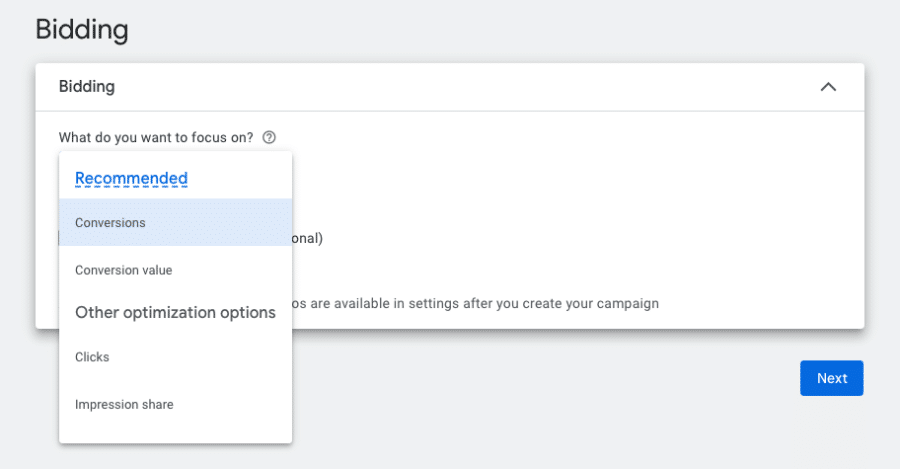
It lets you decide between Conversions, Conversion value, Clicks or Impression share.
These first two bid strategies are what Google calls automated bidding strategies. Meaning that they’ll use the conversion data in your account to optimize your campaigns.
But if you don’t have any conversions in your account yet, those options don’t make much sense.
Instead, go with the Clicks option.
If you’ve already created a campaign, you can go back to the Settings and select a different bidding strategy:
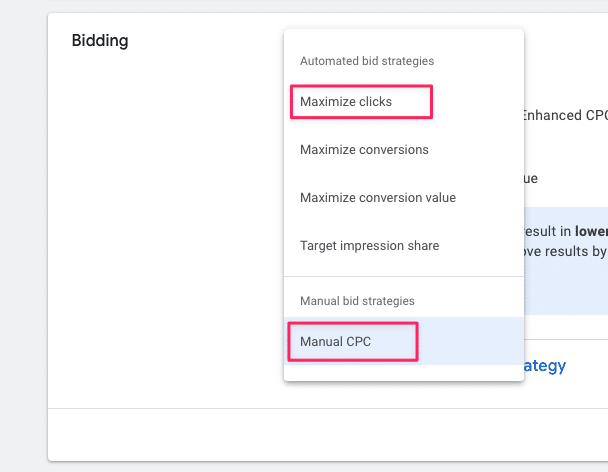
I would recommend starting with Manual CPC and selecting an arbitrary number for your max CPC, like $1.
Or if that doesn’t give you good results, use the Maximize Clicks option.
Keyword match types
For new advertisers, match types are a pretty novel concept.
It’s also where things often go wrong.
Keyword match types are modifiers that you add to your keywords, and they indicate to Google how close you want them to find variations on your keyword.
Here is a quick overview of the different match types:
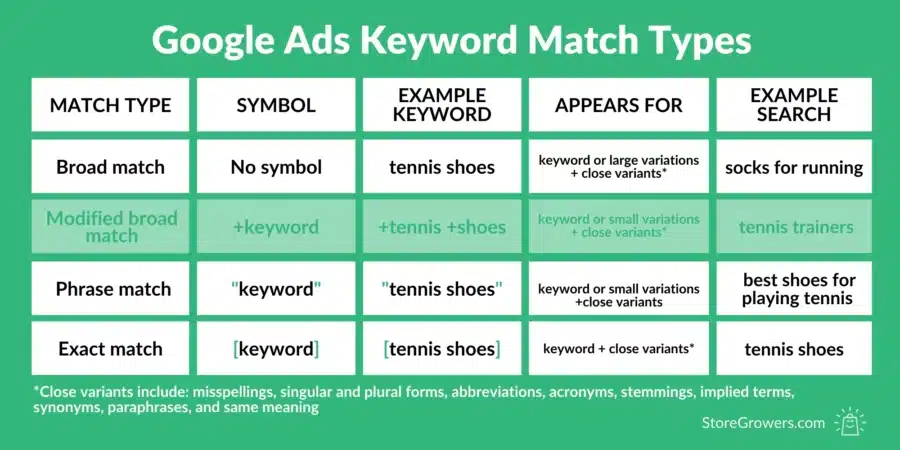
If you don’t do anything special, Google will use broad match, the default match type.
Unfortunately, that also means that you tell Google to look for the keyword you provide, and many others like it.
If you wear tennis shoes, Google might show your ads for hiking boots.
If this sounds crazy to you, that’s because it is 😭
So be sure to learn about broad, phrase, and exact match and how to use these different match types in your campaigns.
Pro tip: It’s much better to start out with exact match and then go broader as you get more experience and understand Google Ads better.
Creating good text ads
For Search Ads, creating the actual advertisements is another important hurdle to take.
Google calls these Responsive Search Ads, and they’re basically a combination of different headlines and description texts.
You don’t get to select what the actual ads look like, all you can do is provide Google the assets, and then they will create and test different combinations.
For your Branded Search Ads, people are already very likely to click on your ad, so you can use this opportunity to learn how to create effective ads.
That’s to make sure you’re ready when you give Generic Search Ads a try.
There you’ll often be competing with 3 other Search Ads for attention. This is a very competitive place and you need to be sure that your ads reflect what customers are looking for, and communicate that you have exactly what they’re looking for.
An important extra for any Search campaign is Ad Assets (formerly known as ad extensions).
These are small snippets of text that are added to your ads and they help you grab more real estate in the search results, increasing the chance of a click.
Like this example from Caraway:
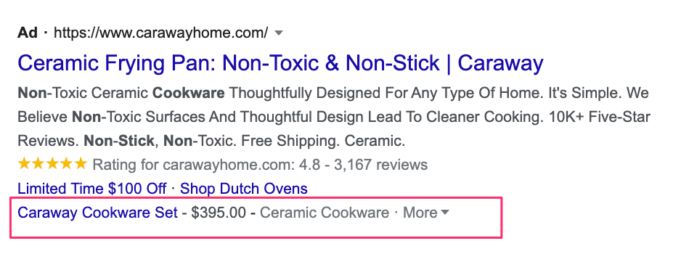
They usually show up most if you’re showing up in position 1-2 of the search results.
Ad extensions like sitelinks, callouts, or call extensions have been around for a while, and most accounts at least have a couple of them active.
But Google keeps experimenting with new types like structured snippets, price, or promotion extensions. If your competitors aren’t using them, you have the advantage to stand out even more.
Provide enough of them so Google can cycle through them and figure out which ones work best.
When are you ready to move on?
All the advice in this article should keep you busy for the first few months.
During that time, don’t look to do more (different campaign types), but look to do things better.
Try to understand more about how the platform works, what all the different options are, and what the impact is of using them.
Then, when you start seeing results and feeling confident, it’s time to branch out.
At that point, I recommend looking at our Google Ads for Ecommerce guide to discover what could be next for you.
