For many ecommerce businesses, Google Ads is a foundational part of their strategy. As much as 18% of all ecommerce revenue is a direct result of Google Ads.
But Google Ads is a big platform with tons of different options to choose from, so it’s not always clear which of these features are relevant for you.
So in this Google Ads guide for ecommerce, I’ll take you through the whole platform and show you what to focus on for maximum impact.
Table of Contents
Building on a Solid Foundation
If you’re exploring whether or not to use Google Ads, the first thing to clarify is whether it’s a good fit for your business.
I know I mentioned in the intro how ecommerce stores get a ton of sales from Google Ads, but that’s just the average.
Here are a couple of important must-haves before moving on.
Sufficient Budget
Some advertisers don’t have or don’t want to invest the money to test Google Ads.
Important here is that you shouldn’t be expecting to run a profitable campaign from day 1.
Your first objective is to get your feet wet and understand what results you can get from Google Ads. And then slowly improve your results.
Here is my recommended budget if you’re starting:
- Bare minimum: $10/day for a month
- Ideal minimum: $1,000 / month
This budget might need to be bigger depending on a few factors:
- How competitive is your industry? The more competitive, the higher your budget needs to be
- Are you dealing with long sales cycles? If it takes longer for people to purchase, you will need to run your campaigns for longer.
- How much profit do you make on a sale? If you have low margins, it will be harder to run a profit, so you will need more time for testing.
I can’t stress how important this is. If you can’t afford the money that you need to spend on this, you won’t be able to give it enough room to test.
Here is a very common problem that causes advertisers to be super impatient:

I realize $1,000 can be a lot of money for a starting business. So if your budget is small, keep the number of products or keywords low.
Don’t try to run a campaign with 200 products at $5 a day for a month. You’ll spread your budget too thin and won’t be any smarter whether this can work. So focus your budget on the things that are likely to result in sales.
Store prerequisites
Two stores that do have the same budget and start the same Google Ads campaigns might see very different results.
One might run campaigns that make basic mistakes but still turn a profit. While the other one runs perfect Google Ads campaigns, but still loses money with every click.
I’ve seen this happen many times. And it took me some time to figure out why this was happening.
Today I’ve isolated these three factors that are a good barometer of Google Ads’ ecommerce potential:
- Product knowledge
- Unit economics that makes sense
- Infrastructure: email capture, cart abandon, welcome, repeat program, etc.
I believe these three things are essential to get right BEFORE you start with Google Ads.
These aren’t just nice to have but can mean the difference between making or losing money.
Google Ads Strategy
Part of the complexity for people new to Google Ads is that there is no such thing as a “Google Ad”.
Google Ads is a platform that allows you to advertise in different places, using different campaign types and different ad formats.
So the first thing you’ve got to do is figure out which of those are relevant to your business at this point in time, and which ones to shelf for later.
Campaign Order
While you could start with any campaign type and see results, it’s not the most effective approach based on my experience teaching people how to run Google Ads for the last 10 years!
If you don’t pay attention to this, you will be competing with other stores that have been doing this for YEARS.
So I suggest running the different campaign types in Google Ads step by step:
- Standard Shopping Ads
- Dynamic Remarketing Ads
- Search Ads
- Performance Max
- YouTube Ads
- Demand Gen
- Display Ads
The main reason for this particular order is to make things simpler and minimize the mistakes you can make.
Minimize mistakes
If you run campaigns in the order I describe above, it becomes harder for you to make basic mistakes.
Let’s say you skip my advice and start with Search Ads instead.
They’ve been around for 20 years and a lot of advertisers have gotten REALLY good at them.
They are very easy to start and get traffic to, but mistakes are easily made when it comes to ad group structure and match types.
Those instantly make it hard to get to profitability.
So in what follows, we’ll follow that order.
But within each campaign type, there is also a lot of complexity, so in the rest of this guide, I’ve divided all of the sections into 3 levels:
- Beginner: do this if you’re just starting out
- Intermediate: you’ve got some experience but want to make sure you’re doing things right
- Expert: you know how to get results (and would like more of them)
So instead of trying to get everything perfect at once, focus on doing all of the beginner things.
Once you get the hang of those, start moving up. With every level you move up, your results will also go up as you get smarter, more refined, and more detailed.
This also avoids getting hung up on details that aren’t really relevant at this point.
Google Ads Basics
While Shopping Ads require some additional setup and configuration, most of the other campaign types share the same basics.
The most important thing, of course, is a Google Ads account. It’s free to create.
If you’re managing campaigns on behalf of clients, turn your account into a Google Ads MCC account, which allows you to manage multiple accounts by logging in and out.
The Google Ads interface (Beginner)
No matter whether you’re creating Google Shopping campaigns or YouTube Ads, you control everything from the Google Ads interface.
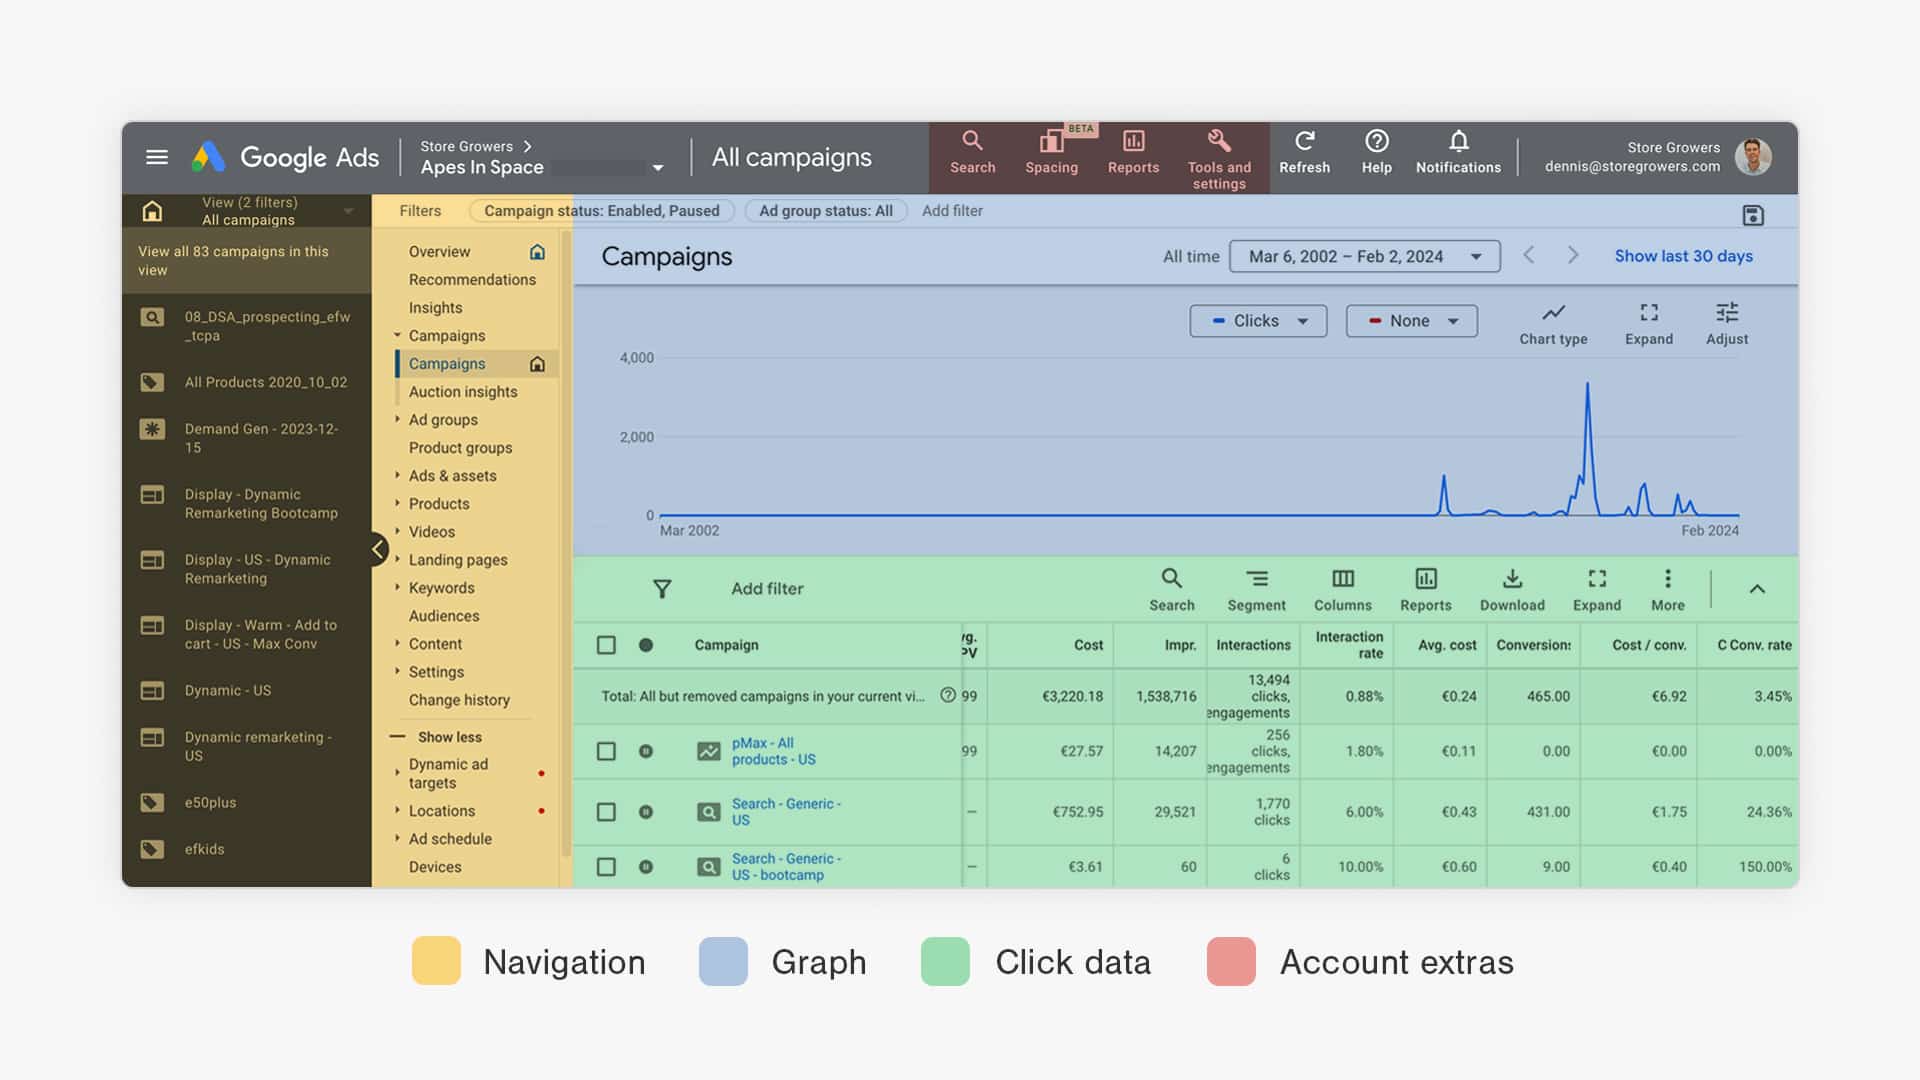
Note: at the time I’m writing this, at the beginning of 2025, Google is “in-between” interfaces. That means they’re actively working on a new version that some Google Ads users see. So in what follows below, it could be that things look a bit different on your end.
The first two columns are all about navigation, and finding your way to the correct part of your campaigns. (You’ll spend the most time in the Campaigns/Ad groups/Products Groups/Keywords tabs of that middle navigation.)
The Graph section gives you a quick overview of what’s happening in your account, so be sure to select the metrics that are most important to you.
The click data is the most important part of the report, this is where you’ll see what’s working and what’s not.
Google Ads Editor (Intermediate)
While you can do everything from the Google Ads interface, some things get pretty tedious.
The Google Ads Editor is a free tool by Google. It’s made for Google Ads power users and allows you to be much more efficient.
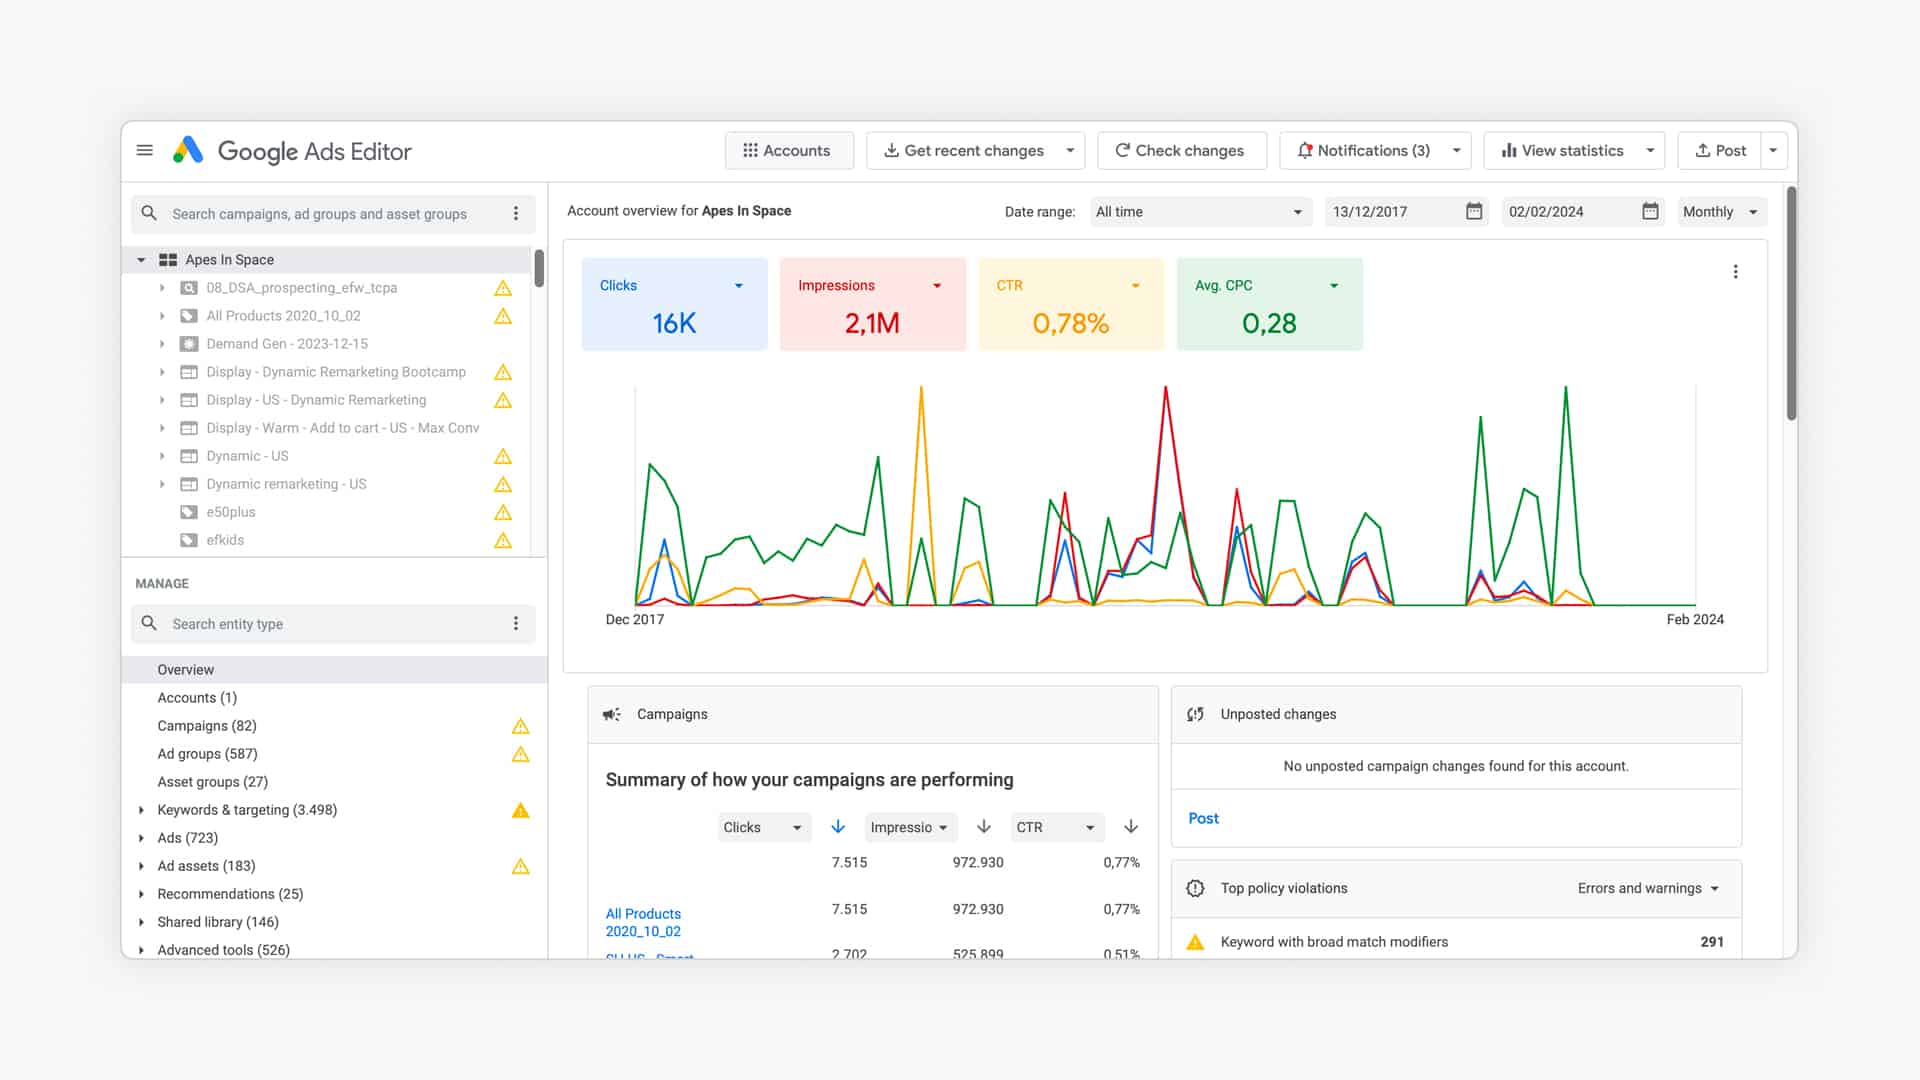
There are a few benefits of using the Google Ads Editor instead of the interface:
- Easy to make bulk changes
- Copy/paste items (saves a ton of time when setting up new campaigns)
- Edit settings without having to go through the wizard
- Work “offline”: helps to prepare a bunch of changes or edits
- No need to “verify” your account every time you want to update the budget
Google Analytics (Beginner)
The second tool you need is Google Analytics 4.
Since the move from Universal Analytics to Google Analytics 4 in 2023, it’s lost its status of being an essential tool. But it is still very useful to get an outside perspective on what’s happening in your store.
There are a few things you need to get the most from its ecommerce features:
- Configure ecommerce tracking: make sure you’re able to see transactions
- Link Google Ads and Google Analytics: allows you to import audiences & conversions into Google Ads
Also, keep the default auto-tagging switched on. Unless you know exactly what you’re doing, keep it as it is to avoid screwing with your data even before you get started :p
Enough prep, it is time to get cranking!!
Shopping Ads
For most advertisers, Shopping Ads take the biggest share of total Google Ads spend.

Rightly so, as they bring in high-quality visitors that convert well. But they’re less straightforward to get started than a Search campaign.
You need to connect multiple tools and make sure you get everything right before you can start showing your Shopping Ads.
So let’s look at those different pieces.
Product feed (Beginner)
To run Shopping Ads, you first need a product feed. The easiest way to visualize this is as a big spreadsheet with all of your product information.
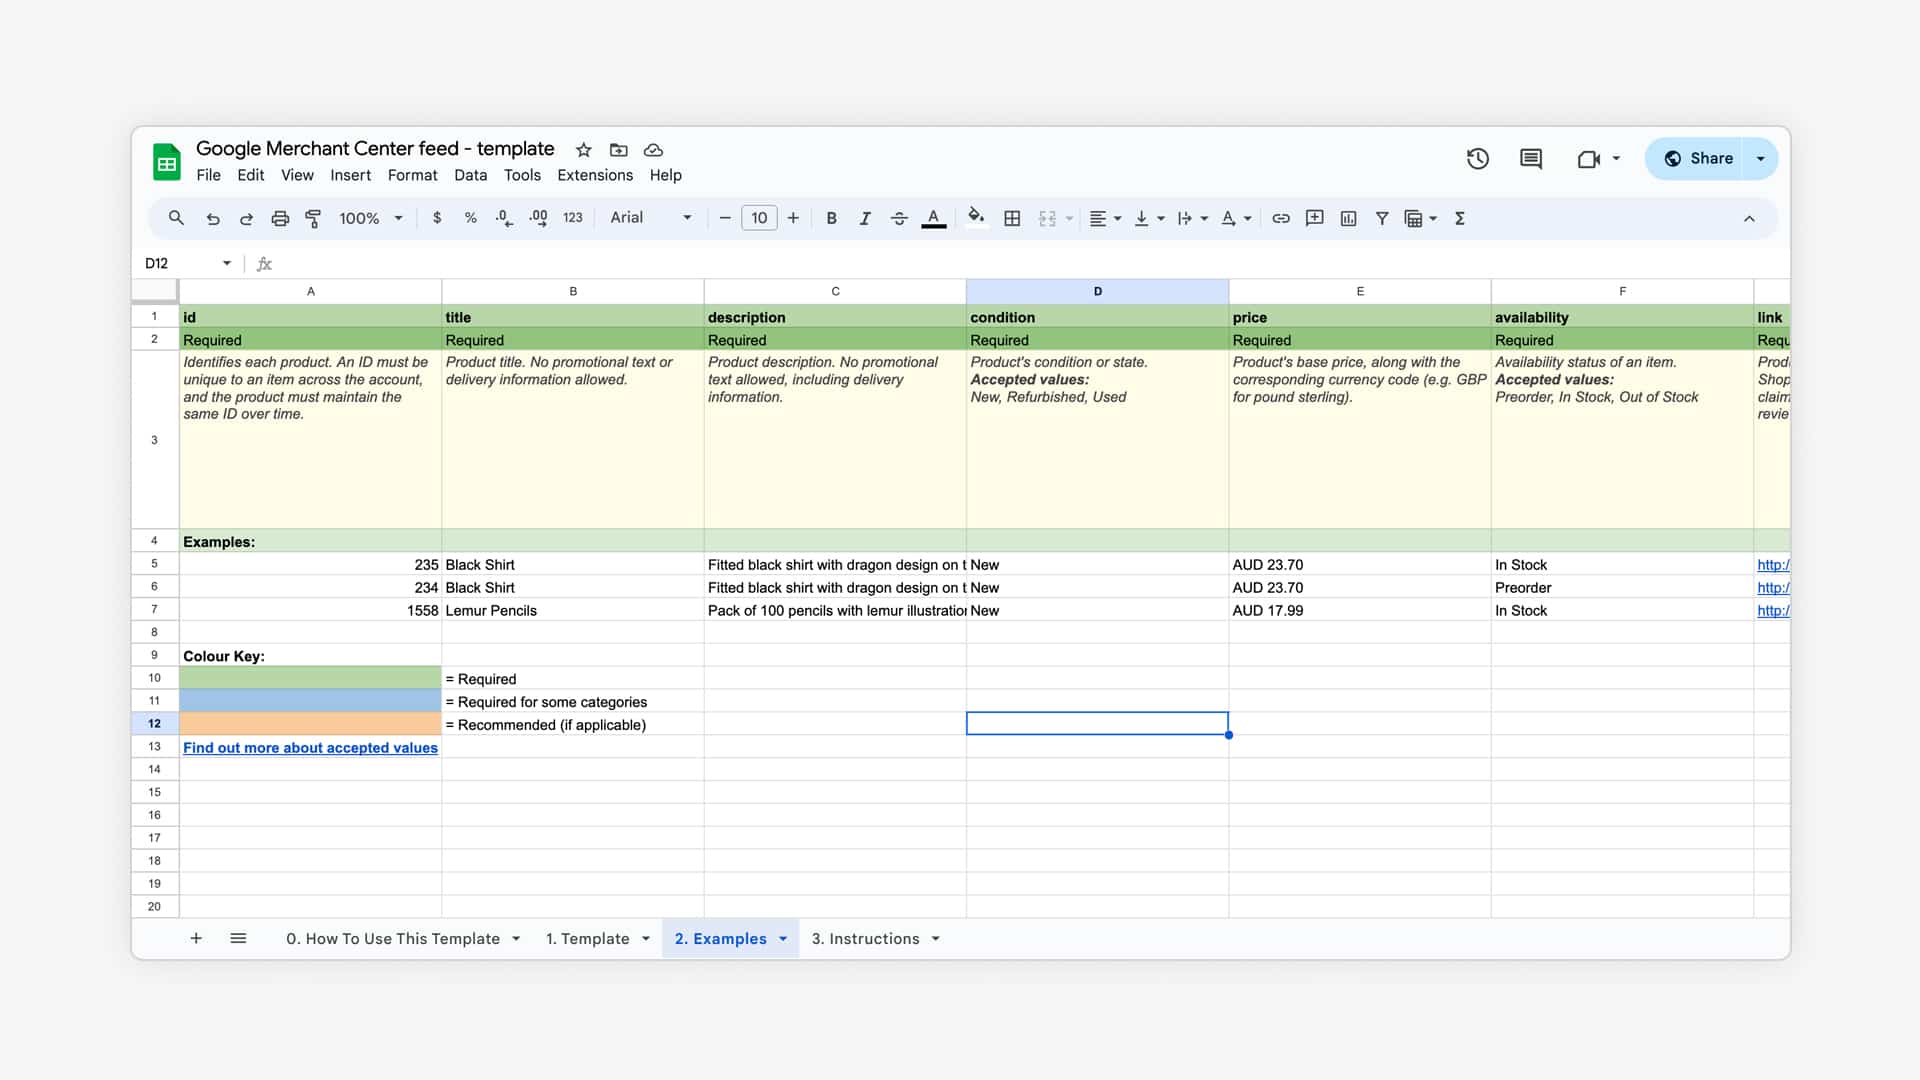
The challenge with creating this feed is that you have to provide all of the different attributes that Google wants AND provide it in the format that Google wants.
If you’re on one of the big ecommerce platforms, there is usually an app or plugin to take care of this. I’d highly recommend taking this option as it avoids a lot of headaches.
Take a look at our product feed app recommendations.
Google Merchant Center (Beginner)
Google Merchant Center is another free Google tool where all the heavy lifting happens.
It’s the place where you connect your product feed to Google’s system. Some platforms (Shopify, and Magento) will connect straight through the API. On others, you’ll have to add the feed manually.
Next, you can get the details on the quality of the information you’ve provided:
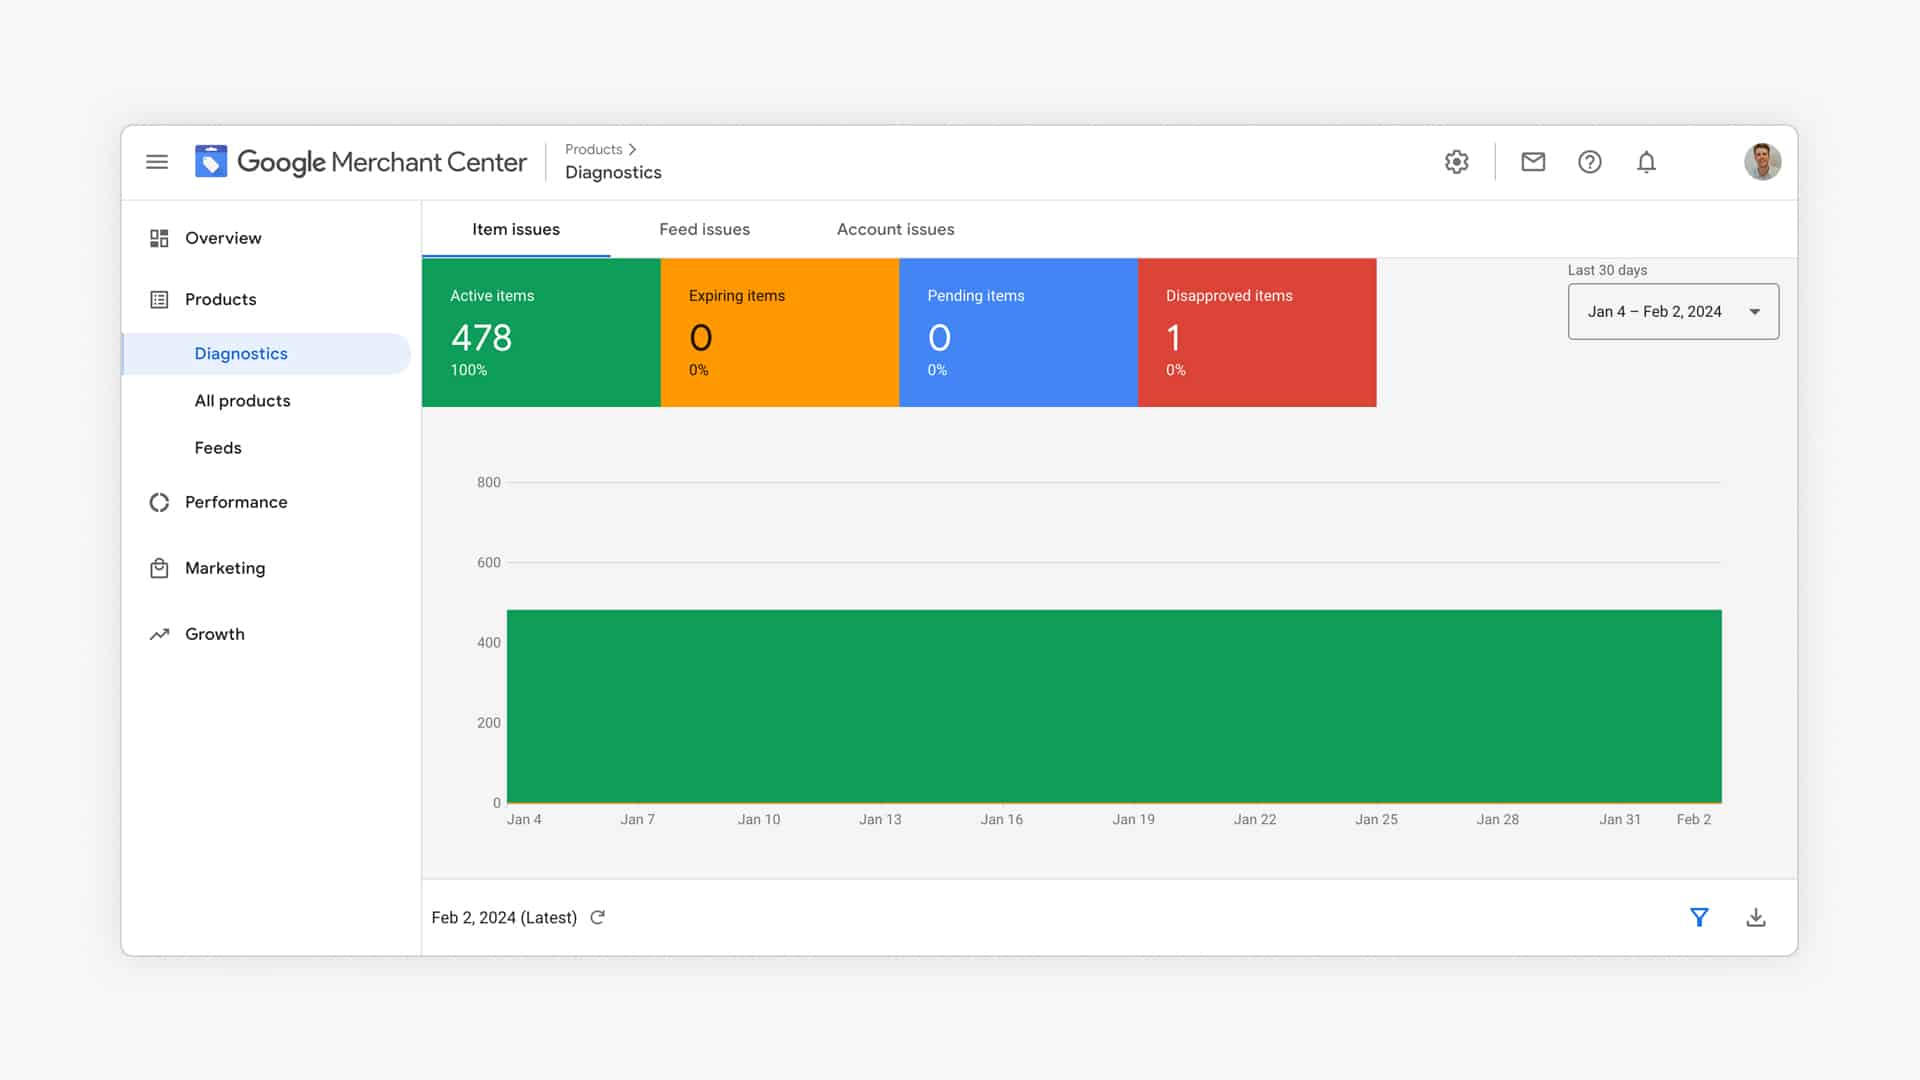
I can’t predict which errors and warnings you’ll see. Those depend on your product feed.
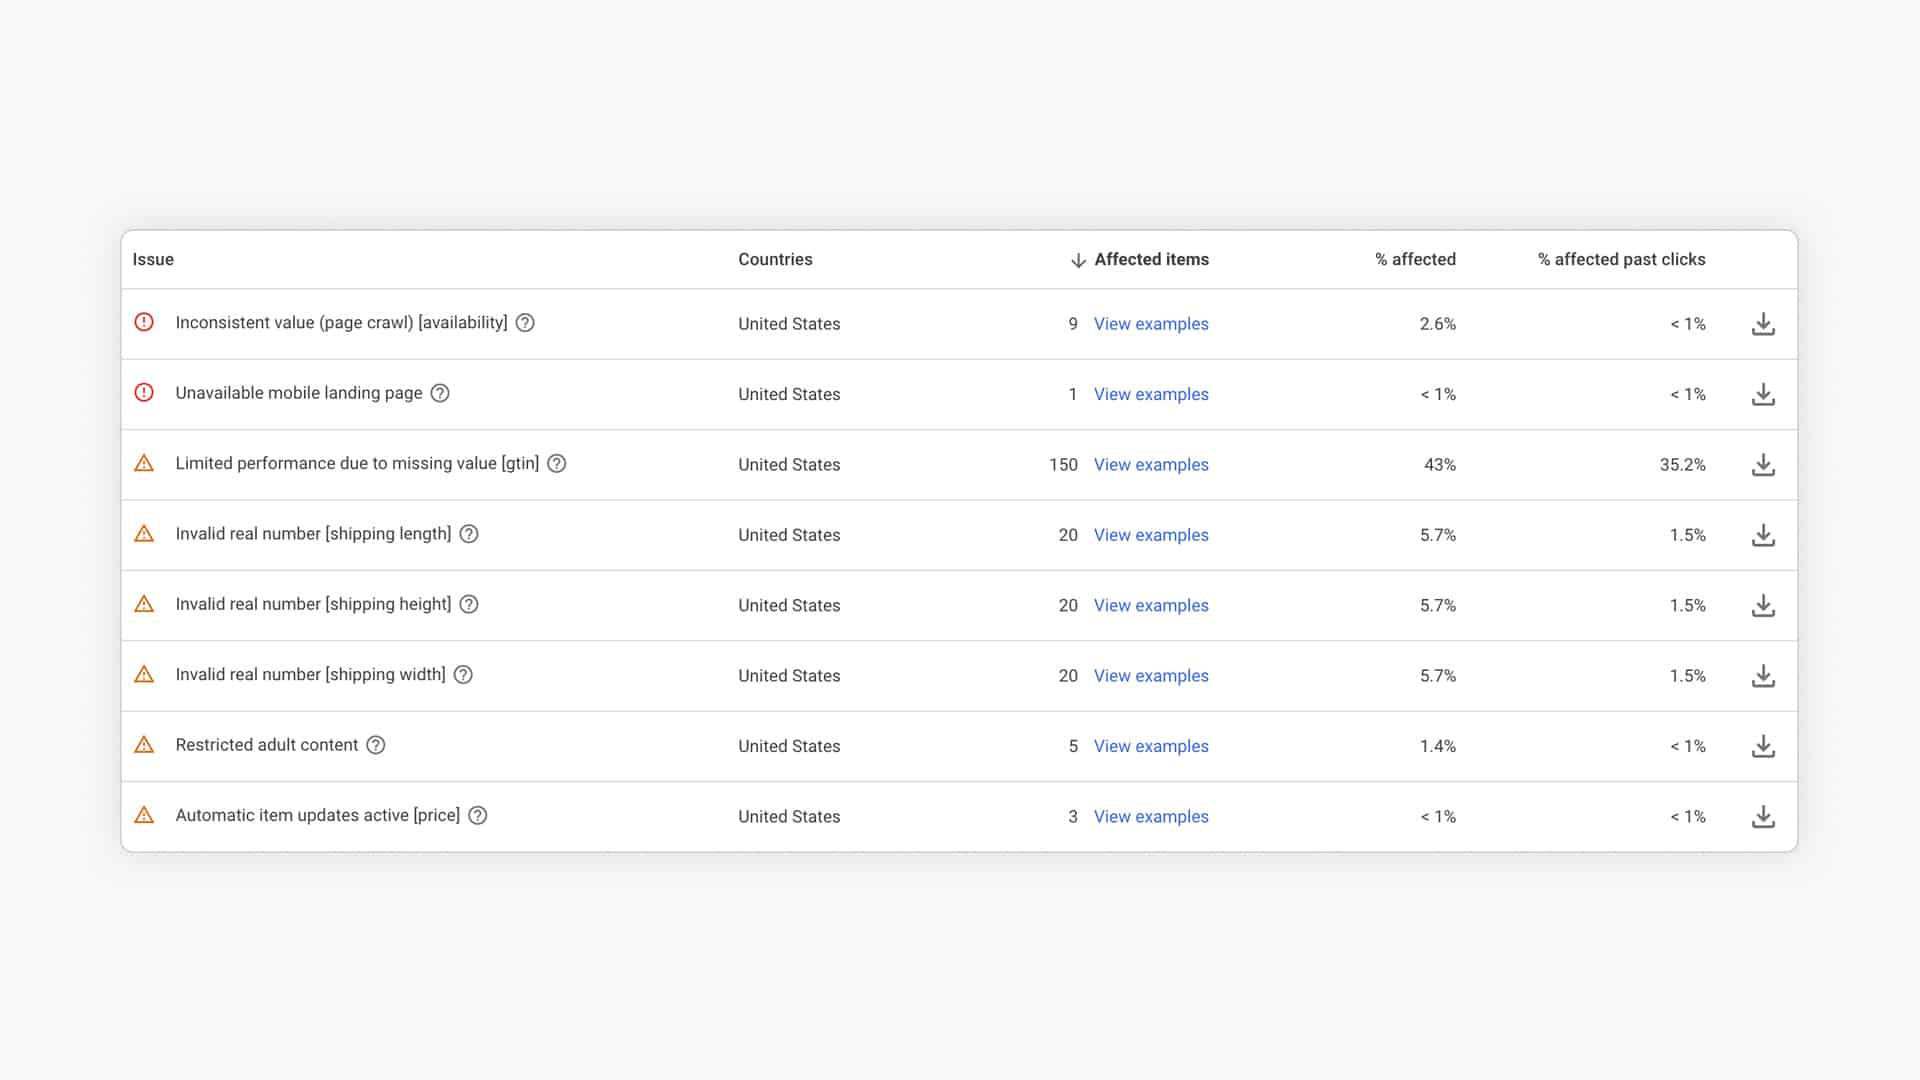
If you’re stuck, check this guide to help you fix all the errors.
When all the errors (at least the red ones) have been taken care of, you’re ready to move to Google Ads!
Performance Max Vs Standard Shopping Campaigns (Beginner)
When you set up your Shopping Ads campaign, the first thing to decide is whether to go for a Performance Max or a Standard Shopping campaign.
Both campaigns can work, but each one has benefits and drawbacks.
The biggest difference between the two is that with Performance Max, Google will automate a lot of the things that you do manually with Standard Shopping Ads.
Things you can’t control with Performance Max:
- Individual bids
- Where your ads show up
- Who you’re targeting
All of these reduce complexity, so if you’re just starting it’s tempting to pick this option.
And if you have experience running Standard Shopping campaigns, you can run a test with pMax.
But if you’re starting your first campaigns, I suggest you run Standard Shopping Ads. (Which is what we’ll do in the rest of this section).
Negative Keywords (Beginner)
By default, you can’t pick the keywords you want your Shopping Ads to appear for. (I’ll share a workaround for that in one of the next sections).
But you can add those where you want to prevent your ads from showing up.
A couple of common examples of negative keywords: free, manual, refund, job, etc.
You can find them through things like keyword research or in the search term reports of previous campaigns.
Bidding strategy (Intermediate)
Too many people get hung up on bidding.
Don’t get me wrong, having the right bidding strategy is important, but starting out you won’t get any benefits from one or the other.
So if you’re starting, use Manual CPC, if you don’t see clicks coming in, raise the bid or switch to the Maximize Clicks bid strategy.
Then, when you’ve got conversion data coming in, you can start to test automated bidding strategies like Target CPA or Target ROAS.
Note: The Enhanced CPC bid strategy was phased out at the end of 2023.
Shopping Campaign Structure (Intermediate)
Out of the box, a Shopping campaign is very simple: a single campaign with a single ad group and a single product group that contains all of your products.
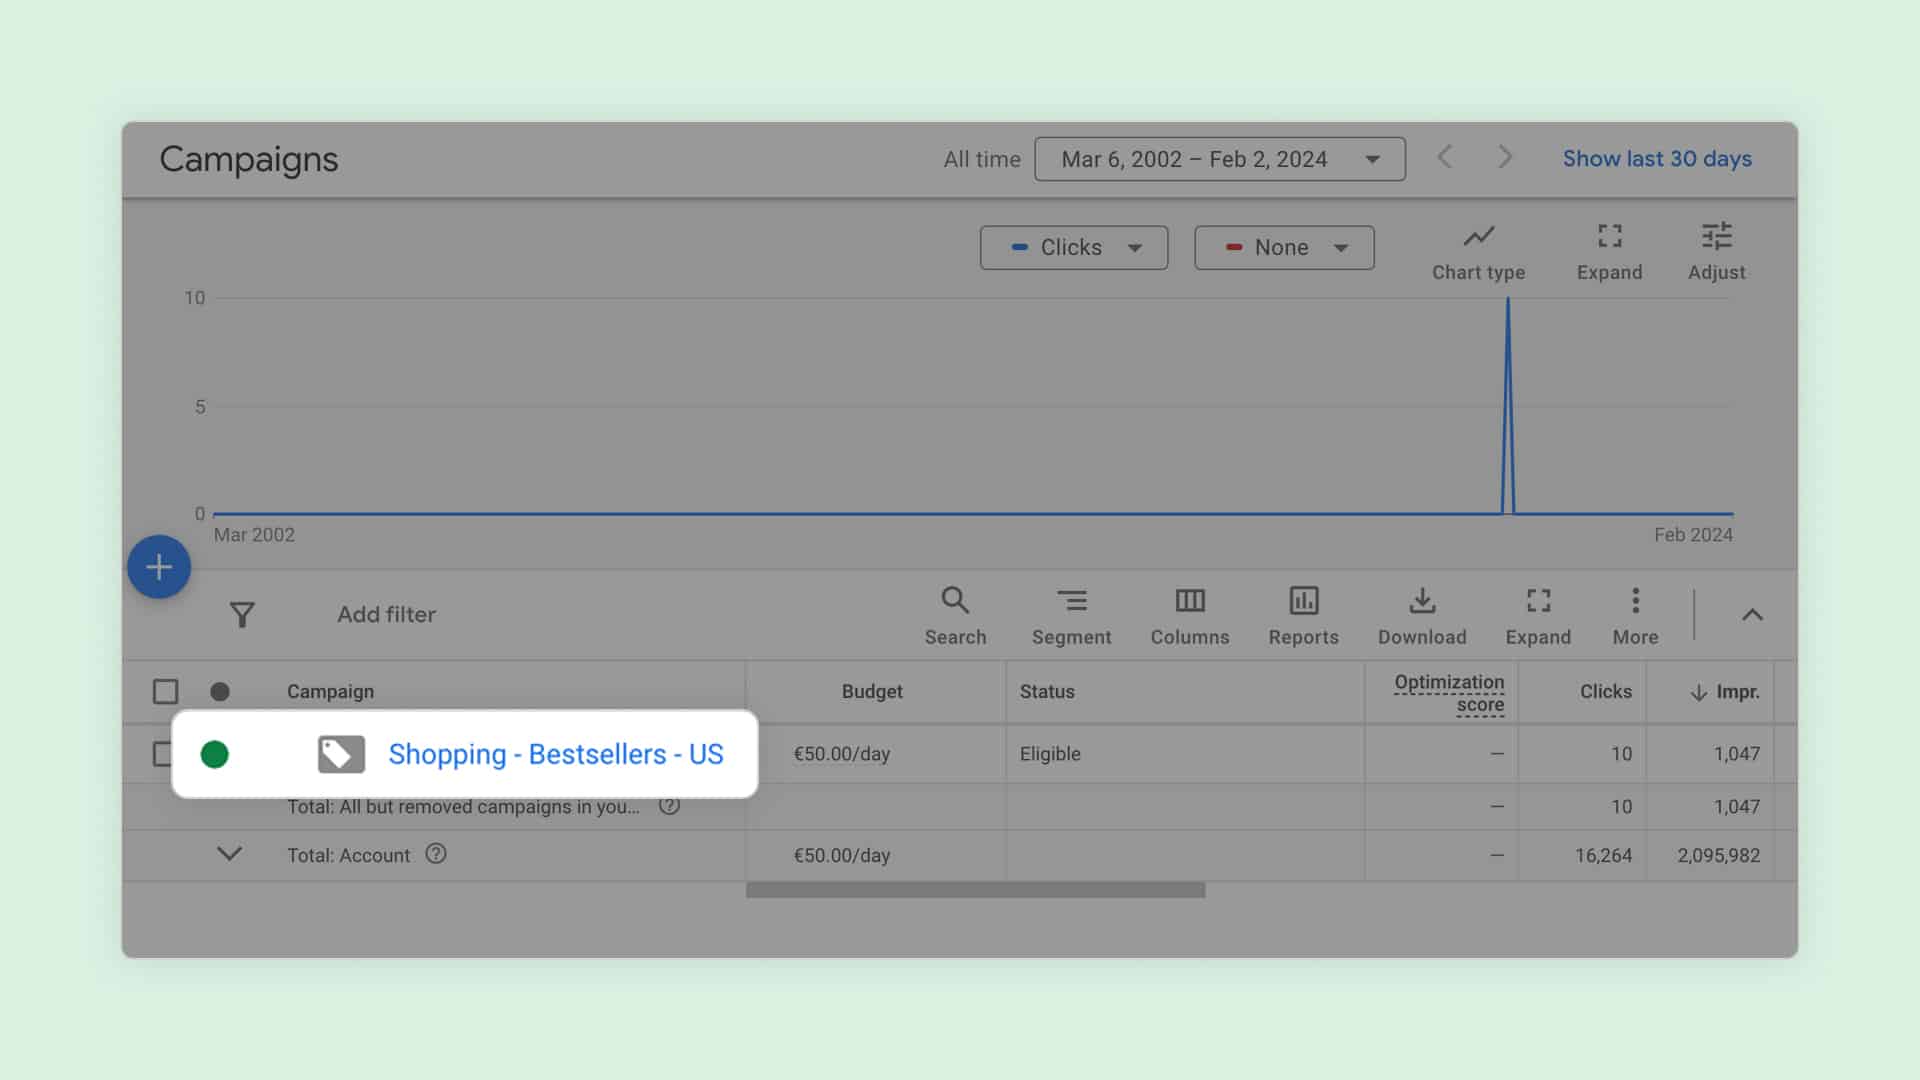
Some advertisers might split out some product groups to bid differently for each product. But most advertisers get stuck right there.
And that’s a shame.
My biggest issue with this default setup is that you are paying the exact same amount for any search queries that Google decides to match with your products.
Improving your Shopping campaign structure is one of the most impactful things you can do.
Let’s do a little quiz. If you’re selling this chainsaw:
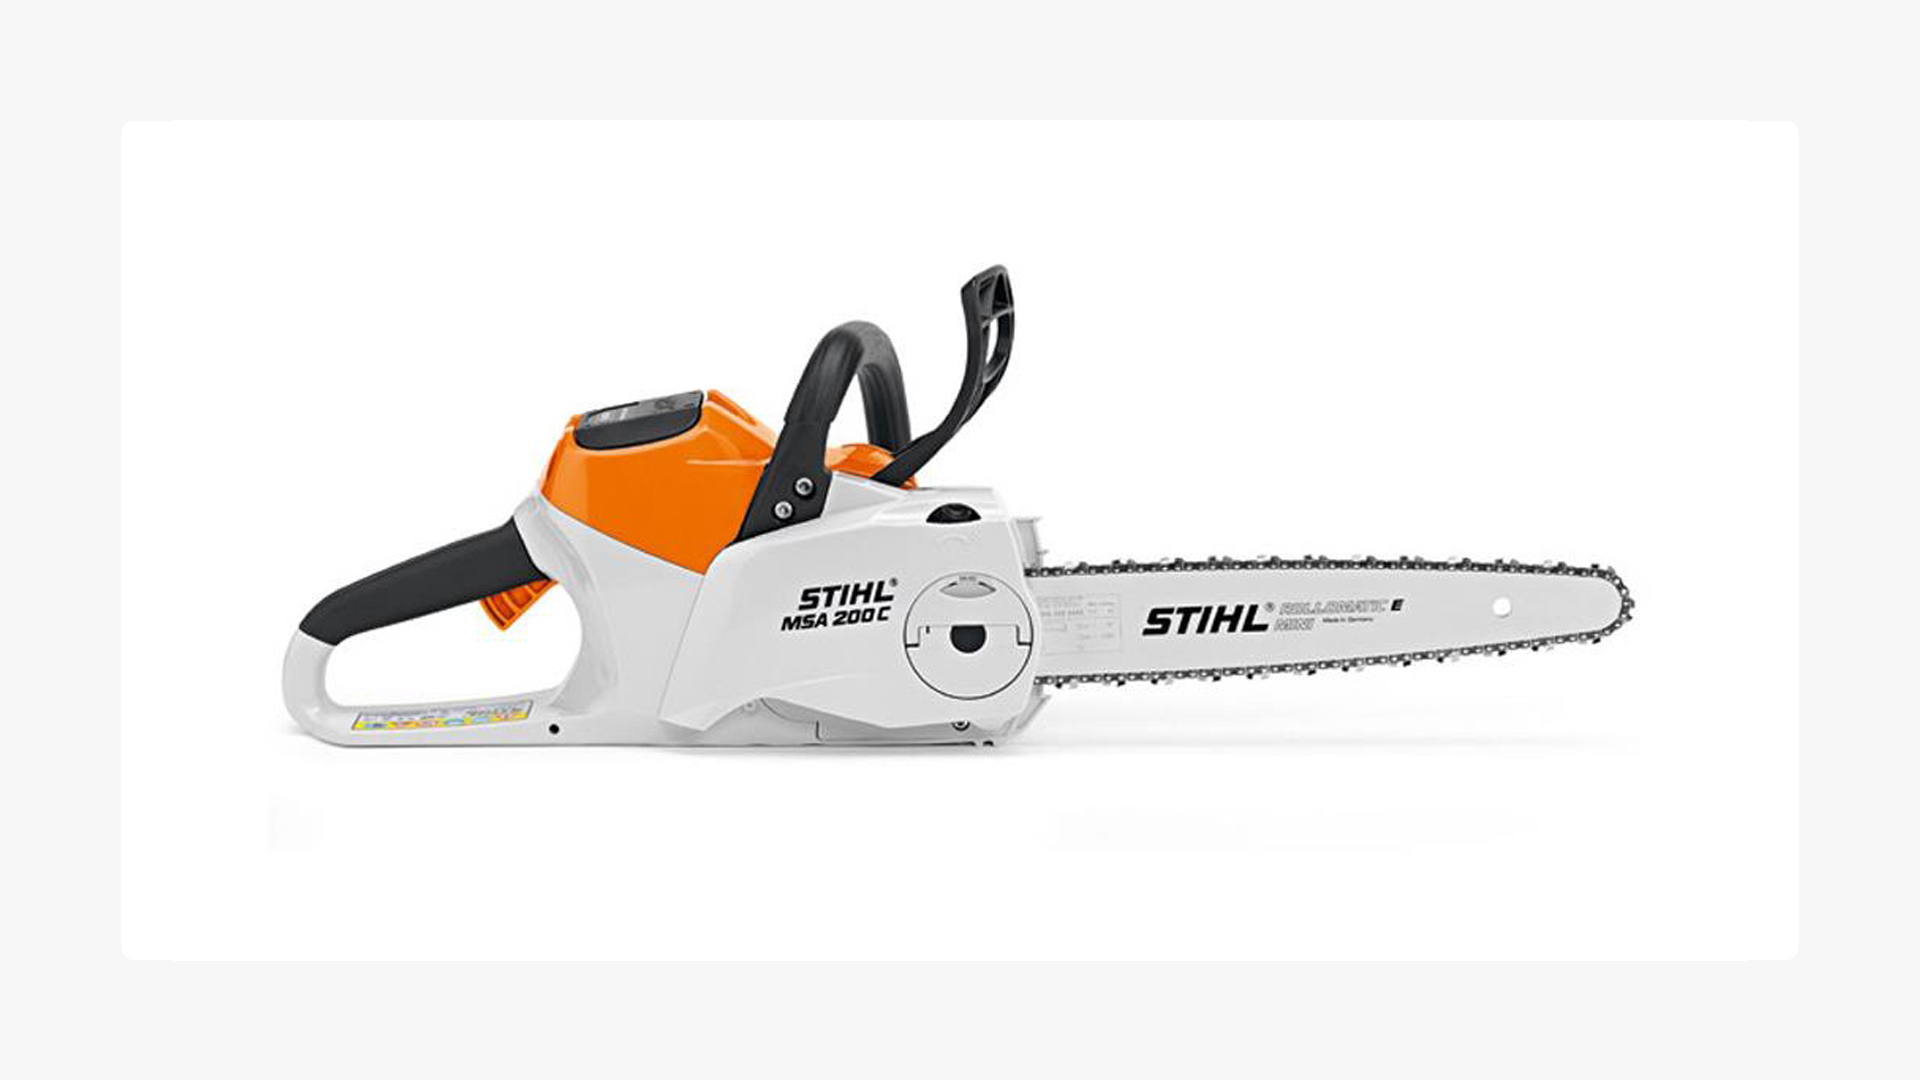
Which search queries would you want to show Shopping Ads for?
Would you pay the same for a click on your ad if someone searched for “chainsaw” compared to “stihl msa 200 battery chainsaw”?
If you’re not sure about the right answer, maybe the following insight will help.
That second search term, the one that includes the brand and product name, has a conversion rate that’s at least 2 times higher compared to the first one.
That means a click on your ad after someone searches for that is a lot more valuable to you, which means you can afford to spend a lot more for that click.
Now how do you go about implementing this?
Instead of having a single campaign targeting all search queries, you created (almost) duplicate campaigns that target a different group of keywords AND that have a different max CPC.
If we look at the example above, we could have a campaign that targets all search queries that include the brand name (“Sthil”) and product names (“MSA 200”) and another campaign that targets all other searches.
The key to getting this to work is a setting called campaign priority. I’ve marked this as an intermediate tactic because it’s not super easy to get this right.
Custom labels (Intermediate)
Another way to run more efficient campaigns is to allocate your budget to products that are selling well, have a good margin, or have a good overall profit.
That logic is not available in Google Ads, but by using custom labels, you can add it to your product feed.
Bid Adjustments (Intermediate)
Bid adjustments are tweaks you can make to increase or decrease your CPCs depending on a user’s characteristics.
Bid adjustments go from -100% (turning something off) to an infinite increase.
You could, for example, decrease your max CPC by 45% on mobile devices. A $1.00 bid becomes a $0.45 bid. You would do this if you knew that clicks coming from mobile devices are 45% less valuable to you.
Possible bid adjustments:
- Devices
- Ad schedule
- Location
- Audiences (see the next section)
Google support docs have an overview of all bid adjustments.
Audience segments (Intermediate)
Audiences segments are a special type of bid adjustment.
Here you’re able to adjust your bids based on visitors that are part of different audiences. (If you’re targeting people that have been to your site this is called Remarketing Lists For Search Ads).
You could, for example, increase your max CPC by 70% for visitors who have been to your site and started checkout but didn’t finish.
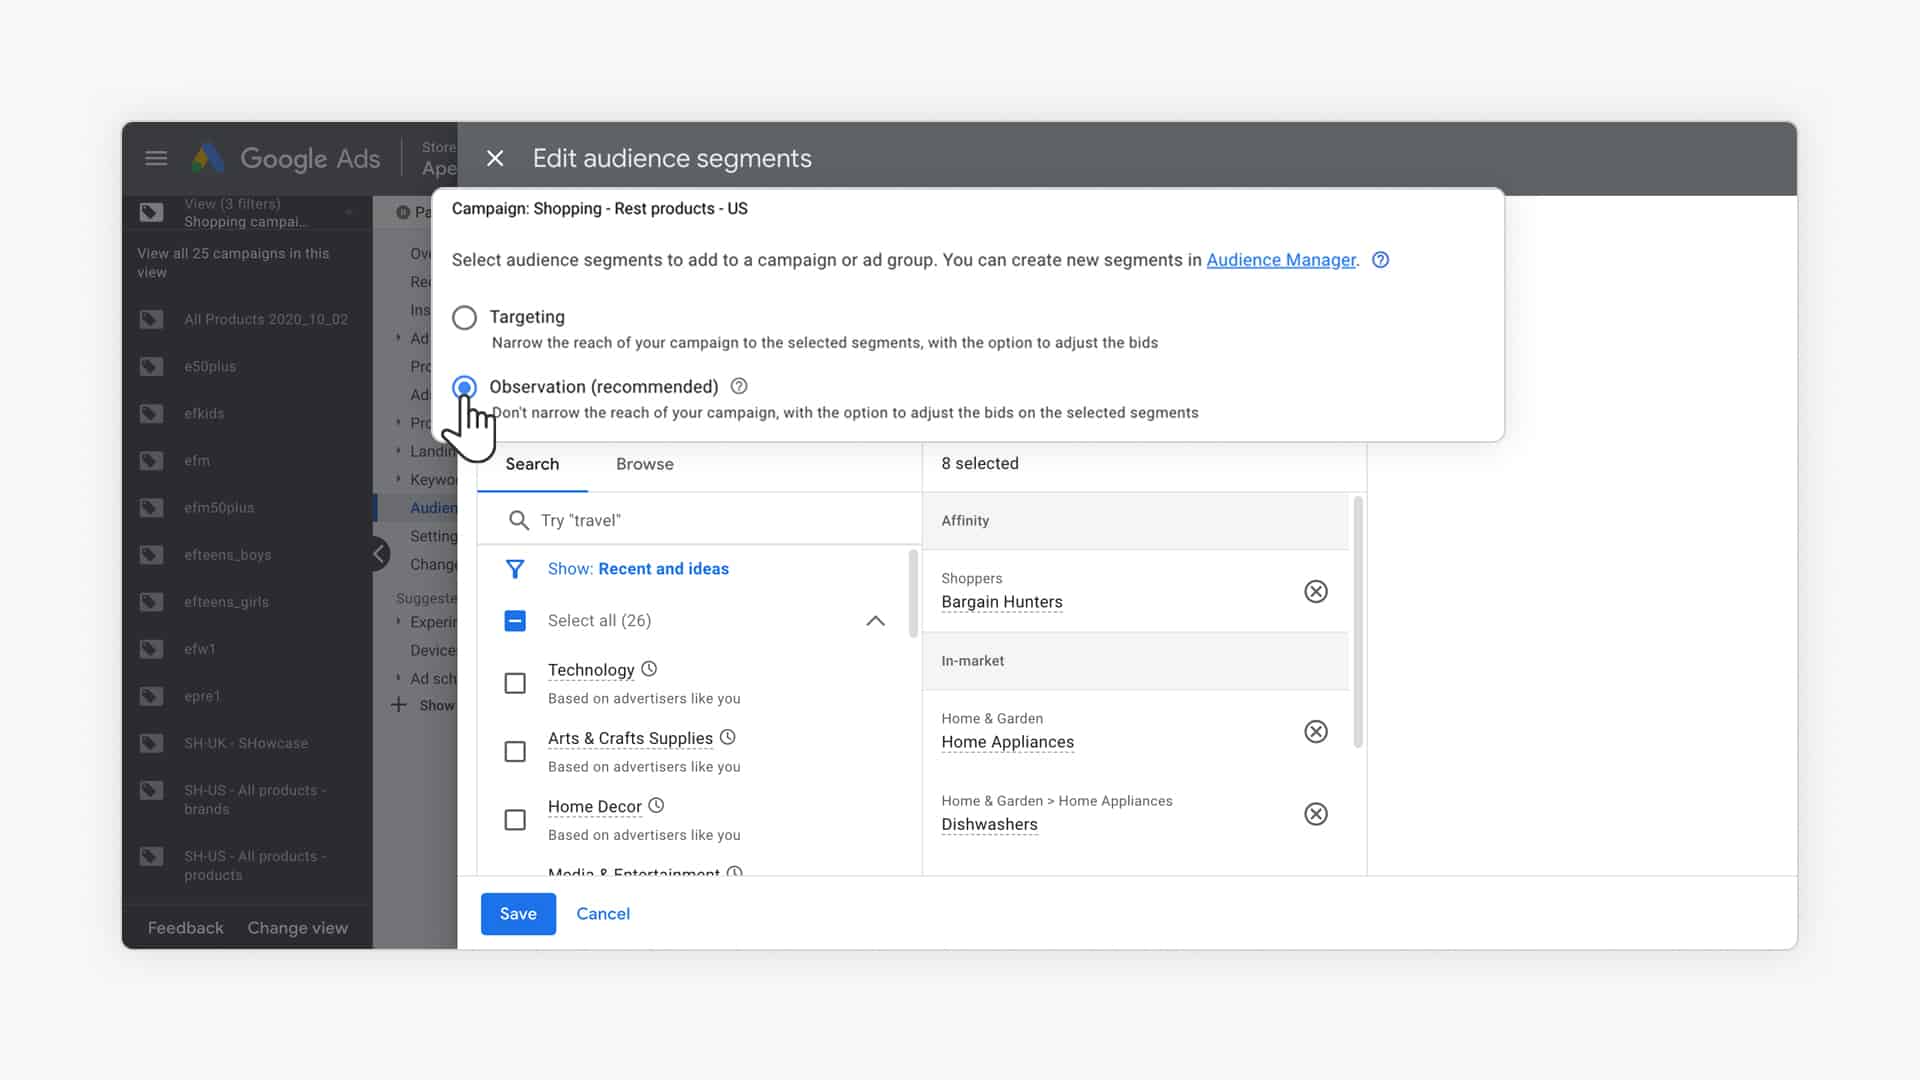
Important tip: be sure to add your Audience segments to your campaigns as Observation, not Targeting (as that would exclude all other visitors from your campaigns).
Here is what that looks like in Google Ads:
For more details on retargeting visitors have a look at the section on Remarketing Ads further in this guide.
Product Feed Optimization (Expert)
Shopping Ads rely on the information that you provide in your product feed.
So the number one way to get better results is to optimize your product feed.
Here are the three most impactful optimizations you can do:
1 – Product titles
The most important attribute is the product title.
The main method of how Google matches a user’s search query with your ad is by looking at the title. That means that if you have the wrong keywords in your titles, your Shopping Ads will show for the wrong queries!
To get this right, you might need to do some keyword research.
A second piece of having optimized product titles is the word order. With Shopping Ads, there is a cut-off, so you want to make sure your most important keywords are at the start of your title.
Take a look at this video to get more tips on how to improve your product titles:
2 – Product identifiers
Product identifiers are the brand, GTIN or MPN numbers. They are the cause of many headaches when setting up your feed.
But getting them right is essential to make sure your products get visibility. If you’re using the same GTIN number as another seller, Google has more information about which search queries to show your products for.
3 – Product images
If you’re selling products that others are also selling, consider changing them up to stand out.
Changing them can range from flipping them, all the way to shooting your own product pictures.
This last one is probably too labor-intensive for most stores. But it’s something that a lot of dropshipping stores can benefit from.
Going Deeper on Google Shopping
While this guide is a big one, it barely scratches the surface of what it takes to win with Google Shopping.
That’s exactly why I developed our Google Shopping Success course.
It covers everything I’ve learned from running these campaigns for the past 12 years and much more.
If you want to learn more, I’d love for you to check it out!
On with the article 👇
Google Remarketing Ads
The next layer of ads are Remarketing Ads. (Quick clarification: Remarketing is Google’s name for retargeting, these terms mean exactly the same)
Remarketing Ads are a special type of Display Ads that appear on other sites to people who have visited your website.
Here is an ad I got after visiting sho retailer Mahabis’s website:

They are a good example of an aggressive remarketing program. If you visit their website, they will haunt you for months to come 🙂
An important thing to mention is that you should try to see if Remarketing Ads work for your business.
For some of my clients, they work really well, but for others, it’s hard to generate enough return from them.
Static Remarketing Ads (Beginner)
There are 2 big groups of remarketing campaigns: static or dynamic campaigns.
Static remarketing campaigns are where you show the same ad to every visitor. You can create separate ads for visitors to specific pages on your site, but all those visitors will all see the same ad.
The above Mahabis ad is an example of that.
This is not a good option for most stores.
Dynamic Remarketing Campaign (Intermediate)
The other type is dynamic remarketing campaigns. Instead of having the same ads for all visitors, Dynamic Remarketing Ads feature the exact product a visitor was looking at.
Google knows this because of the tracking code you have placed on your website. The campaign is linked to your feed allowing Google to create a unique ad for that specific user.
The reason this type of remarketing is “intermediate” is that the tracking code can be quite tricky to get right.
Below you can see an example of what Dynamic Remarketing Ads looks like for retailer Yeti:

These ads don’t look amazing, but showing actual products people have recently looked at can work very well.
If you see good results, you can invest some extra resources to get them to look good.
Note: If you’re running Performance Max campaigns, these will automatically create and run Dynamic Remarketing Ads for you.
Creating Effective Remarketing Ads (Beginner)
When you create a Remarketing Ad, you won’t find any option to select static or dynamic ads. Google calls all of them Responsive Display Ads.
Here is what that looks like in the interface:
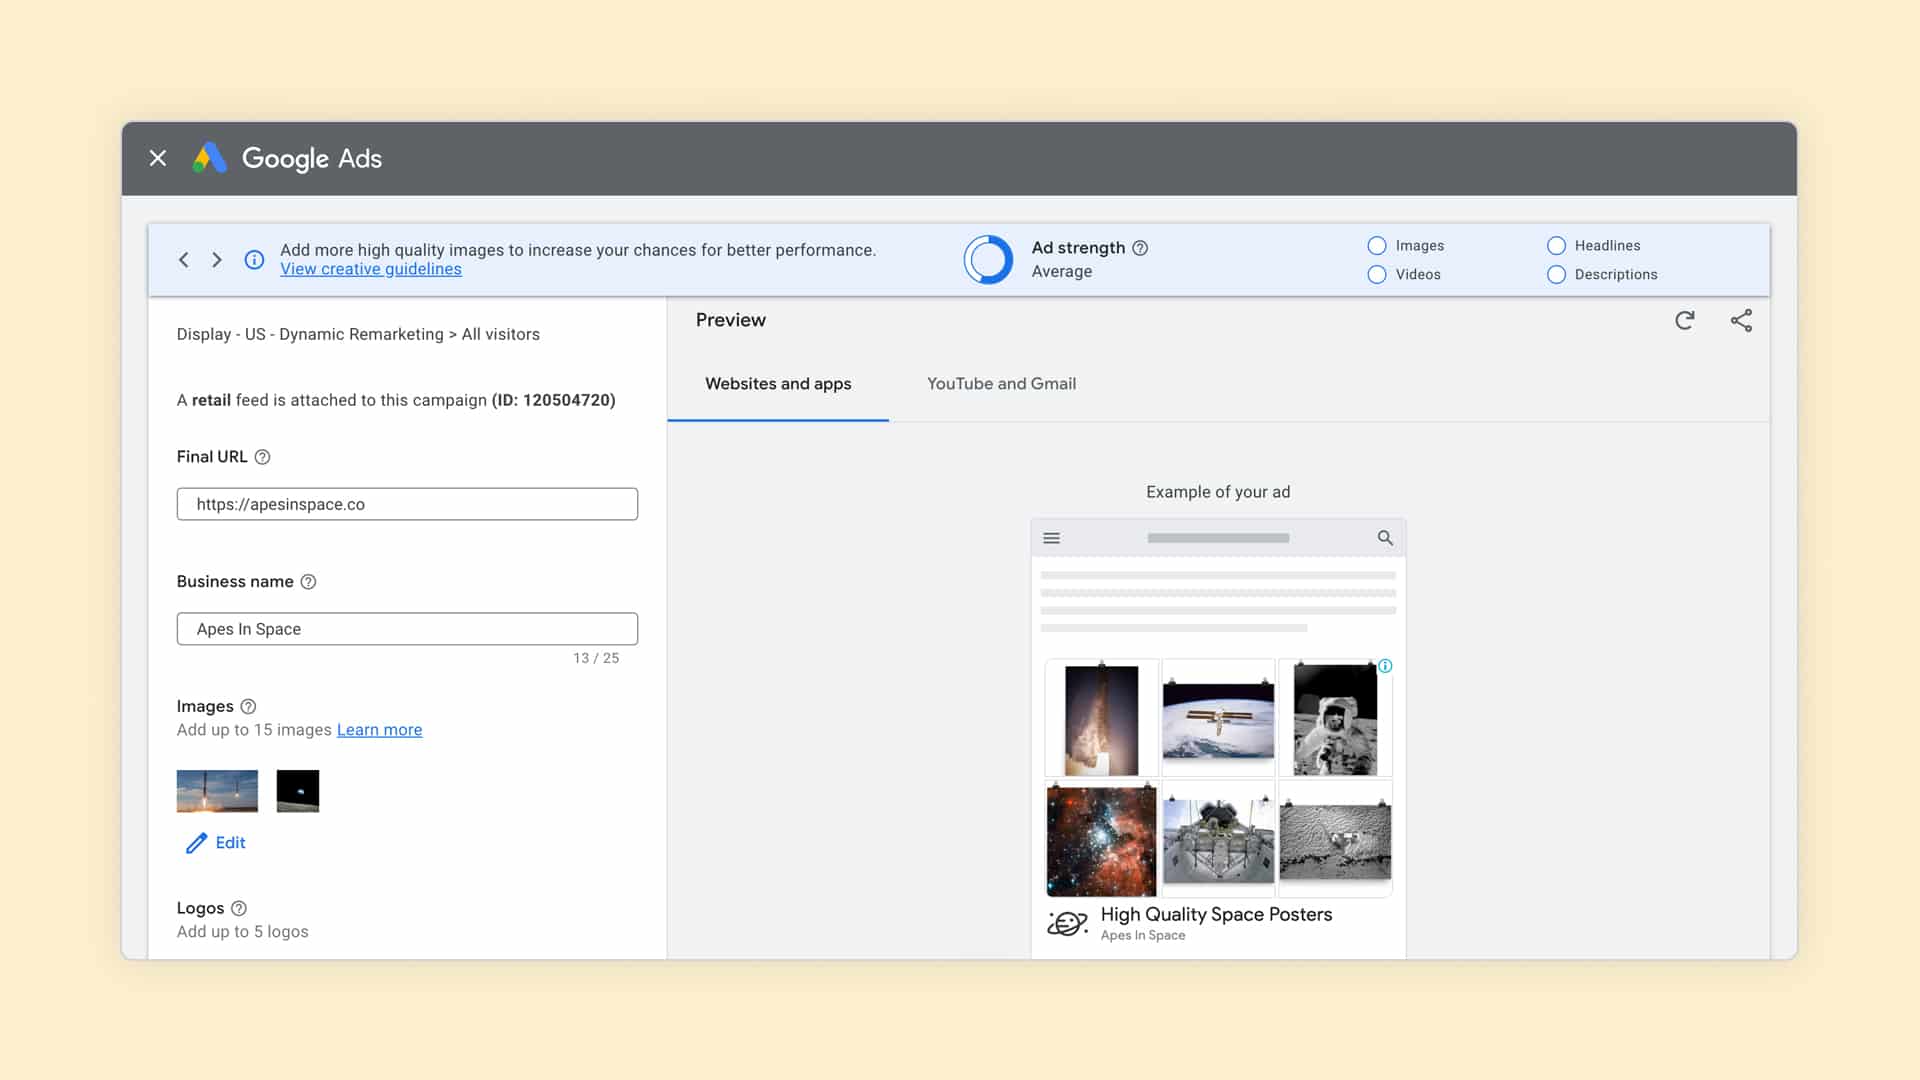
The responsive part in ad type refers to the fact that you’re providing Google with a bunch of assets that combine into different combinations.
For static remarketing ads, these assets are headlines, logos, images, descriptions, and even videos.
For the dynamic remarketing ads, you’re doing exactly the same. But Google can also show a product gallery like the Yeti example I just showed you.
Unfortunately, you don’t have any control over which creatives or elements are triggered.
There is a report where you can see which assets are most effective:
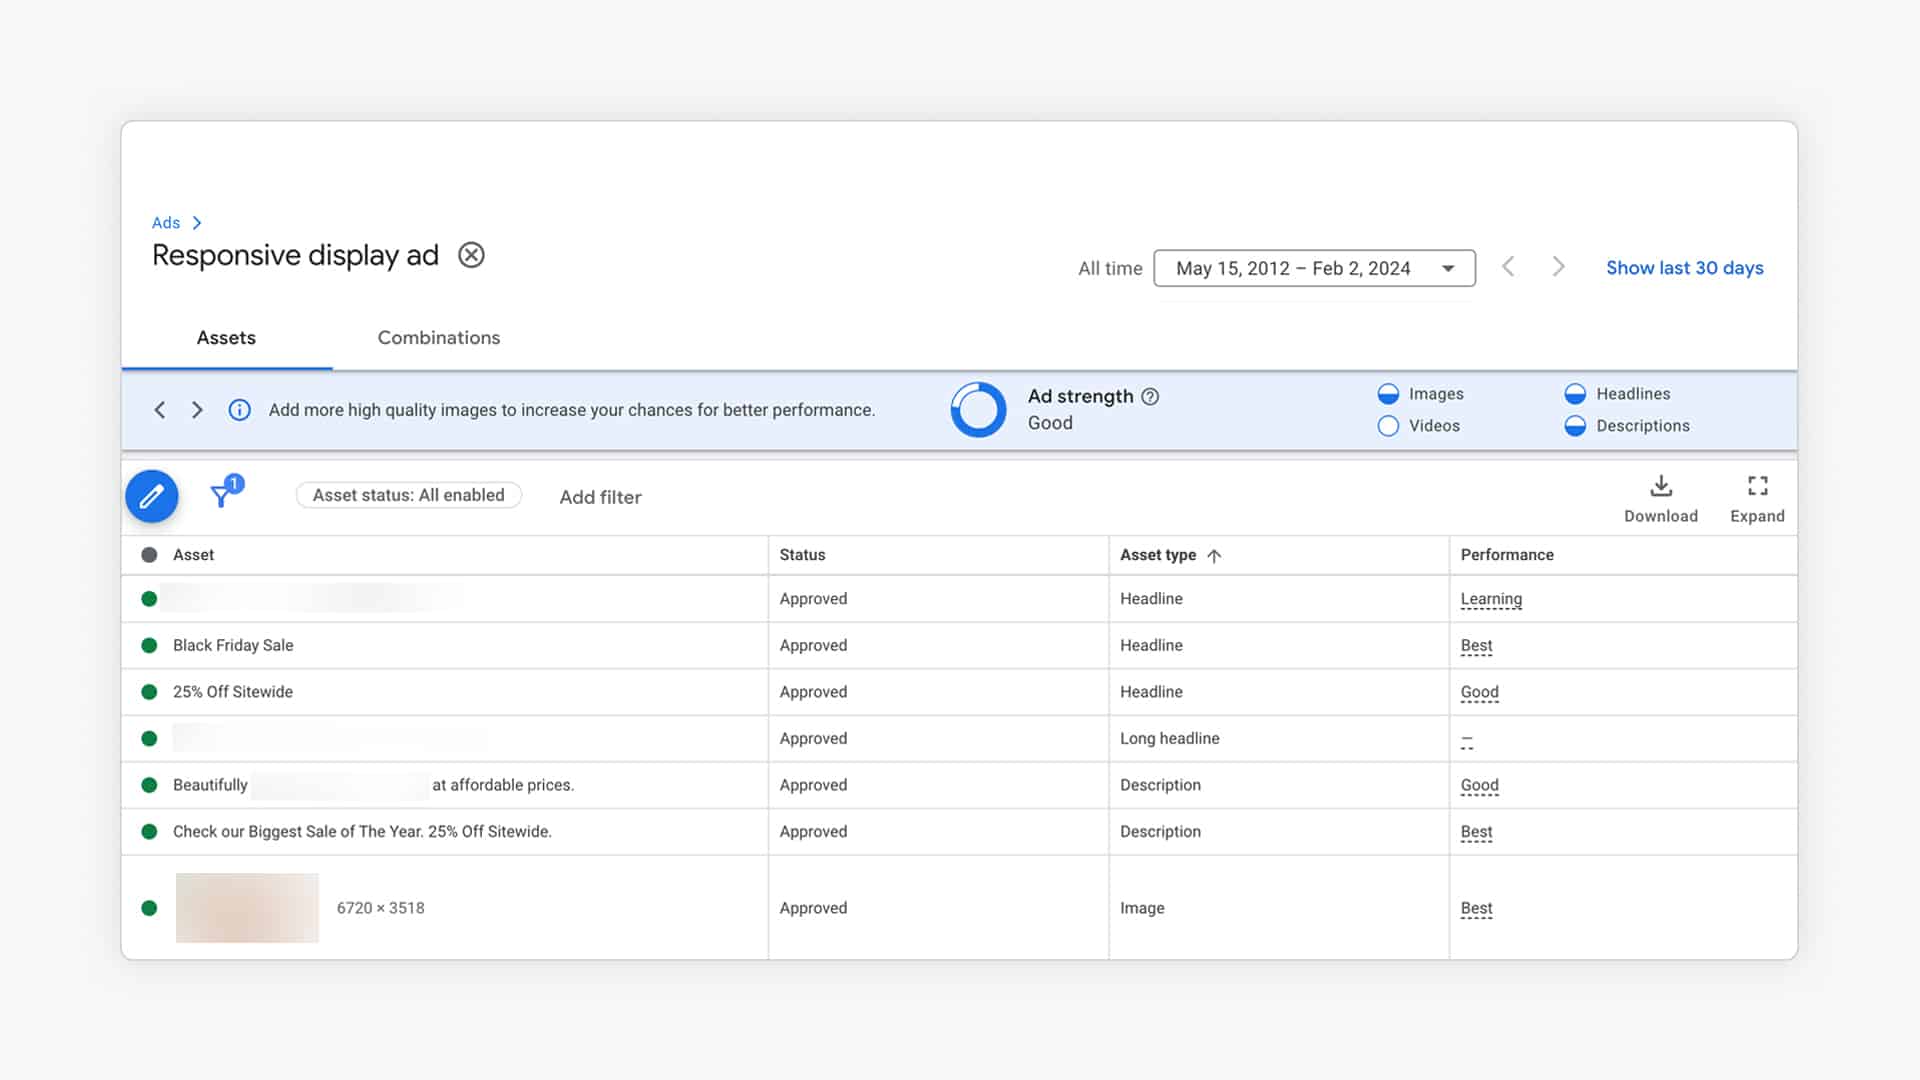
But this information isn’t very useful when you try to optimize your ads.
Remarketing Audience segments (Beginner)
Besides the ads, the main difference between static and dynamic remarketing is the tracking code you need to put on your website.
For static remarketing, a single code will do. Based on that you can target visitors that have (not) been to specific pages.
But if you have a more dynamic tracking code, Google can match which products a specific user has visited.
This allows you to build more specific remarketing audiences. By default, Google creates a few interesting audience segments in your Audience manager:
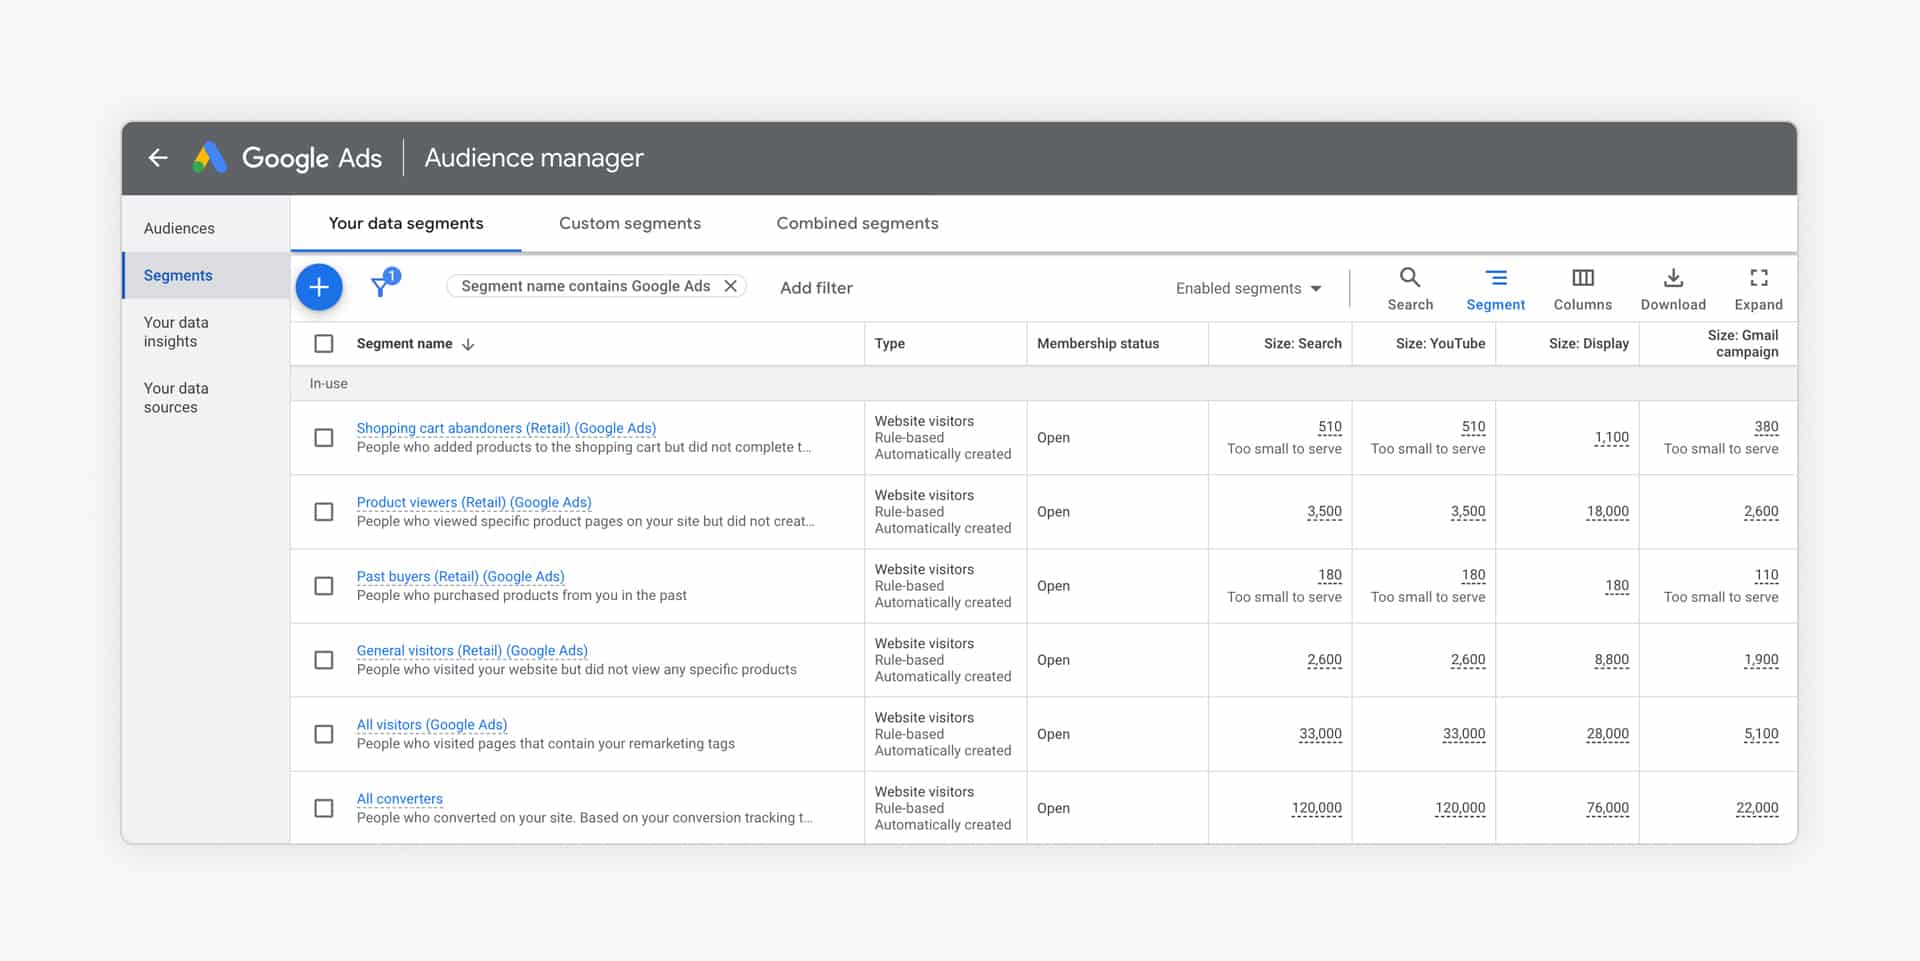
The best audience segment to start with is your product viewers. These are people who have looked at one of the product pages on your site but didn’t follow through on purchasing.
The most valuable audience probably is the Shopping cart abandoners. But for most stores, this audience is too small to contribute to sales.
These default groups are just scratching the surface. You can (and should) get a lot more granular if you want to get good results.
Google Search Ads
Finally, we get to the “regular” kind of Google Ads. This is the ad type most people refer to when they mention Google Ads.
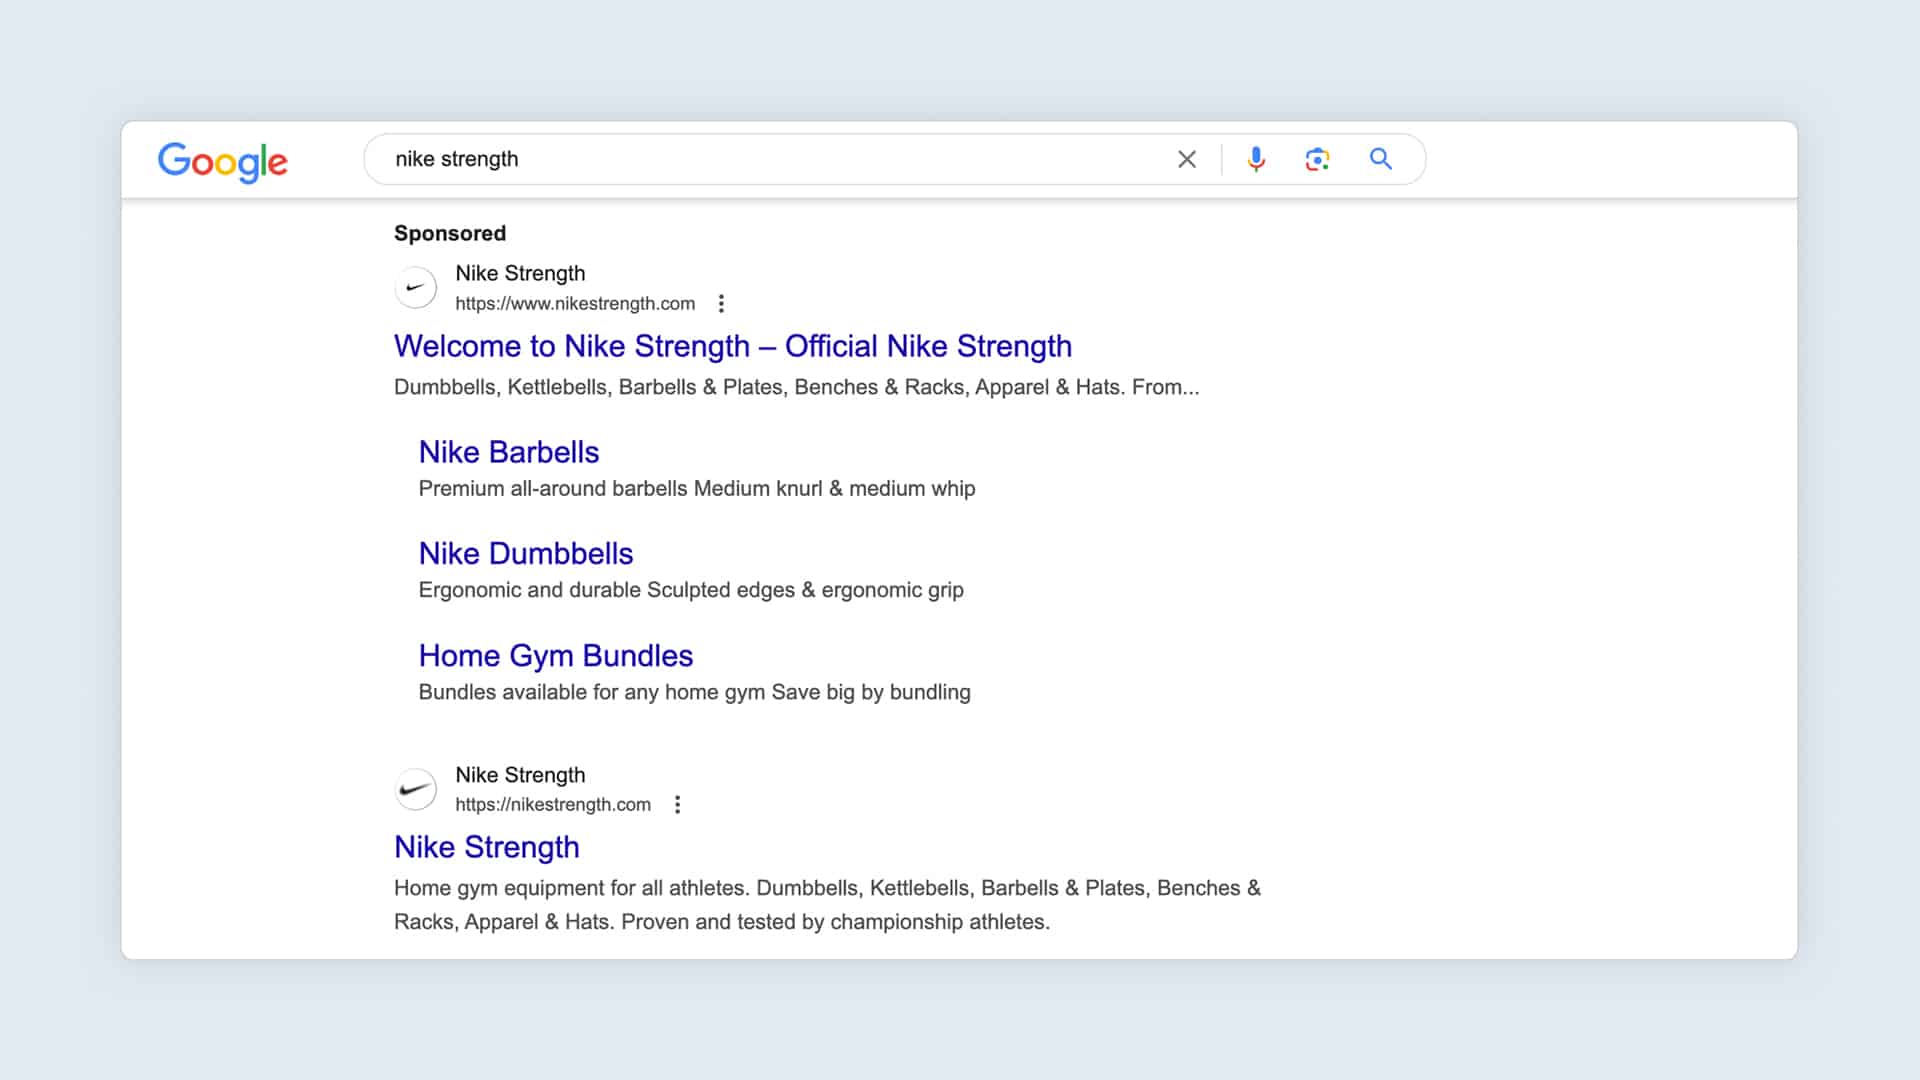
Because these are so common, it might be strange to wait so long to introduce them. The reason for that is because they have been around for a lot longer. Meaning more people have had more time to get good at them. They’re also hyper-optimized by Google.
So the learning curve is steep.
But if you started with the before-mentioned campaigns, you should have a pretty good foundation.
You’ve learned the interface, know your way around various reports, and learned basic Google Ads optimization tactics like negative keywords and bidding.
With Search Ads, you have a lot more freedom and options to pick from.
So let’s take a look at those details!
Settings (Beginner)
Although the settings seem like a very basic thing, there are a couple of options you need to avoid to stand a chance with what comes next.
First up are the networks, these are places where your ads can appear. By default, Google has Search Partners and Display Network enabled:
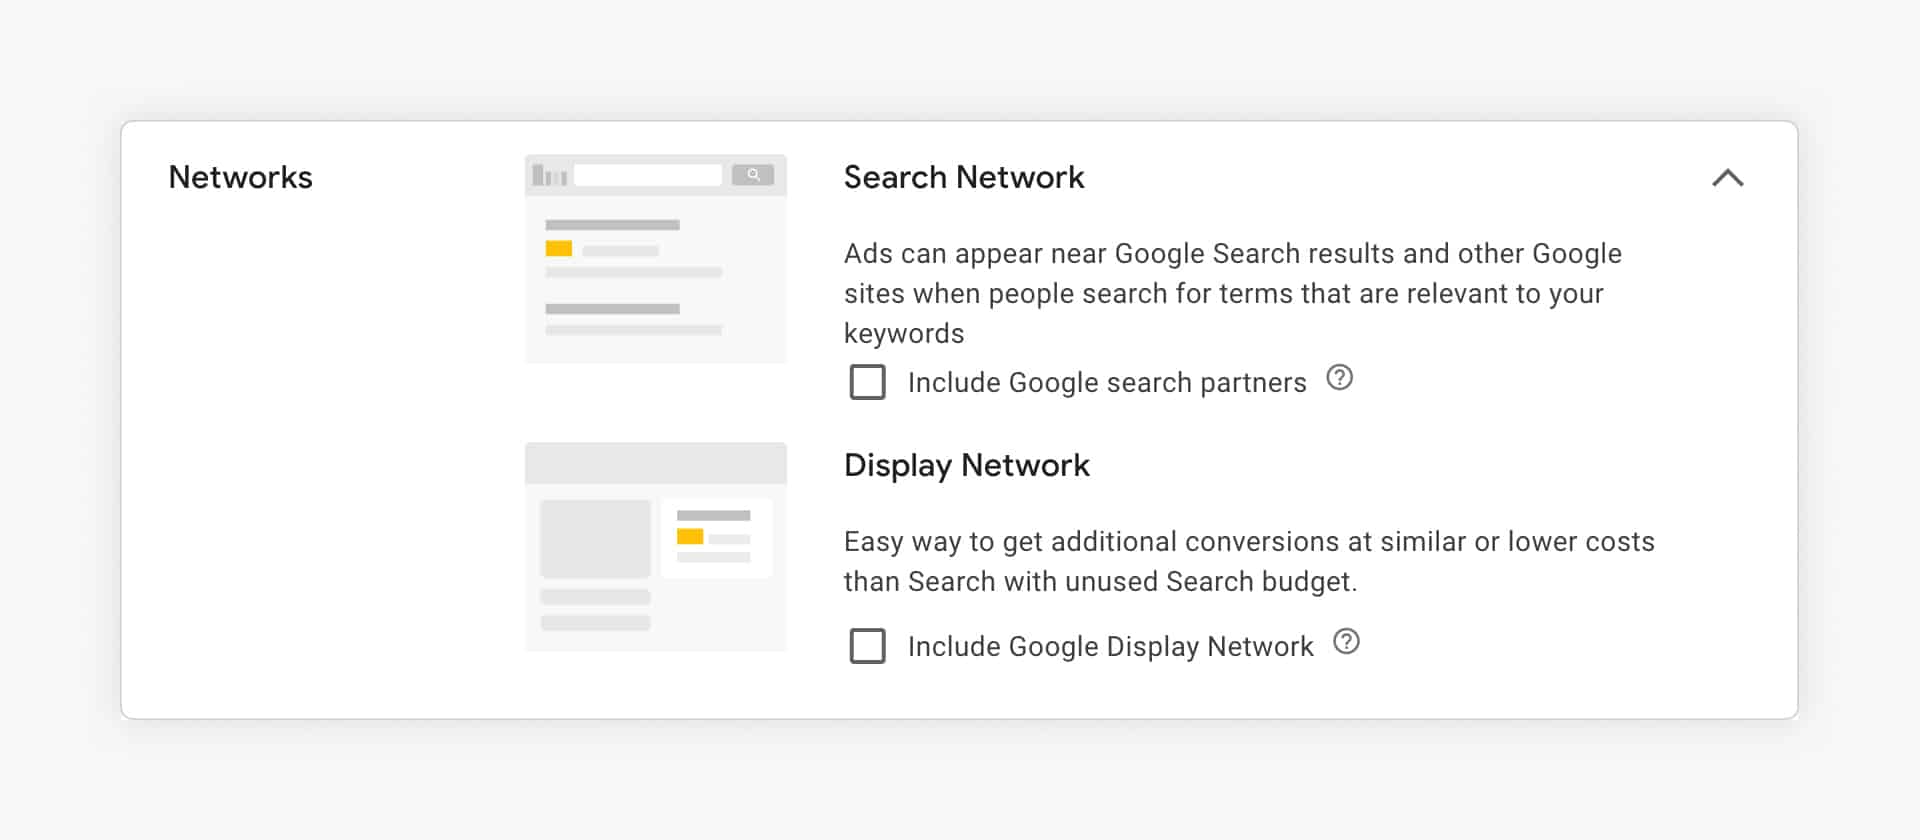
When you create your campaign, opt out of these features to make sure you know where your ads are appearing. Once established, you could add the Search partners to the mix.
Another common mistake is the selection of the bid strategy. For most people new to Google Ads, they don’t really know what’s going on. So they trust Google’s recommendation.
Don’t fall for that trap. I’ll dive deeper into bidding further in this article, but starting out, opt for Manual CPC and stay away from automated strategies like Maximum Conversions or Conversion Value.
Keywords & match types (Beginner)
The core of Search Ads are the keywords you select where you want your ads to appear.
This is a really important step. Pick keywords that are too general, and the visitors you’ll attract are also less likely to buy something.
But if you select keywords that are too specific, you won’t get many clicks.
This second type of mistake is better than the first one, but both are very frustrating starting out.
You can avoid those frustrations and find the right balance between enough traffic and specific traffic through solid keyword research. That process will allow you to find search queries with enough volume and buying intent.
If you’ve been running your Shopping campaigns for a while, you can also use the Search terms reports as a source of keyword research. These will show you actual search queries (and the sales data to go with them).
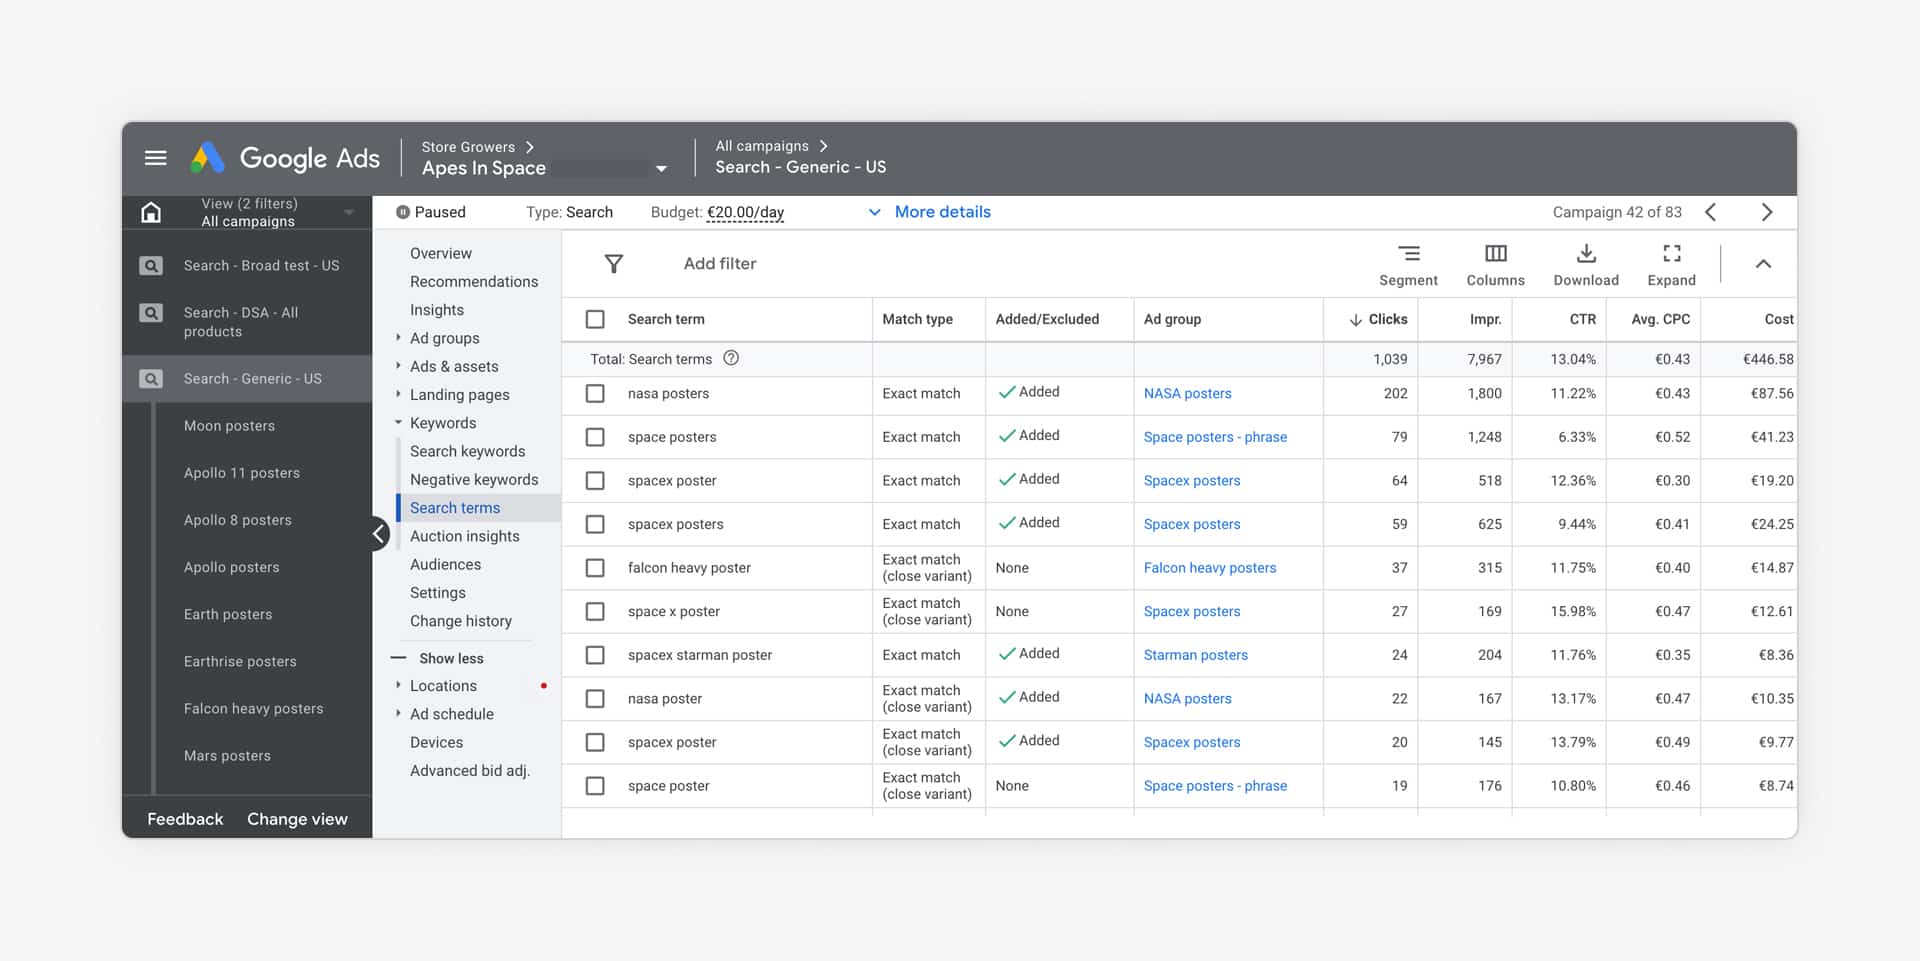
When you have a list (or spreadsheet) full of interesting keywords, it’s time to add them to your campaigns.
Google makes this really easy. You can simply copy/paste the search queries you’ve found.
But if you do that, you run into one of the most common mistakes with Search Ads: using the wrong keyword match types.
These are modifiers that you add to your search queries, and they indicate to Google how close you want them to find variations on your keyword.
Here is a quick overview of the different keyword match types:
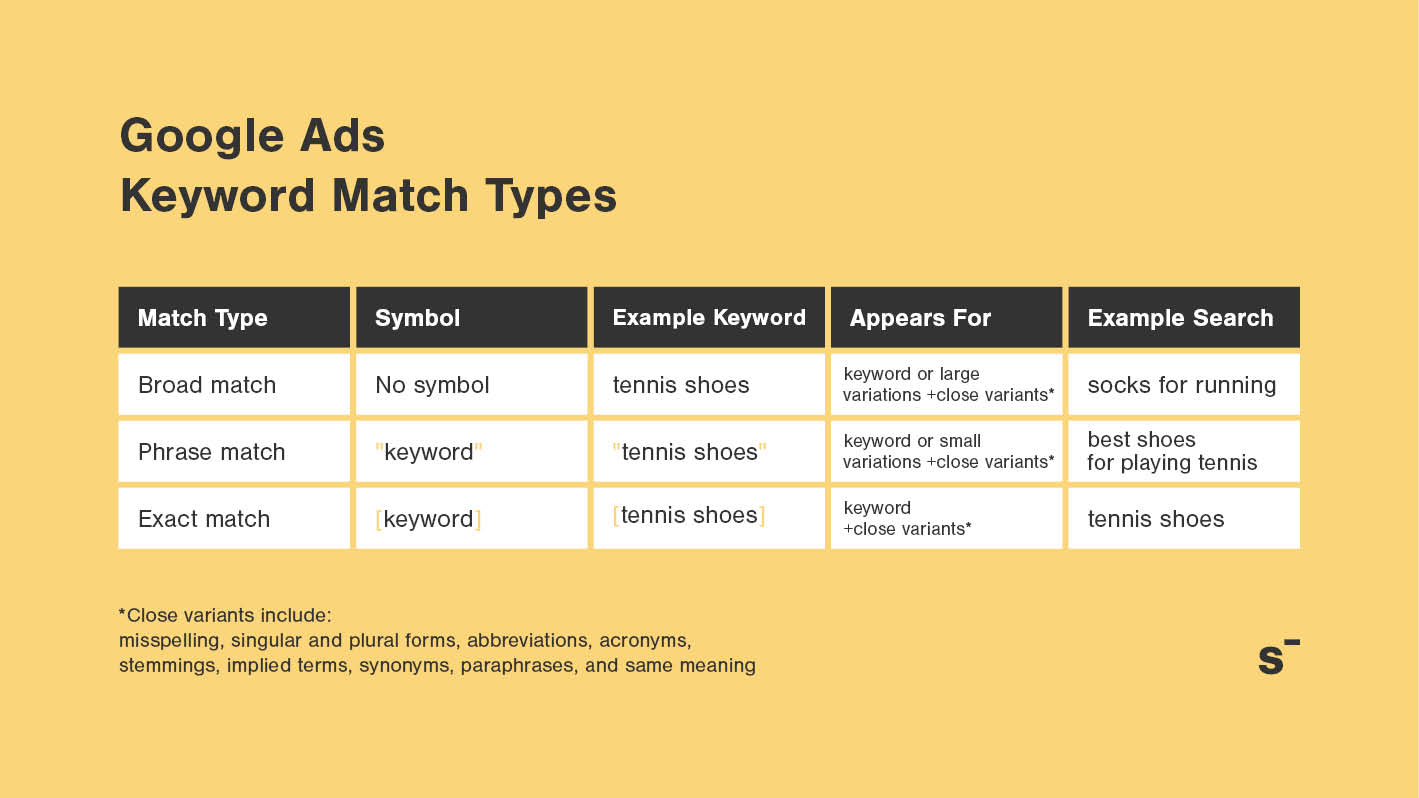
If you don’t do anything special, Google will use broad match, the default match type.
Unfortunately, that also means that you tell Google to look for the keyword you provide, and many others like it.
If you add tennis shoes as a keyword, Google might show your ads for hiking boots.
If this sounds crazy to you, that’s because it is 😭
So be sure to learn about phrase and exact match types and how to use these different match types in your campaigns.
Pro tip: The more specific the better to start out with. That counts for both your keywords and their match type.
Search Ads Campaign Structure (Intermediate)
Similar to Shopping Ads, campaign structure is essential to run successful search campaigns.
A good structure ensures the right ad appears for the right search query.
A good structure makes your campaigns easier to manage and ensures you have good quality scores for your keywords.
That means you have to decide on practical things like:
- Which campaigns do you create?
- Which keywords should you put in the same ad group?
- How many match types should you use?
When you get to this stage, there is so much conflicting advice. (Like the whole debate on whether or not to use single keyword ad groups)
But for ecommerce, there is an extra dimension because you have so many different pages on your site.
So should you create ads for each product? Or do target (sub)category pages?
This really depends on your products, and how popular they are. It makes no sense to create ad groups (and ads) for each one of your products if no one is searching for that specific brand or product. Then you’re better off creating an ad group with ads that target the category name.
Here are a couple of other rules of thumb that might help:
- Split branded and non-branded searches into different campaigns
- Split campaigns per country & language
- Replicate the structure you have on your website with your campaigns
Search Ads (Beginner)
Besides keywords, creating the actual text ads is another hurdle you need to take.
They’re not difficult to put together but can be quite time-consuming if you want to do them well.
When you’re creating the first ad, you literally have a ton of options:
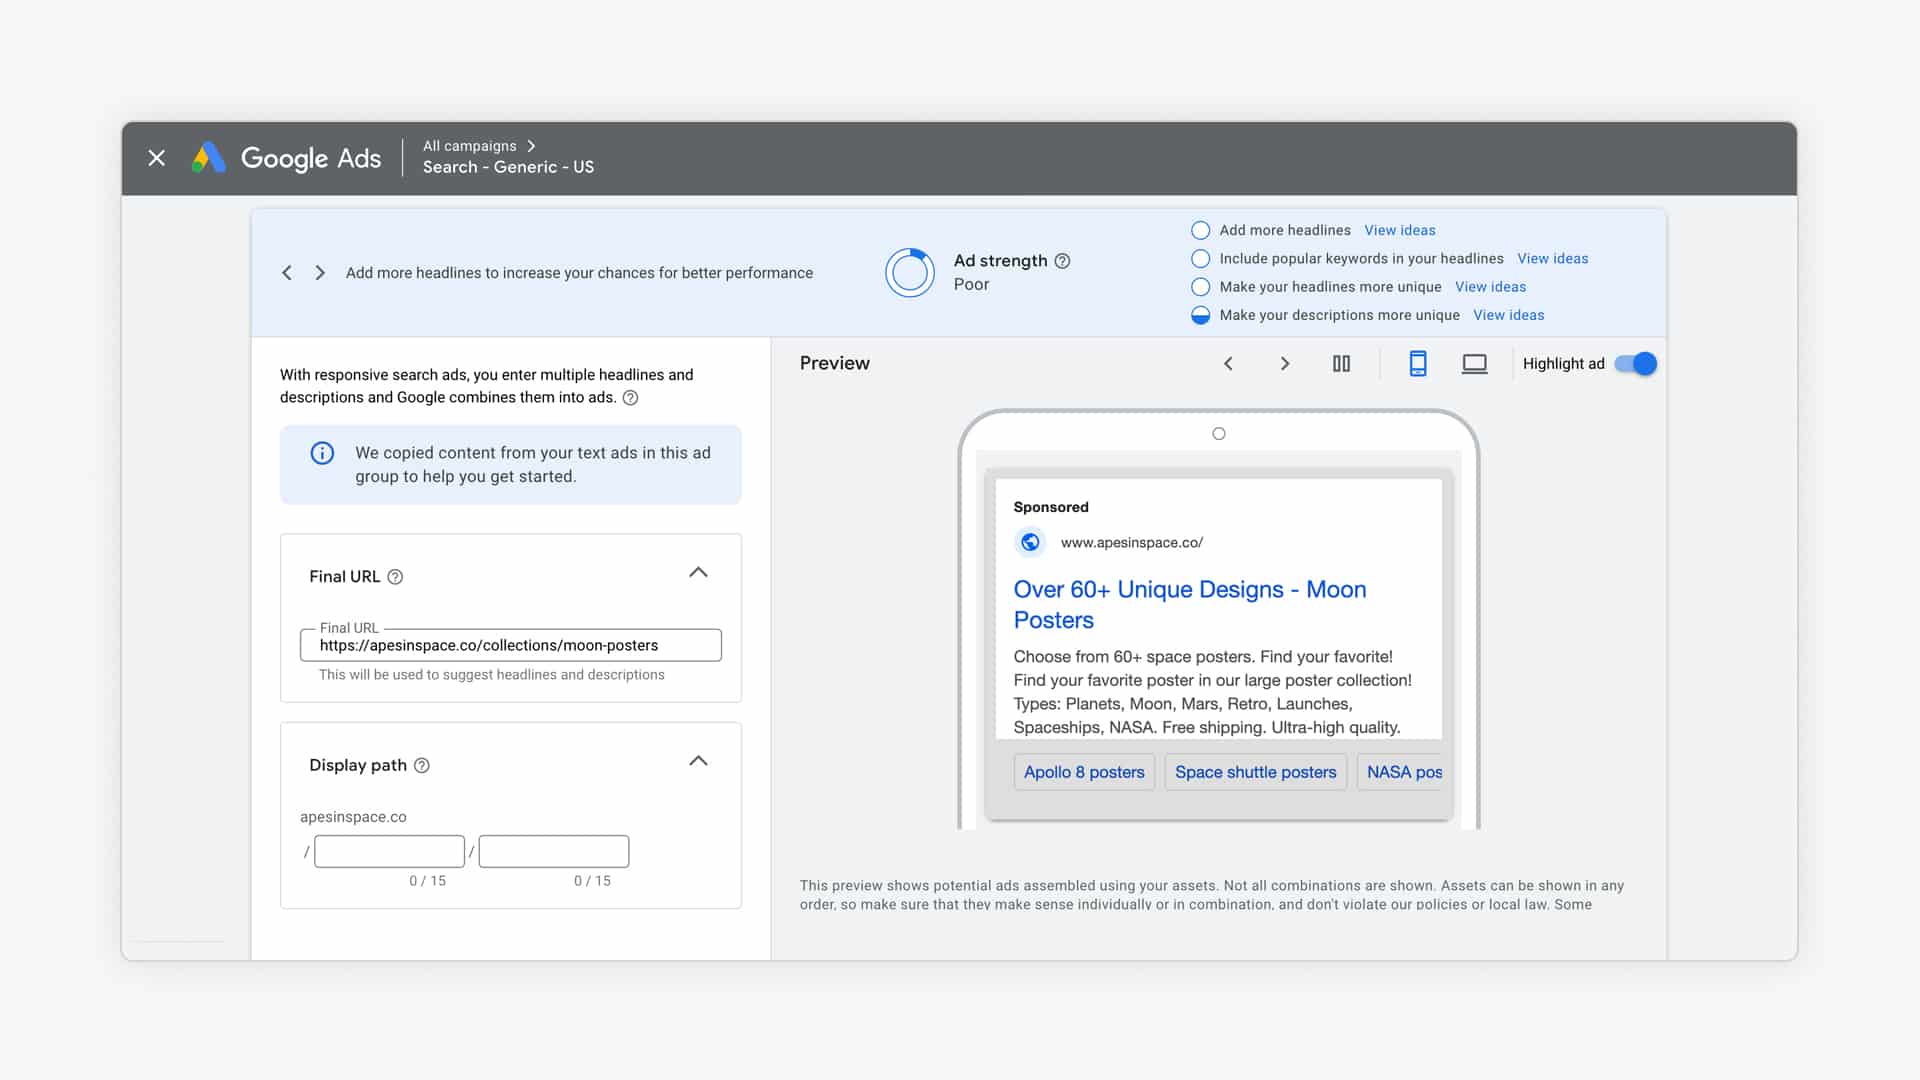
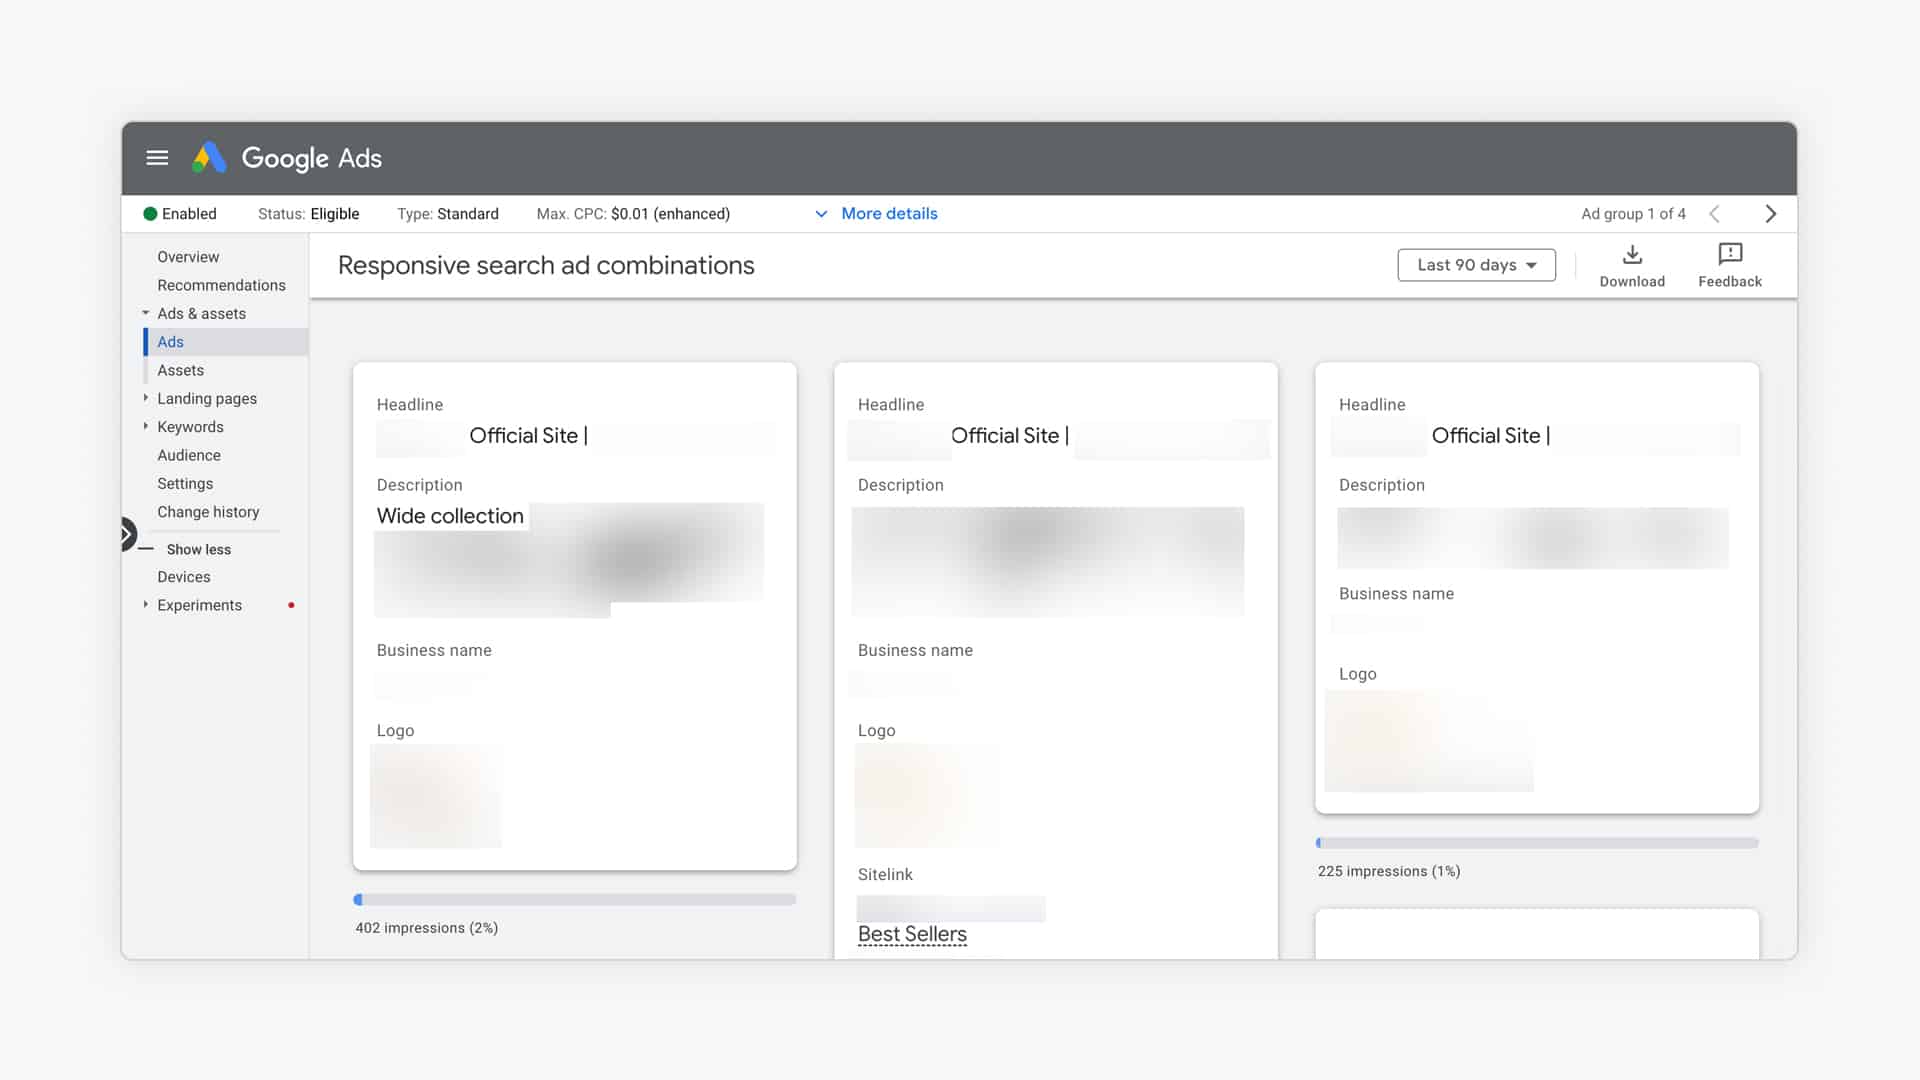
The main ad format for Search Ads is Responsive Search Ads (RSAs). You provide Google with a bunch of assets: headlines, description texts, etc, and they find the ideal combination.
When your ad has been running for a while, you can see the top headline and description combinations:
To speed up your efforts if you have a lot of ad groups and campaigns, you can copy/paste ads.
Then you can customize them according to how much time you’ve got available.
Here are a couple of other ideas on how to improve your ads:
- Minimum: start with a good ad that you reuse across ad groups, only tweaking headline 1
- Upgrade #1: Create a second RSA with more assets (more headlines, description text, etc.)
Ad Assets / Extensions (Beginner)
Ad assets (used to be known as ad extensions) are an essential part of your campaigns. They help you grab more real estate in the search results, increasing the chance of a click.
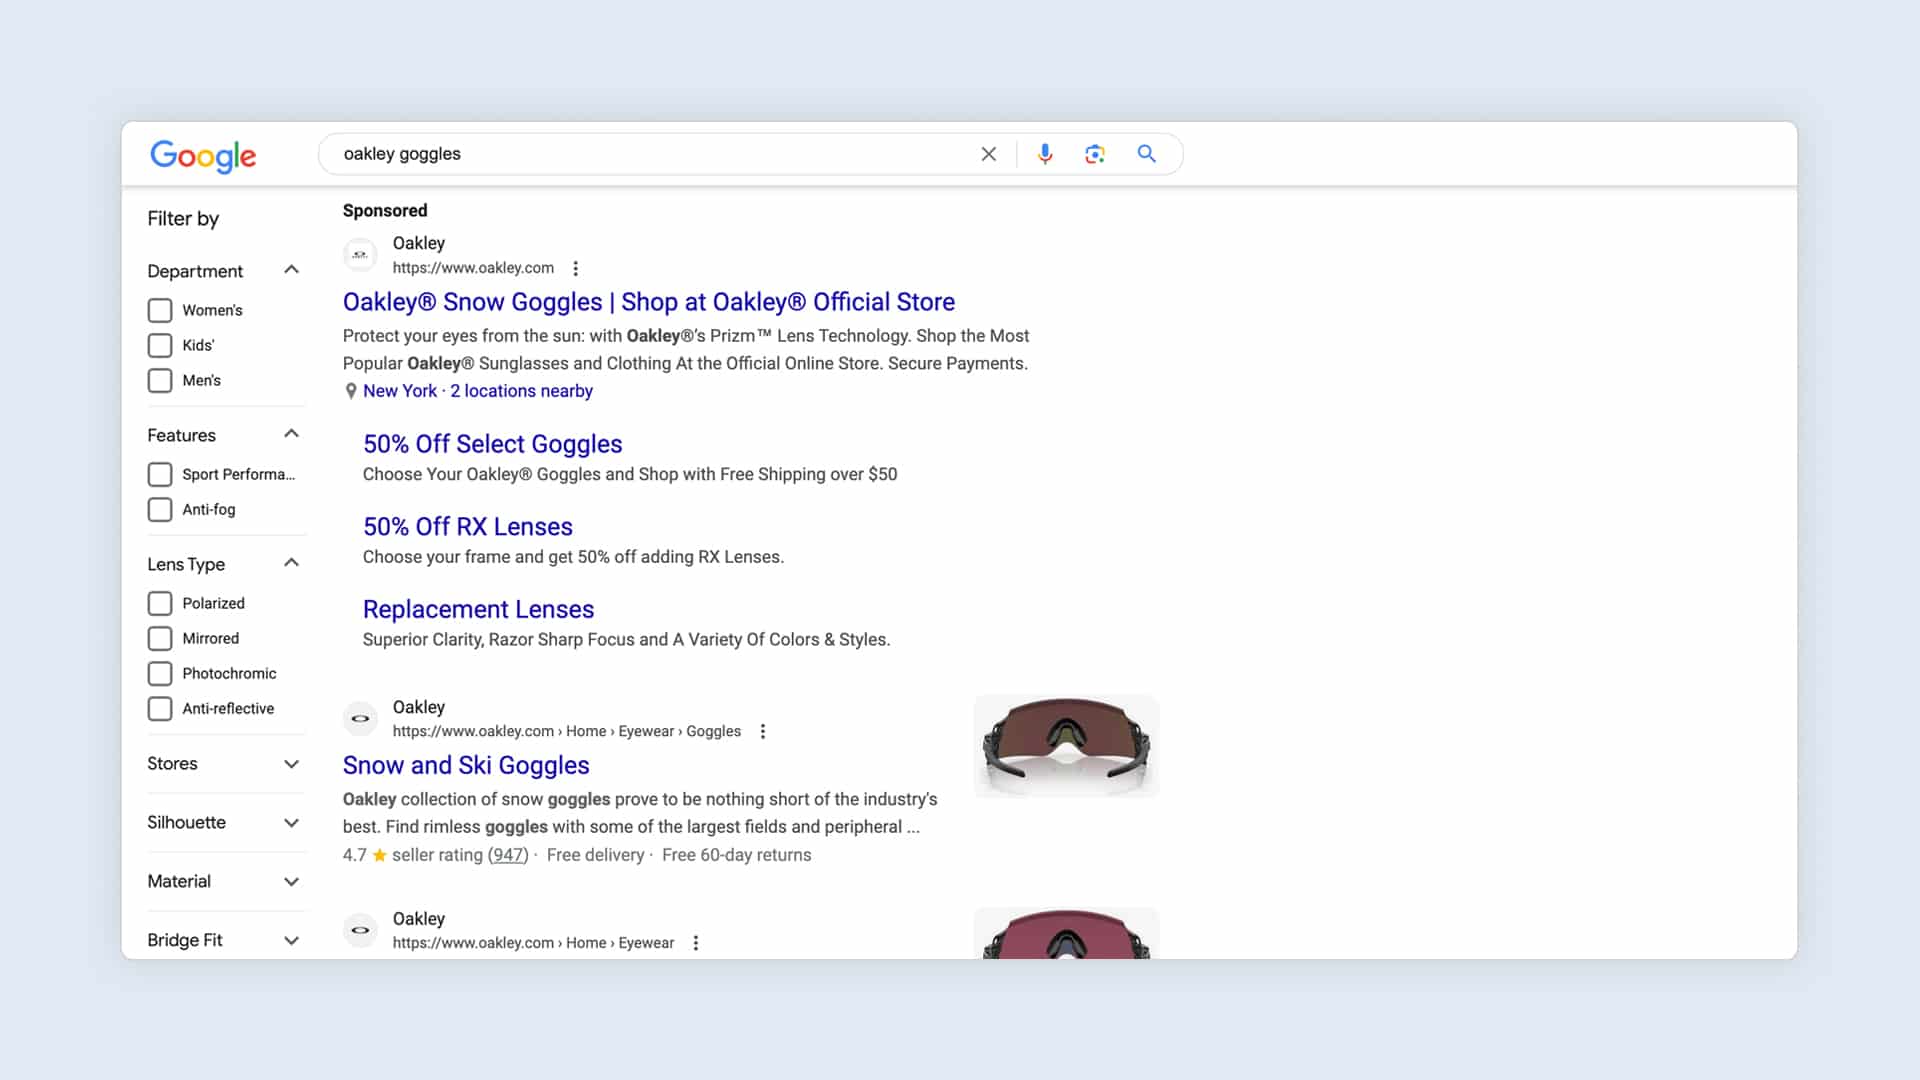
They usually show up most if you’re showing up in position 1-2 of the search results. (Below they also appear, but their visibility is a lot lower)
Ad extensions like sitelinks, callouts or call assets have been around for a while, and most accounts at least have a couple of them active.
But Google keeps experimenting with new types like structured snippets, price, or promotion assets. If your competitors aren’t using them, you have the advantage to stand out even more.
Provide enough of them so Google can cycle through them and figure out which ones work best.
A special type of ad assets are the account level automated assets.
These are extras that Google adds to your ads. And they’re not always what you’d like them to add.
Here is an example of an ad by DTC brand Away:
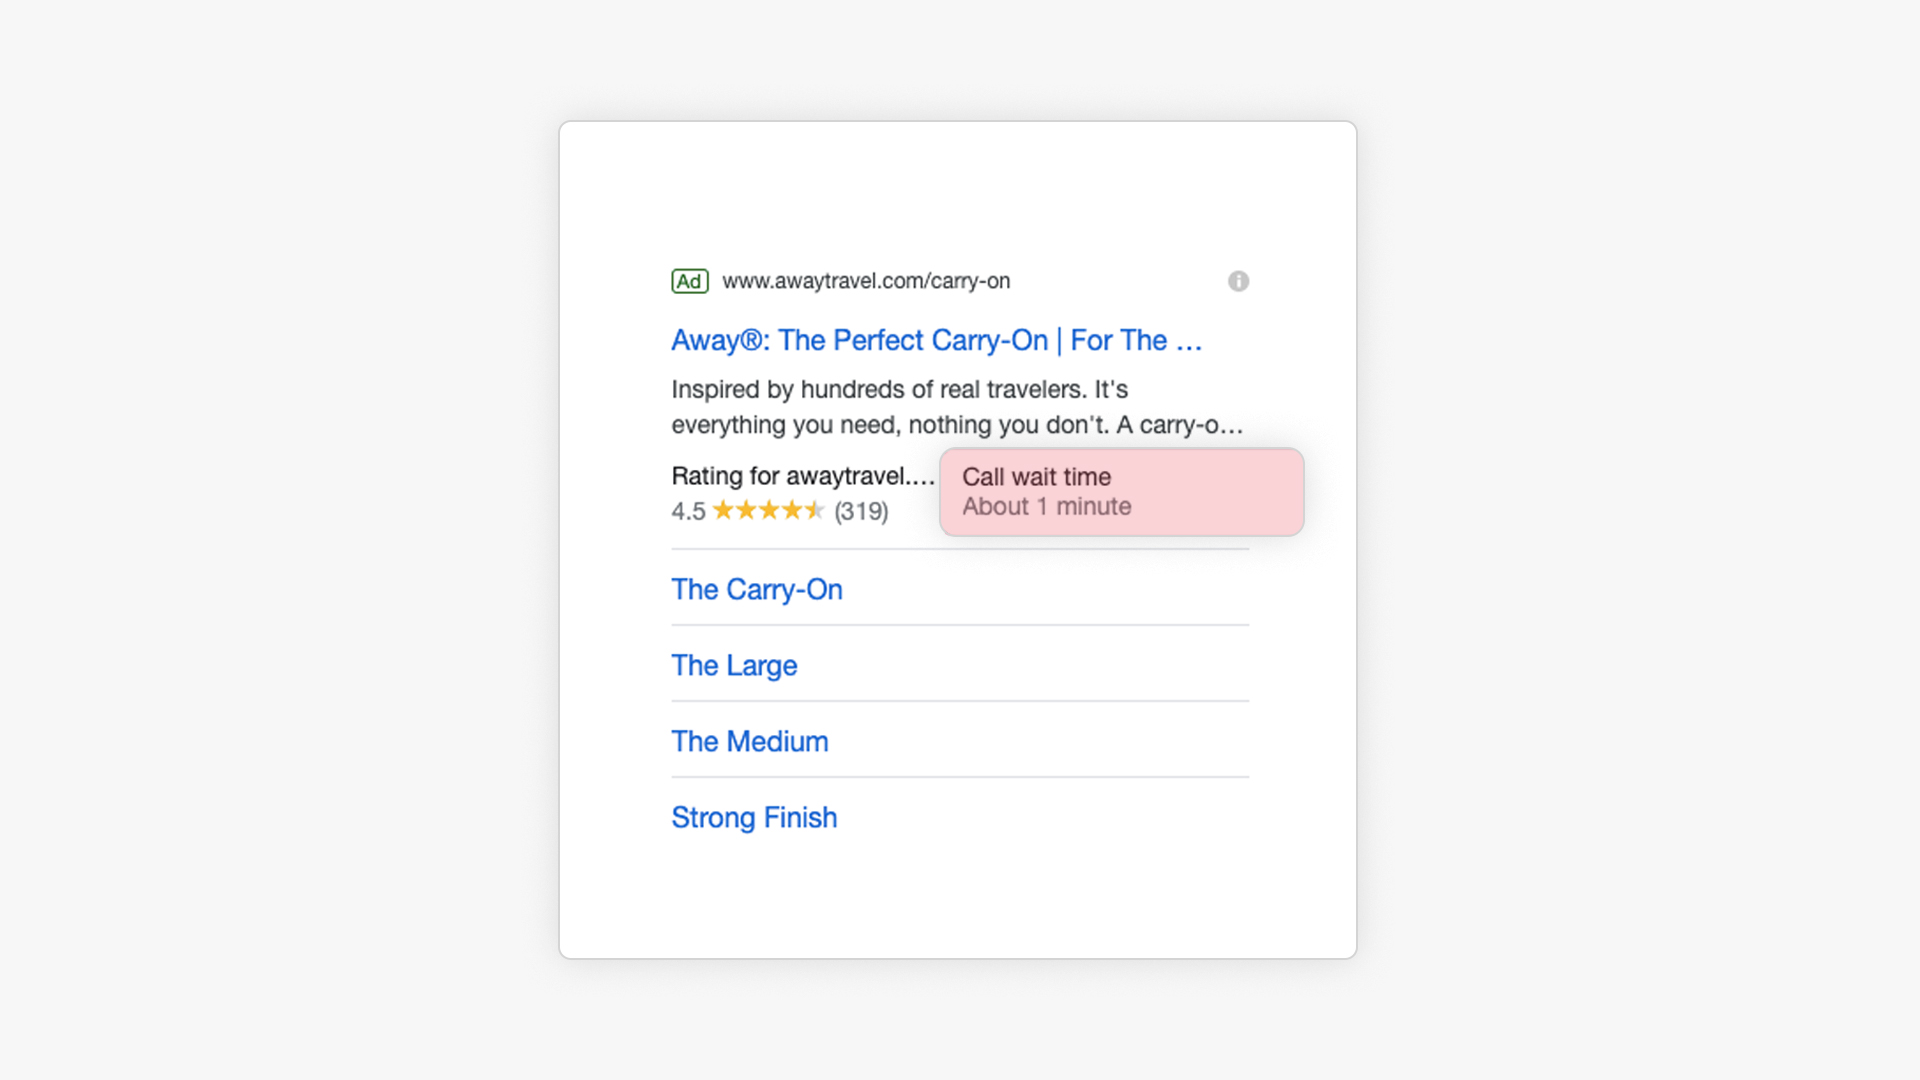
For ecommerce, the most important automated assets are the seller ratings:

They grab the attention and show the strength of your store (in both ratings and count). They’re super valuable, so have a look at this article on how to implement them.
Bidding (Intermediate)
People always want to know the BEST bidding strategy.
But as with pretty much all of these intermediate sections, it depends on the situation.
Let me also say that you don’t NEED to get fancy and use more complex bidding strategies, simply because you’ve been running the campaigns for a while. (I still use Manual CPC in some accounts that I’ve been managing for years).
Because there is no clear answer, you’ll need to test to figure out the best option for you. (I’ll show you in the “Experiments” section how to effectively test bidding strategies).
Starting out, Manual CPC is often a good start. Once you’ve got more conversions coming in, you can start testing automated bidding strategies like Maximize Conversions, target CPA or target ROAS, both really well suited for ecommerce campaigns.
Compare the metrics before and after and adapt your approach accordingly.
Dynamic Search Ads (Intermediate)
If you’ve followed the advice above, you can see that getting Search Ads right is a lot of work.
There are keywords to find, and ads to create.
If you use Dynamic Search Ads, you don’t have to bother with any of these. Instead, you provide the same product feed that you use with your Shopping Ads.
Then you select which pages, and categories should be included.
Finally, you create a few ad “templates”. Google will automatically populate the Headline with dynamic content.
All you need to do is to provide the description texts:
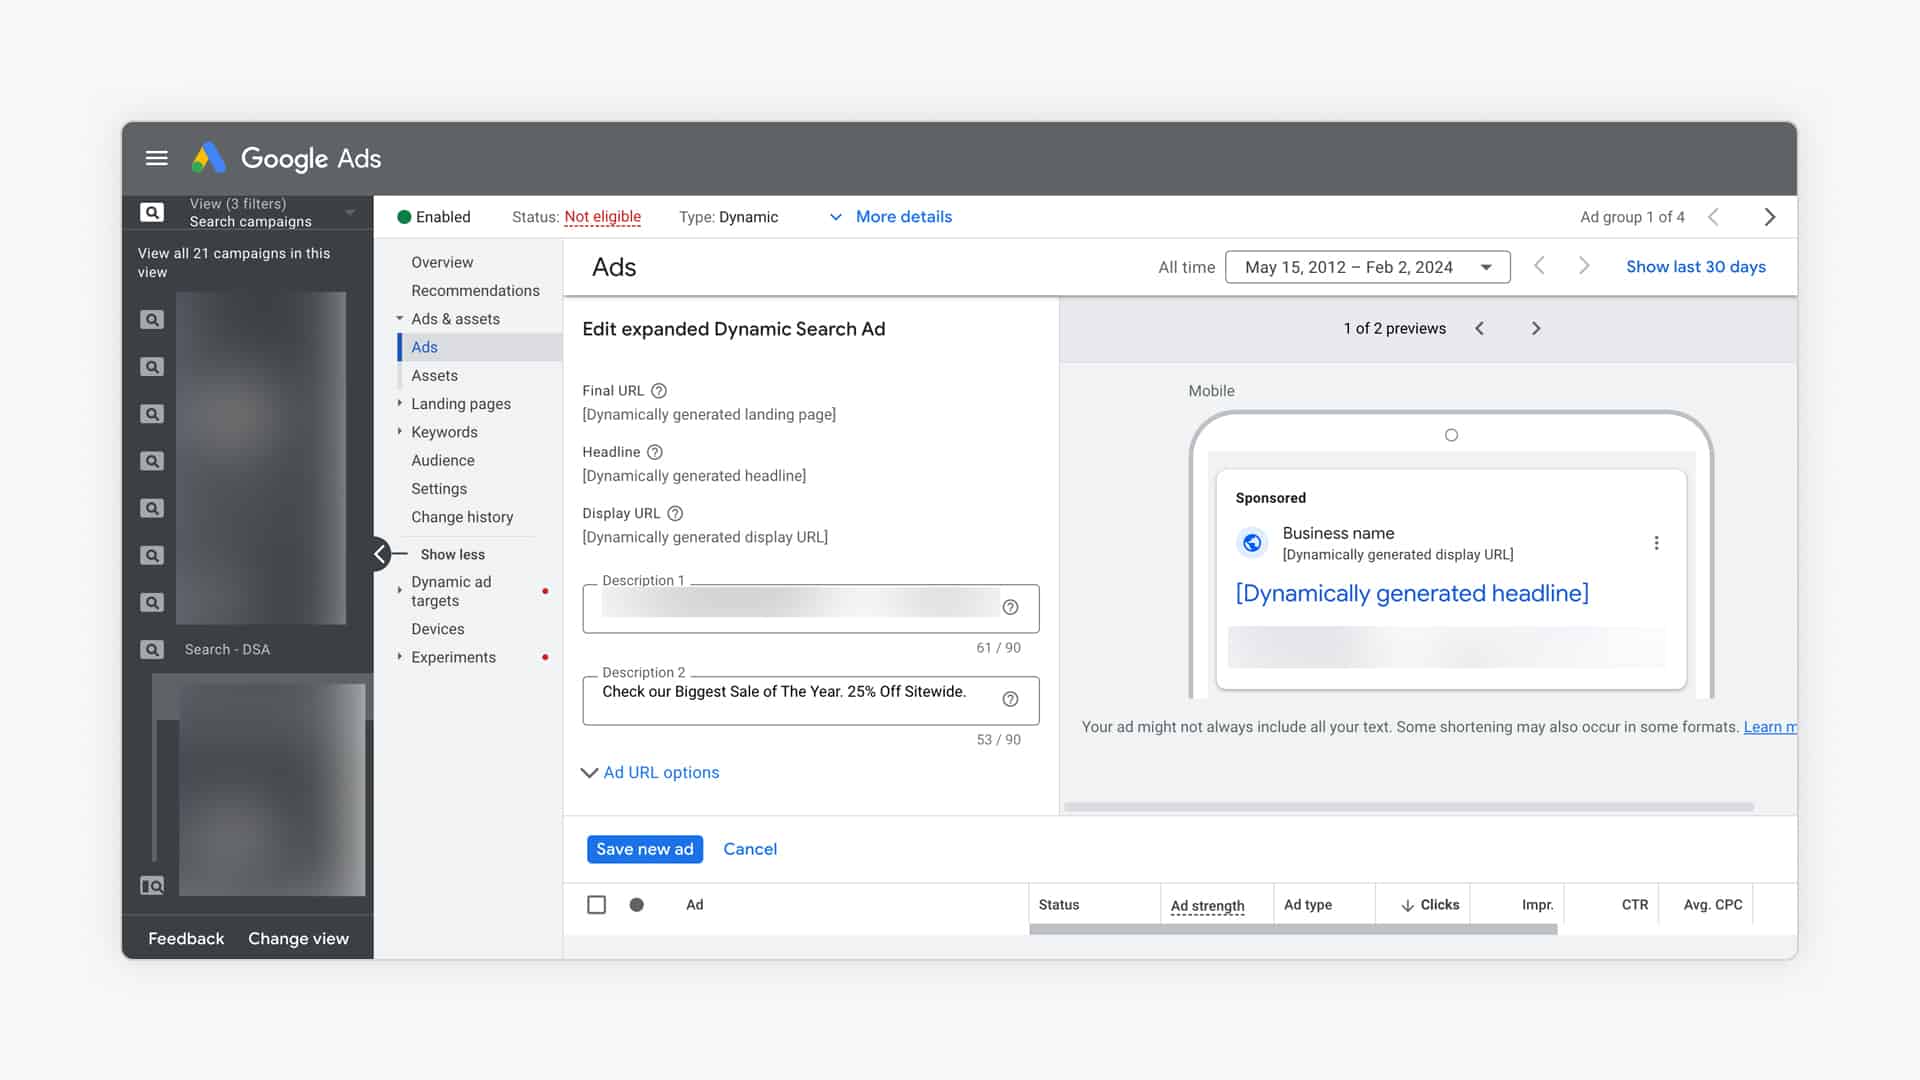
Here is where a good campaign structure can make a difference. The more granular your ad groups are, the better these ad templates will be adapted to the products that they are promoting.
You can see that these Dynamic Search Ads allow you to quickly set up campaigns for a lot of products.
I like to use this campaign type as a very low bid catch-all campaign that targets all products or categories for which I haven’t created a specific campaign.
When you’re running this type of campaign, keep a close eye on your search terms report and exclude keywords that you are already advertising on in the more specific campaigns or that are a poor match in general.
Google Ads Scripts (Expert)
If you feel like you’re limited in the reports you can see in Google Ads and Analytics, or you’d like to optimize your campaigns based on things that aren’t available by default, Google Ads scripts can help you out.
These are little snippets of Javascript that you run in the background. If you’re not a programmer, they can get quite technical. But luckily there are plenty of scripts available that you can copy/paste and slightly modify. Or you can use tools like ChatGPT to help you to write your own scripts!
Two of my favorite scripts:
If you want to know more, check out our tutorial on Google Ads scripts.
Google Ads Experiments (Expert)
Experiments are a special feature in Google Ads that allow you to A/B test every part of your campaigns.
The process is pretty simple:
- Create a draft version of the campaign you want to change
- Make the change (for example switch to a different bid strategy)
- Launch the experiment
- Check the result during and at the end of the test
- Roll out the changes to your campaign or set up a new test
You can test all sorts of things, but the most common experiments I run are bidding strategies.
Here is what a report of such a test looks like when it’s over:

You can see the different KPIs, and the ones that are marked with a blue star are the ones where a significant difference was noted.
Google Performance Max
A Performance Max campaign is a campaign type that shows ads across all of Google’s placements: Search, Shopping, Display, YouTube, Discover, and Maps.
While it looks like the perfect campaign for starting advertisers, you’ll see that all sections here are labeled ad Intermediate. That’s because this campaign type heavily uses automation and doesn’t provide a lot of visibility as to where your ads are showing.
Let’s take a look a the different elements.
Campaign Structure (Intermediate)
Like other campaign types we’ve covered above, how you organize your Performance Max campaign is key.
Do you group everything in a single pMax campaign? Do you create multiple asset groups? Etc.
Because the campaign relies so heavily on automation, it’s important not to over-segment your campaigns. You want to make sure that you have at least 30 conversions over 30 days in a campaign.
If that’s already a stretch for your account, you’re better off sticking with Standard Shopping.
When it comes to organizing your asset groups inside of a campaign, a good starting point is to think about all of the products that are included in that asset group.
If you’re adding headlines, images, or videos to the asset group, do they fit all the products you’ve included? Or just to a selection of them?
Tackling this from another angle is to organize your asset groups around the category or subcategories on their site.
Creative (Intermediate)
When creating a new Performance Max campaign, Google Ads will prompt you with this screen:
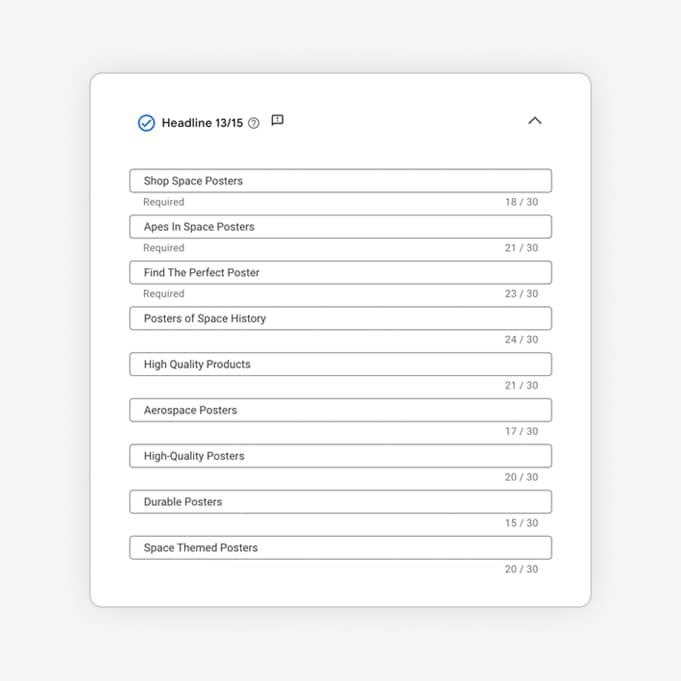
So naturally most advertisers add all the headlines, description texts, images, logos, and videos they can think of.
The first consequence of this is that by doing this, you’re opting into showing your ads on all possible placements.
By NOT providing any assets except for your product feed, you’re able to run pMax campaigns that are almost 100% focused on Shopping Ads.
This is still a very solid approach
To read more about the details of such an approach, check our detailed guide on pMax optimization.
Audience signal (Intermediate)
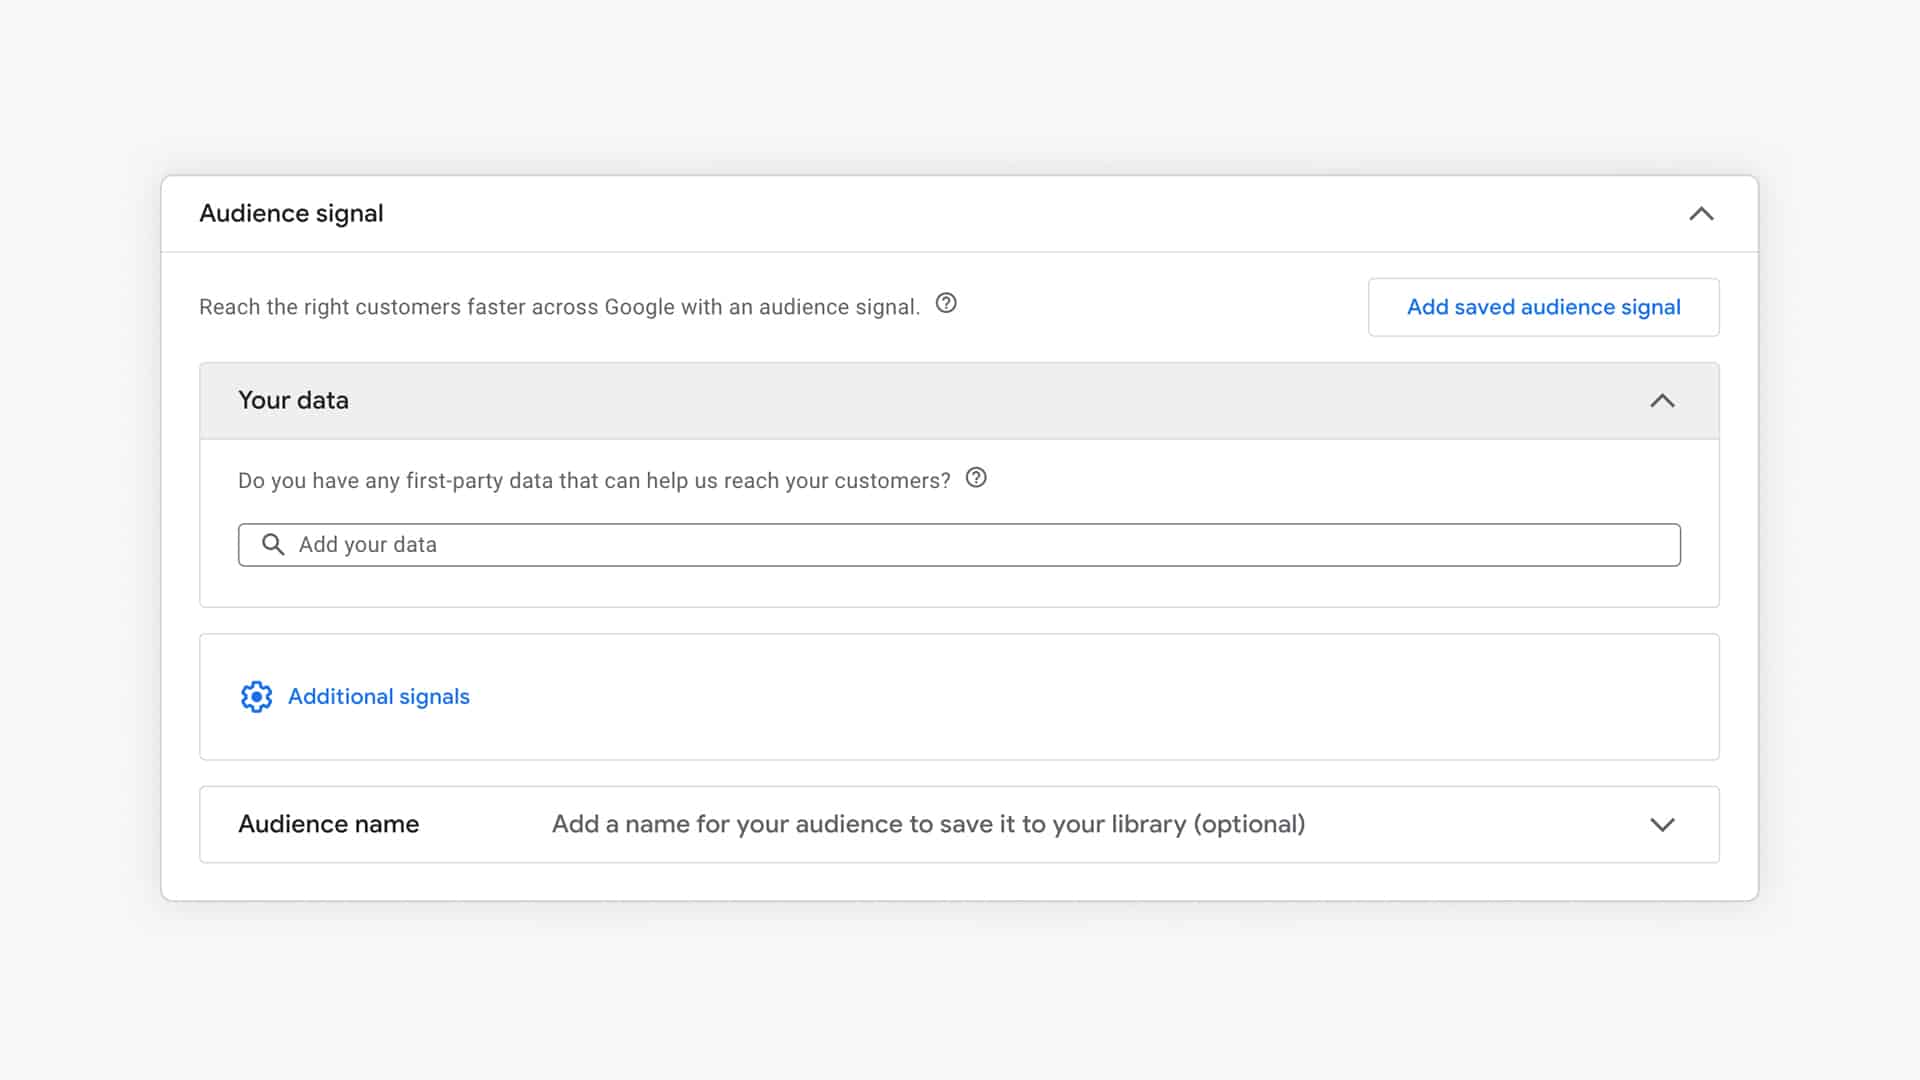
Another unique thing about Performance Max campaigns is that you’re not actually selecting the audience that you want to target.
Instead, you add an audience signal, which Google will use to start showing ads. Then it will expand based on where the targeting is effective.
Search themes (Intermediate)
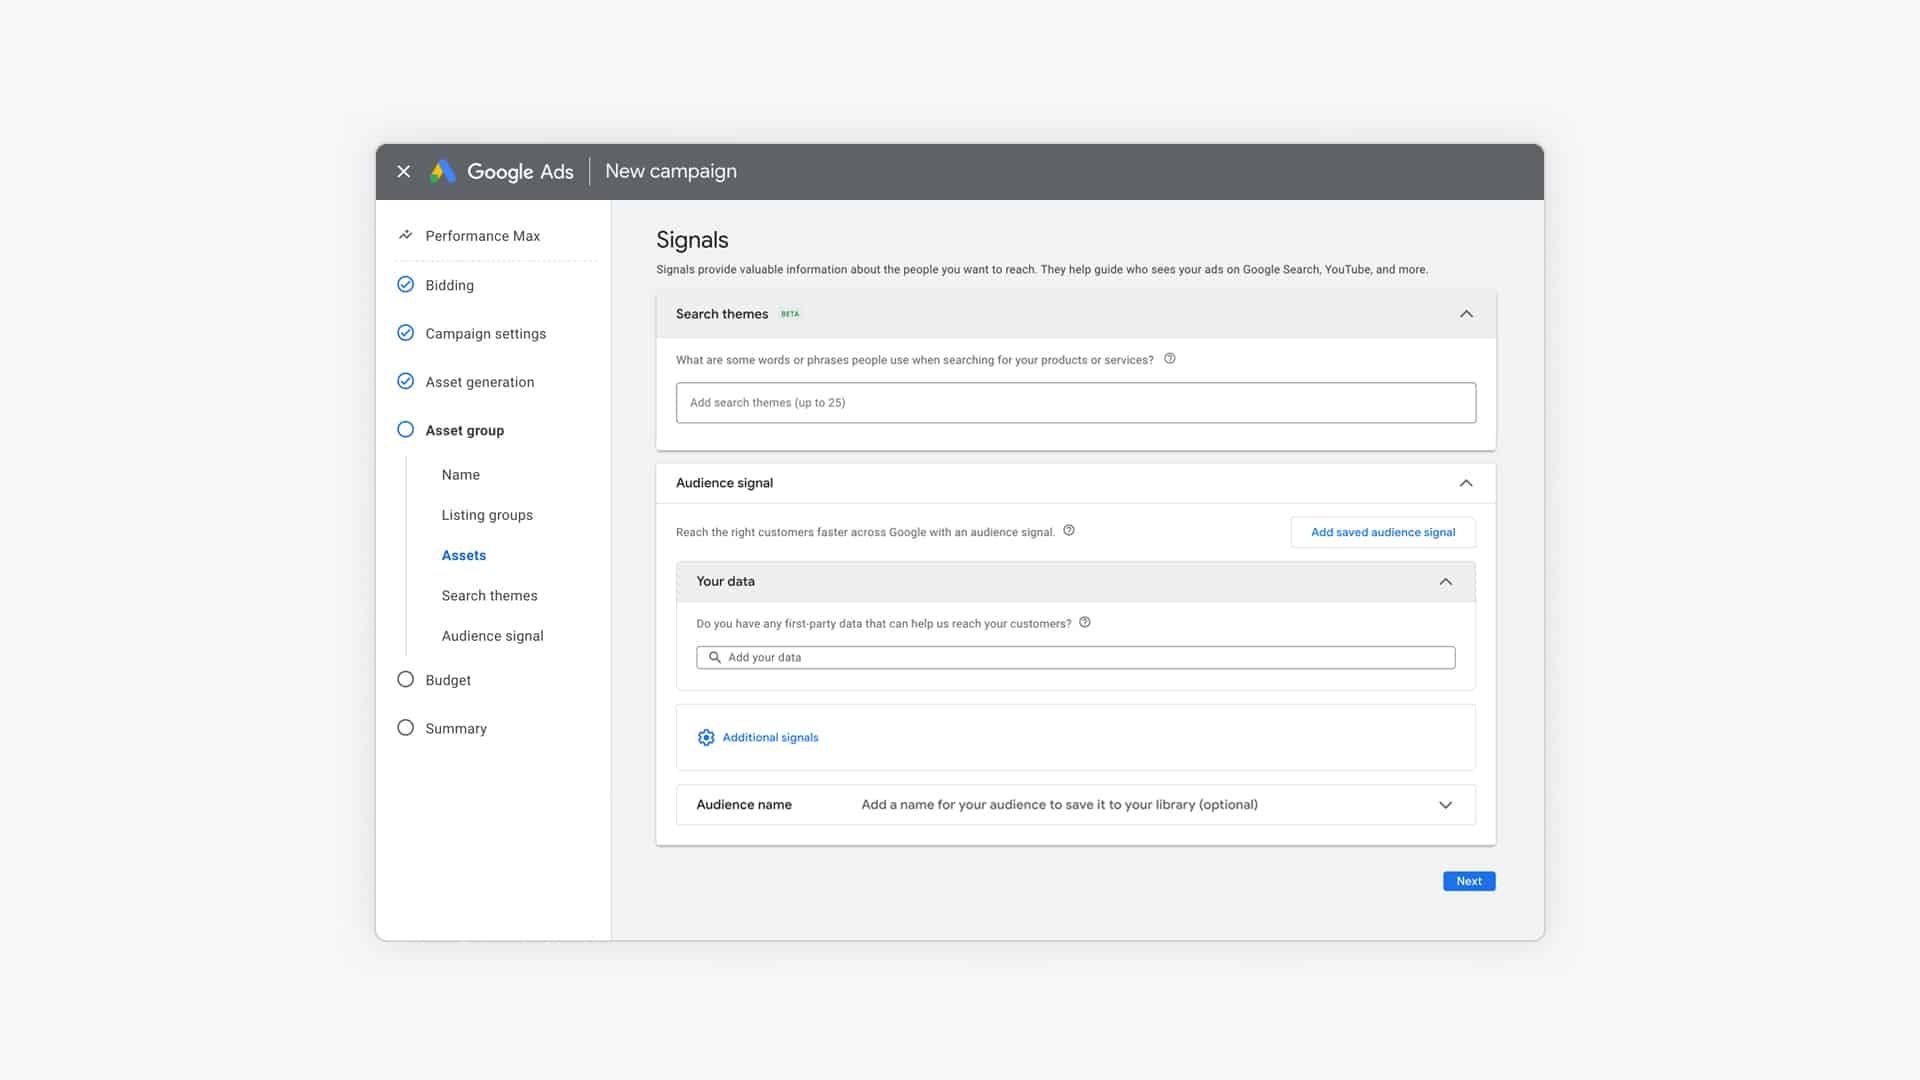
Besides the audience signal, another targeting criterion is the Search themes.
These are basically keywords that you know your potential customers are searching for. You can add up to 25 of these keywords to each asset group:
To understand more about what it takes to run an effective Max campaign, I highly recommend our guide to pMax.
Google Display Ads
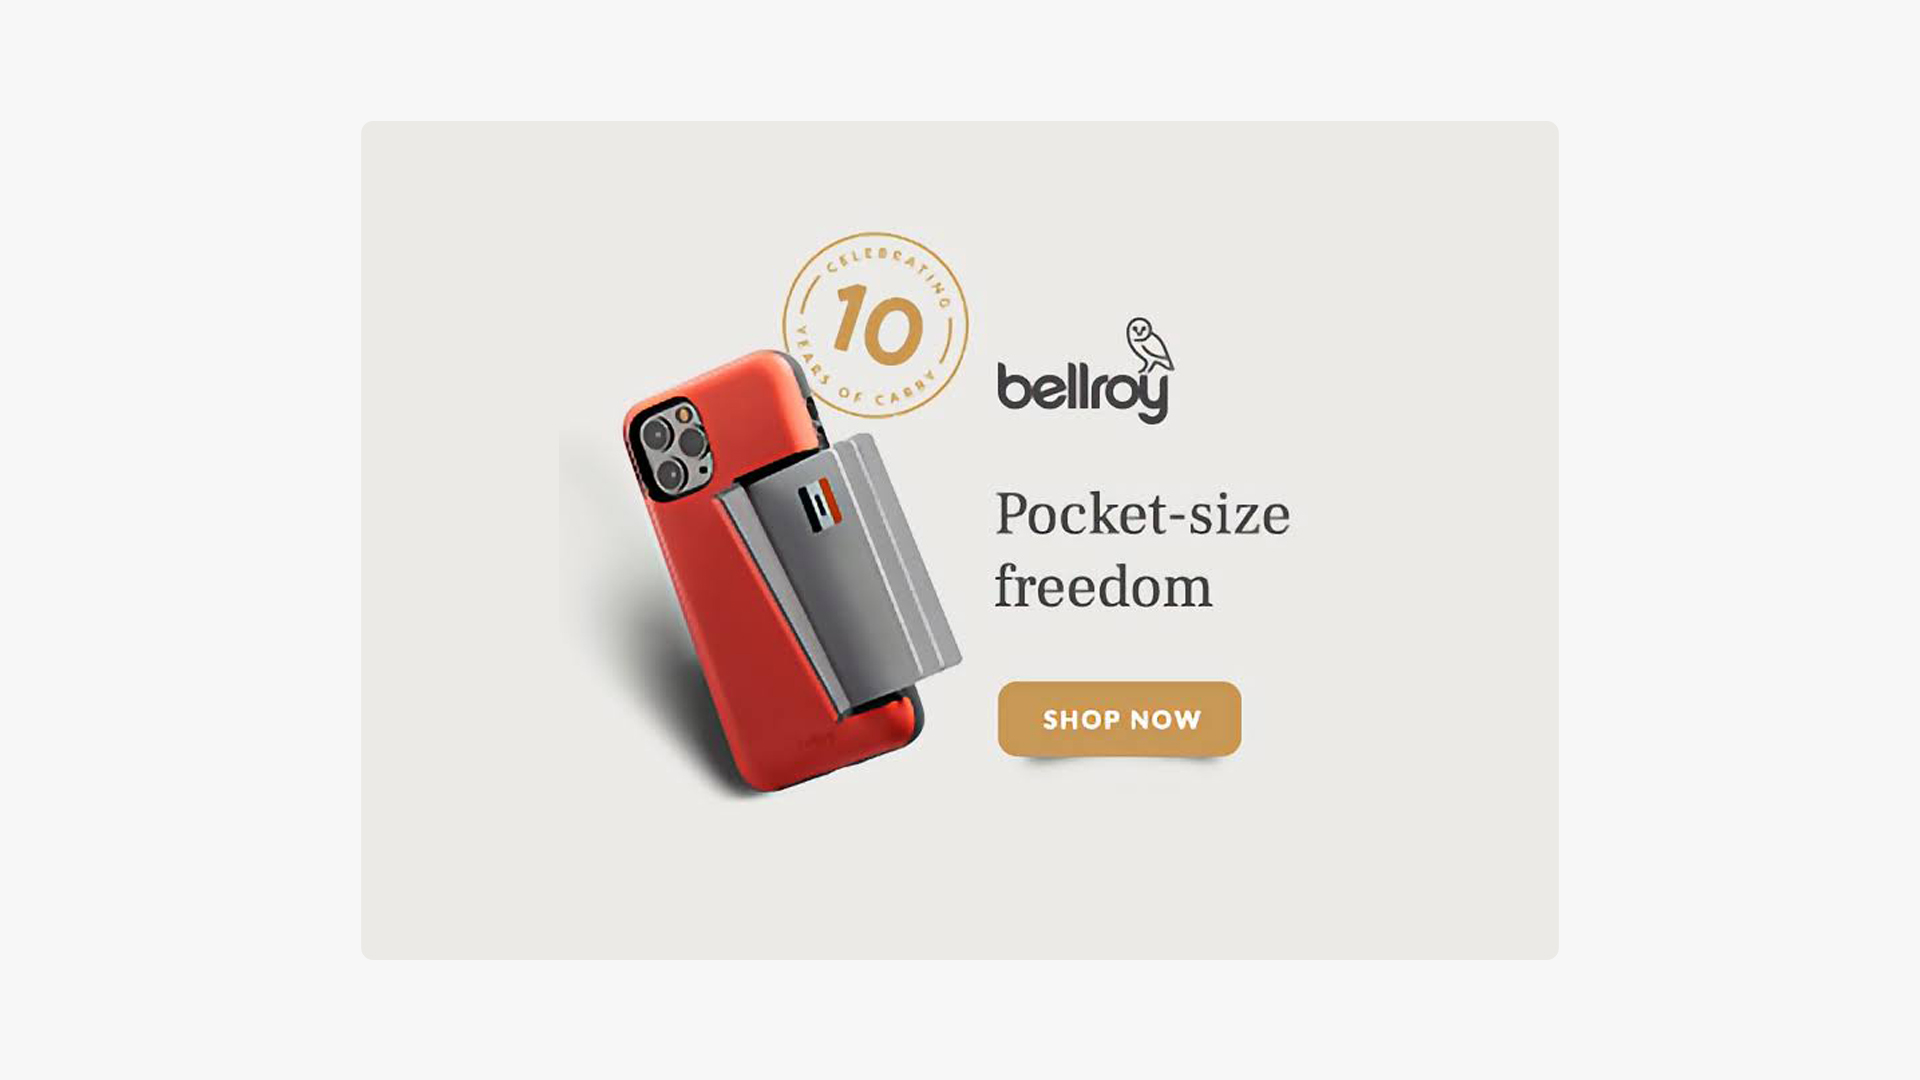
Display Ads are text, image, or video ads that show up on the Google Display Network, a group of Google-owned properties and third-party websites.
Here is an example from wallet brand Bellroy:
This is an ad network with unlimited inventory. It includes:
- YouTube
- Gmail
- 2 million websites (and apps) that show AdSense ads
Google Display campaigns are also managed from the Google Ads interface, but it’s a completely different channel.
To run effective Display Ads, we need a shift in mindset.
With Shopping and Search Ads, we’re showing ads to people who are actively looking for products.
But with Display Ads, you’re showing up to people who aren’t necessarily searching out your products. So you need to interrupt them to be effective.
An important caveat with this section:
Display Ads (and more particularly the tracking codes that power them) are the reason more than 20% of Internet users use ad blockers. It’s a trend that continues to grow. I also use one. It’s also an area that’s infested with click fraud.
Personally, I find Display Ads are a remnant of the past and in most accounts that I see, they aren’t producing good results.
Creative (Beginner)
Display Ads are very similar to the regular kind of Remarketing Ads I’ve shown you above.
The most common ones are the Responsive Display ads where you add logos, images, headlines, and description texts, which Google combines into its most optimal forms.
Most people aren’t big fans of how the “default” ads look. A common complaint is that it doesn’t look like their brand.
Especially because many of the ads you see (of companies with big budgets) look really good. Like the one that I showed you at the start of this section by Bellroy.
You can skip the default look and design your own banners. But that can be a pricey affair (also because you need them in all of the different sizes).
I’m not saying it’s not worth it, but it might be good to start with the default ones to test the waters and invest more money into it once you see some traction.
What you put on the banners is a whole different discussion. They can be straightforward:
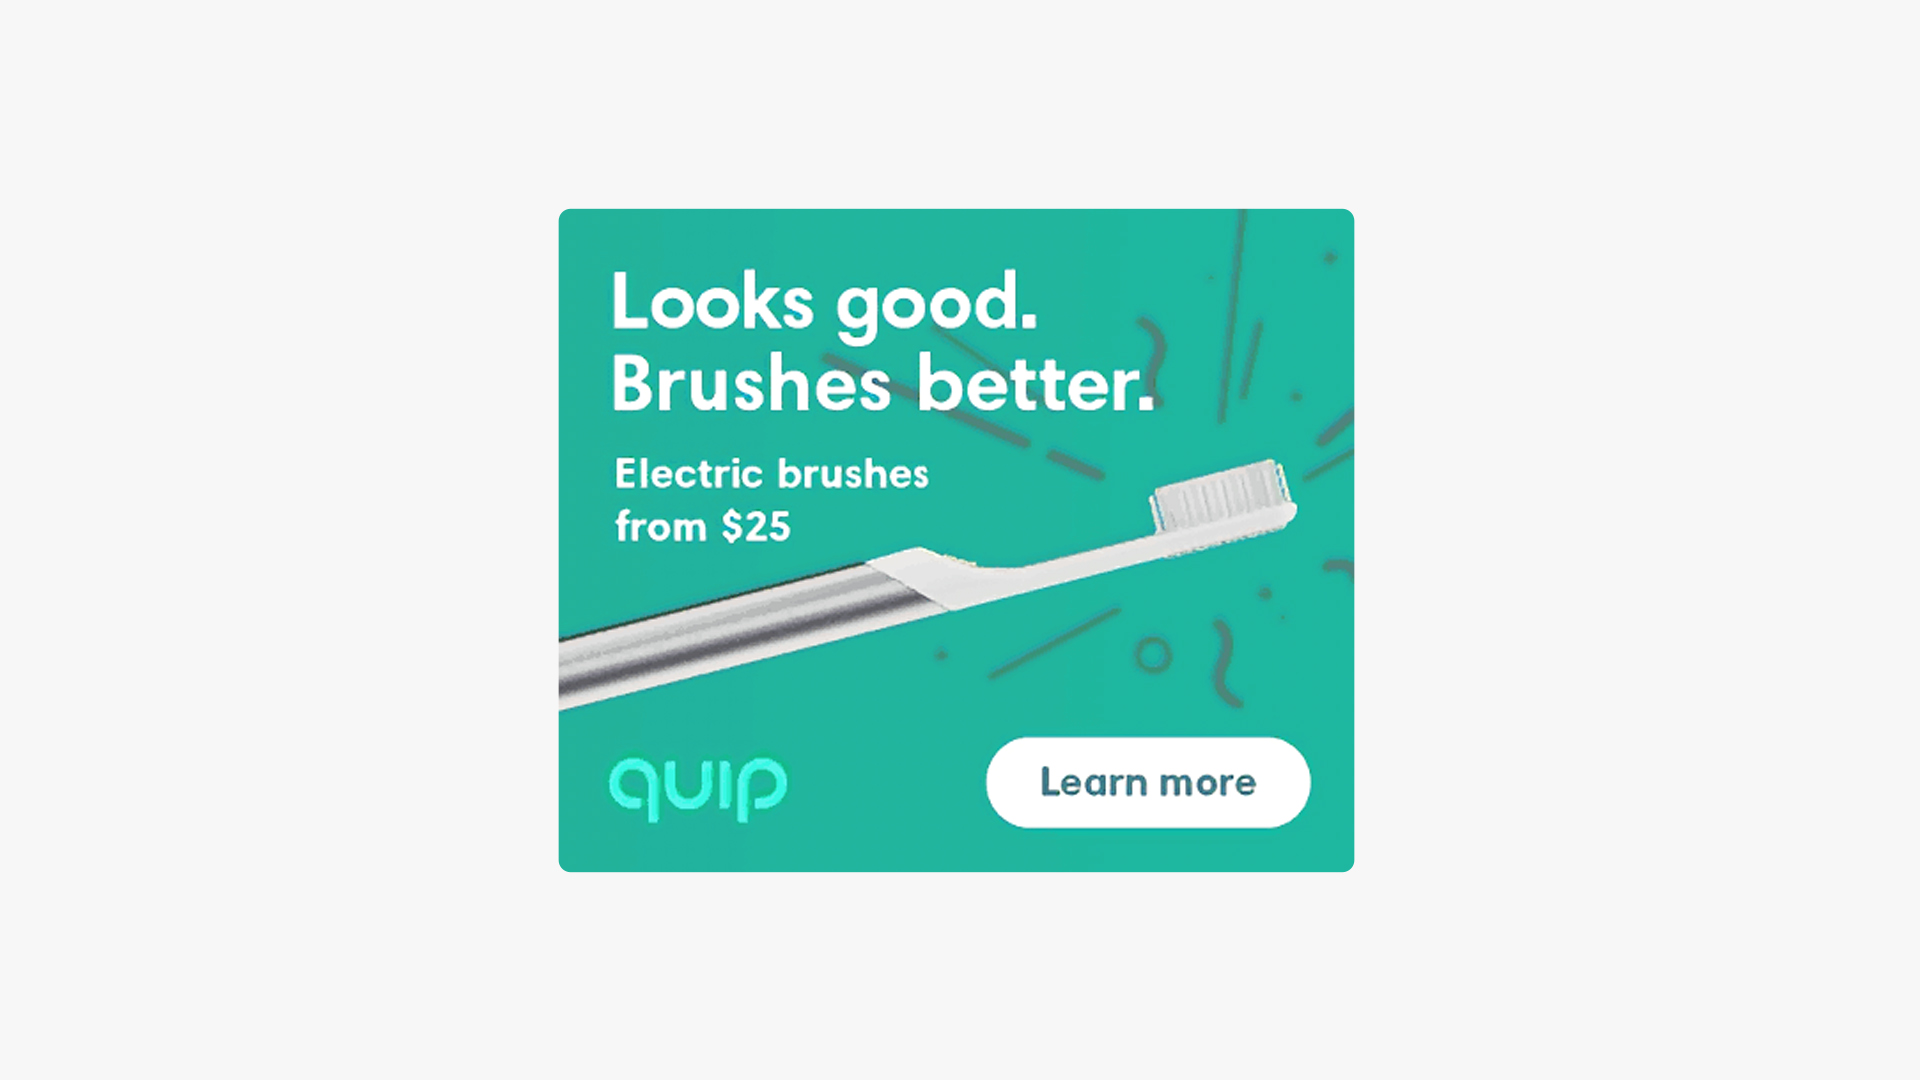
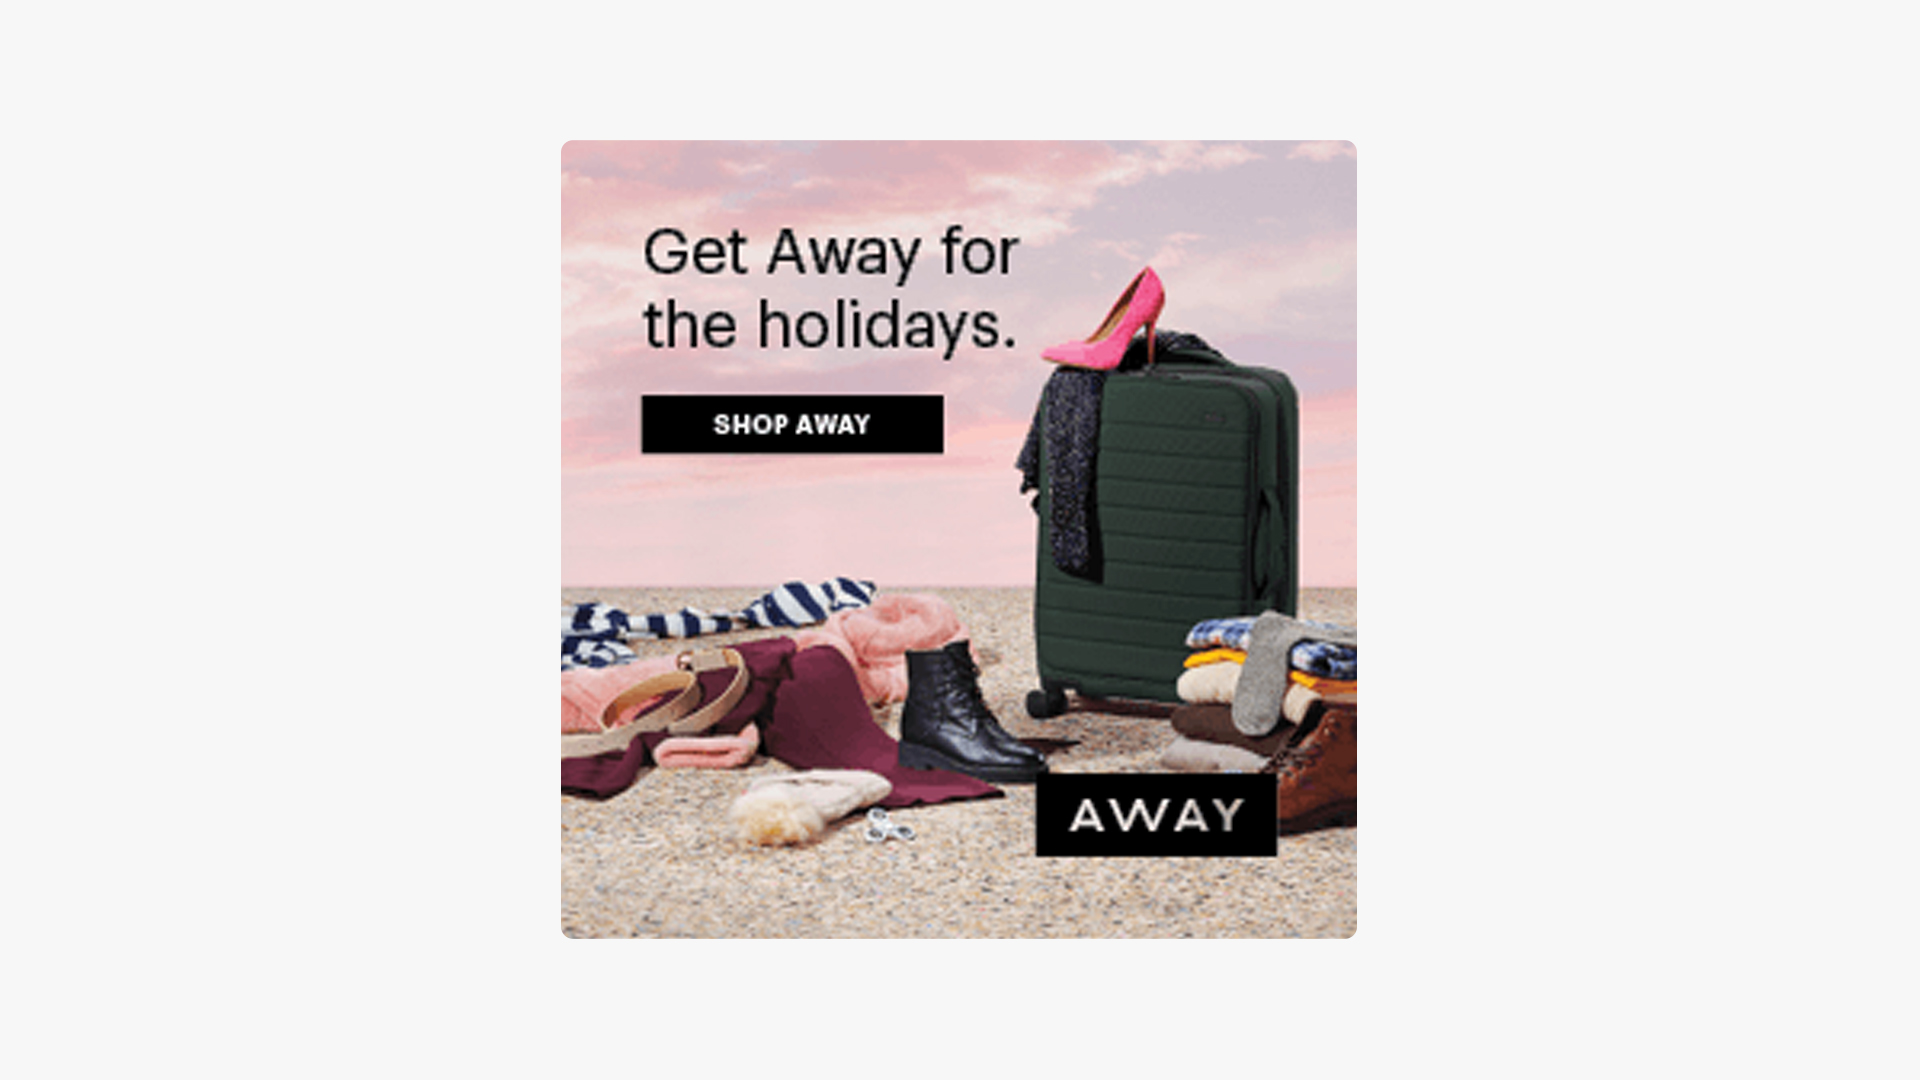
Or tied to a specific occasion, promotion or collection, like this holiday-themed ad by Away:
Targeting options (Beginner)
Great ads are essential, but the other part is showing that ad to the right people.
So how do you find the right people?
Whenever you hear about the latest privacy invasion by companies like Facebook and Google, this is what is at the core of things.
For everyone that interacts with one of their websites or tools, Google creates a profile to figure out who they are and what they like.
They then crunch all of that data and make it available to advertisers like yourself to pick and choose from.
Let’s take a closer look at all the targeting options in Google Ads:
Demographics
The options that are easiest to understand are the demographics.
These are the basic targeting options like gender, age, parental status, and household income (these last two are only available in the US).
On their own, these groups are still pretty big, even if you combine them.
So my suggestion is to use the other targeting options below and use the demographics to filter out groups that wouldn’t be a good fit for your ads.
Here is an example from a client of mine who sells jewelry for women. We’ve excluded the people Google has identified as Male.
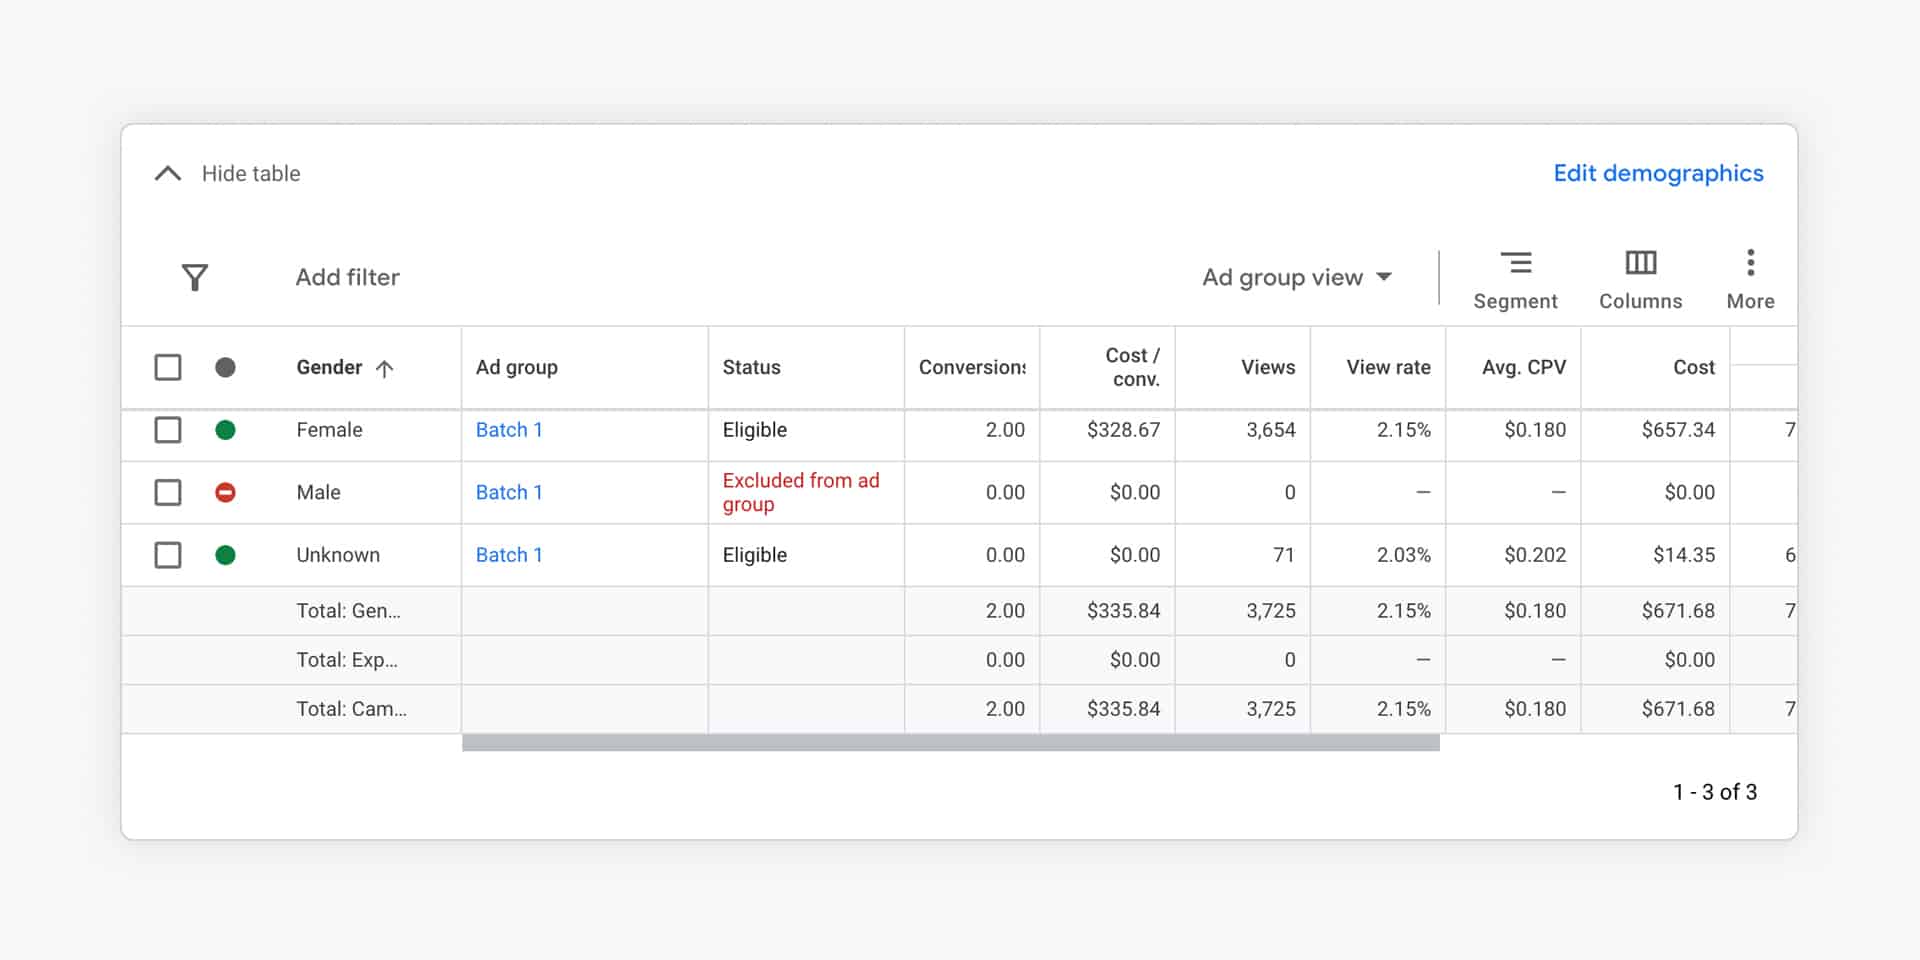
There always is an “Unknown” group of users that Google can’t identify.
Keywords
If you target keywords on the Display Network, you tell Google to show your ads when a specific page or website matches the keyword you provide.
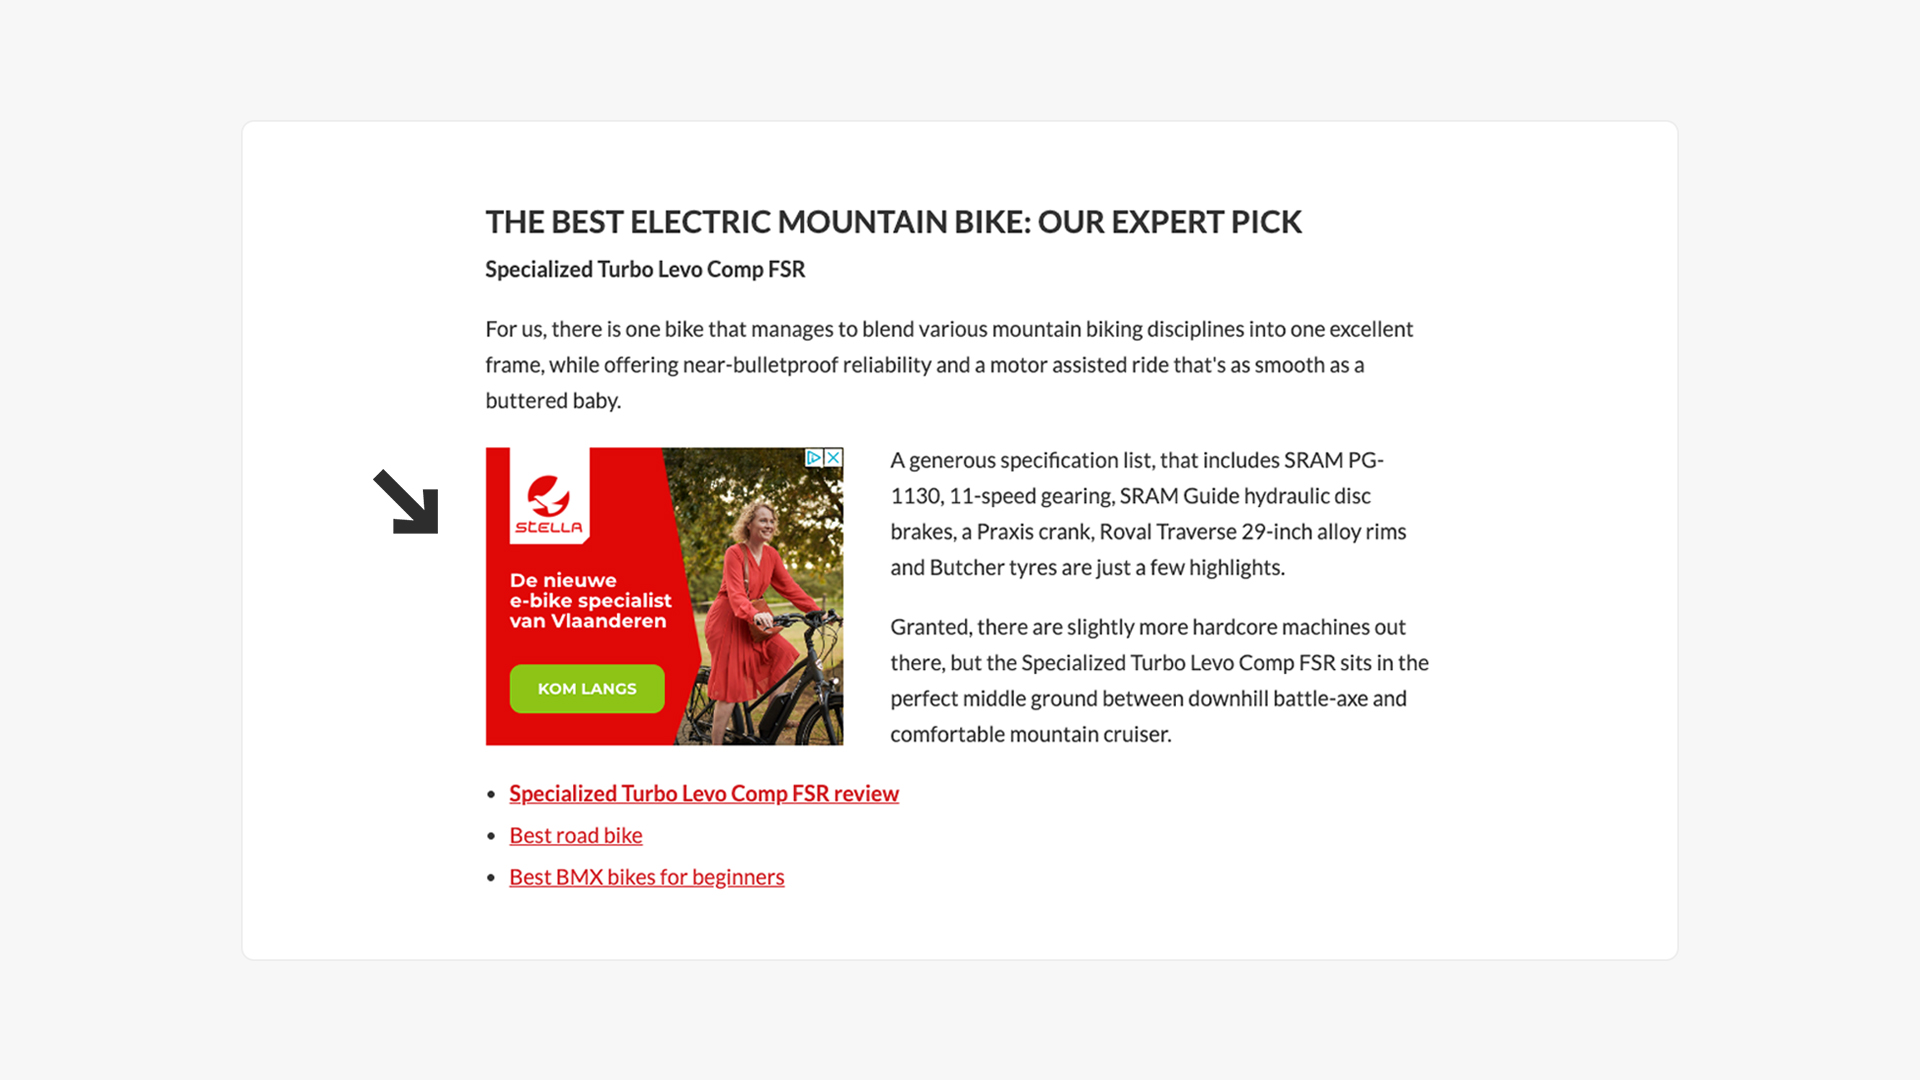
If you’re selling electric bikes, you might add “electric bike” as a keyword. (Don’t worry about match types here, you’ll have to use the broad match version).
So when a visitor is looking at an article about electric mountain bikes, your display ad can show up:
Topics
A second targeting option, similar to keywords, are Topics.
These are pre-made interests that Google has put together.
Here are some examples:
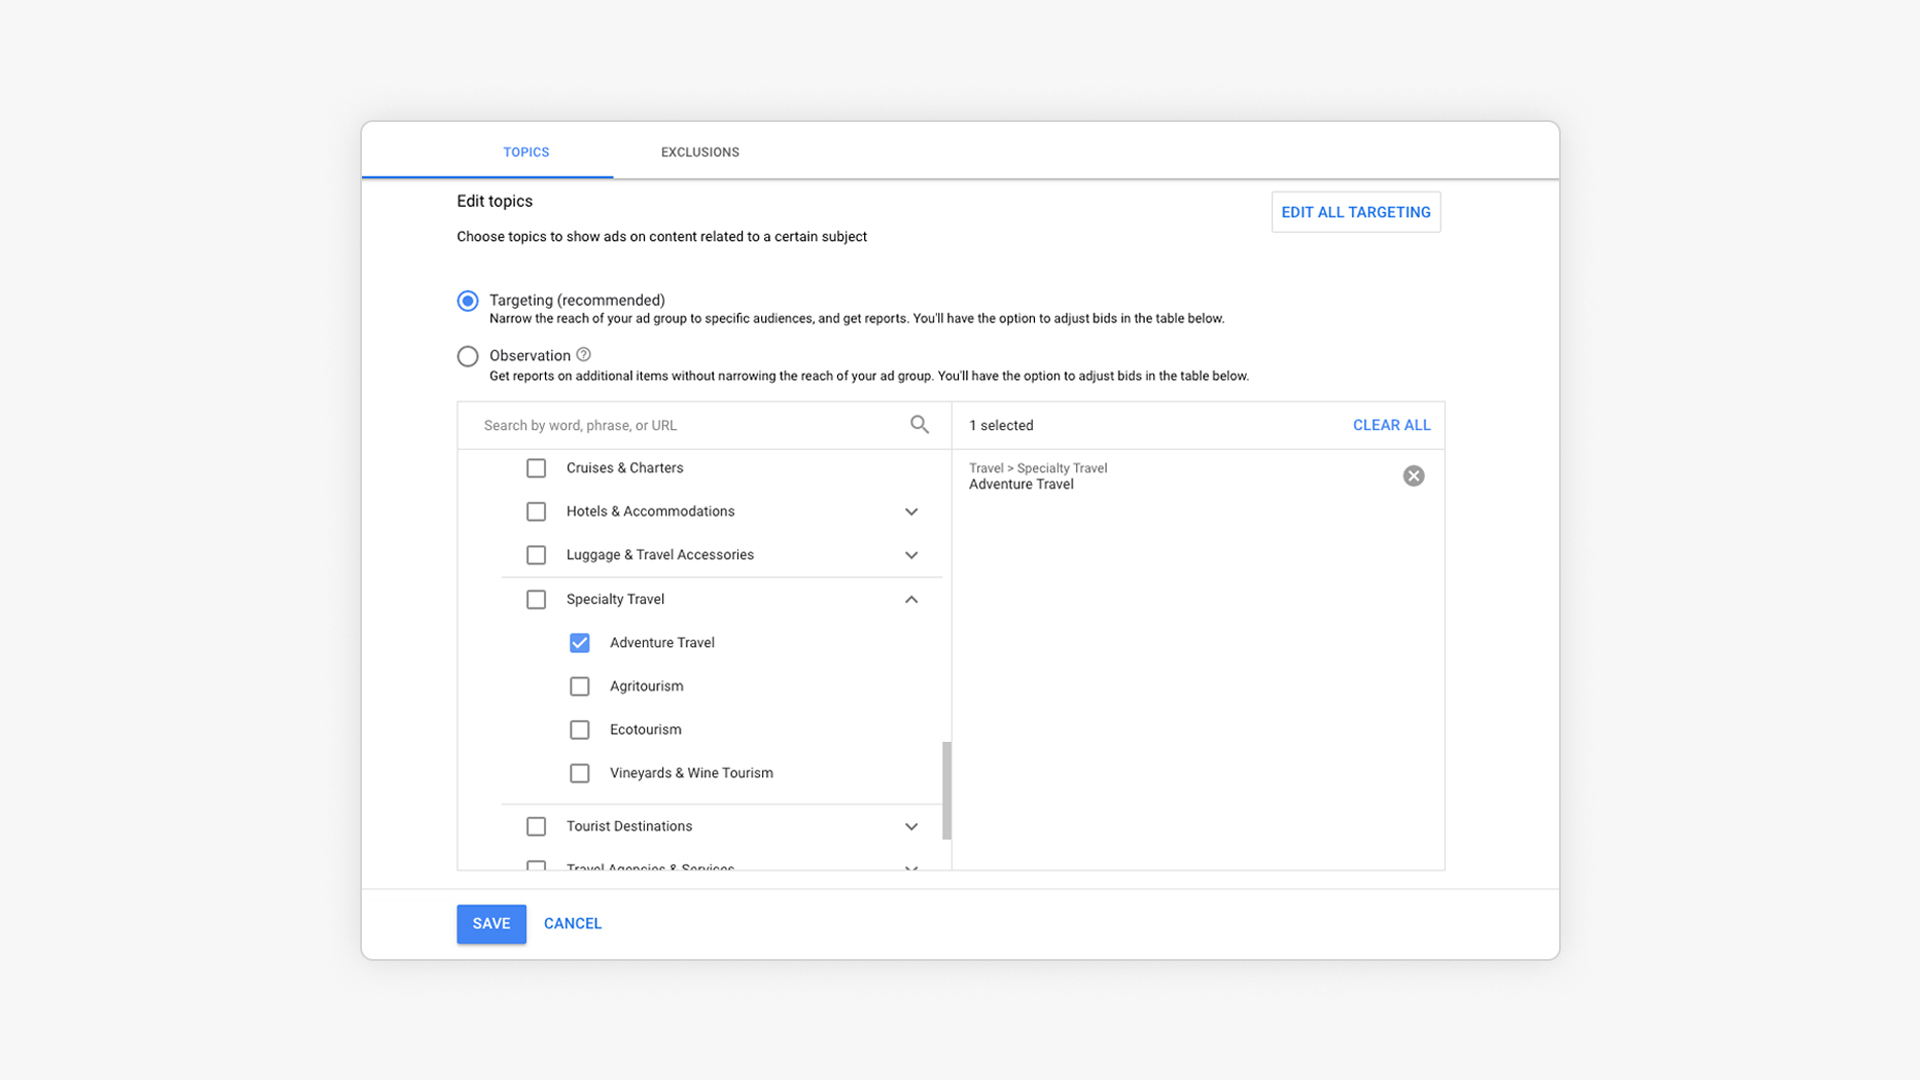
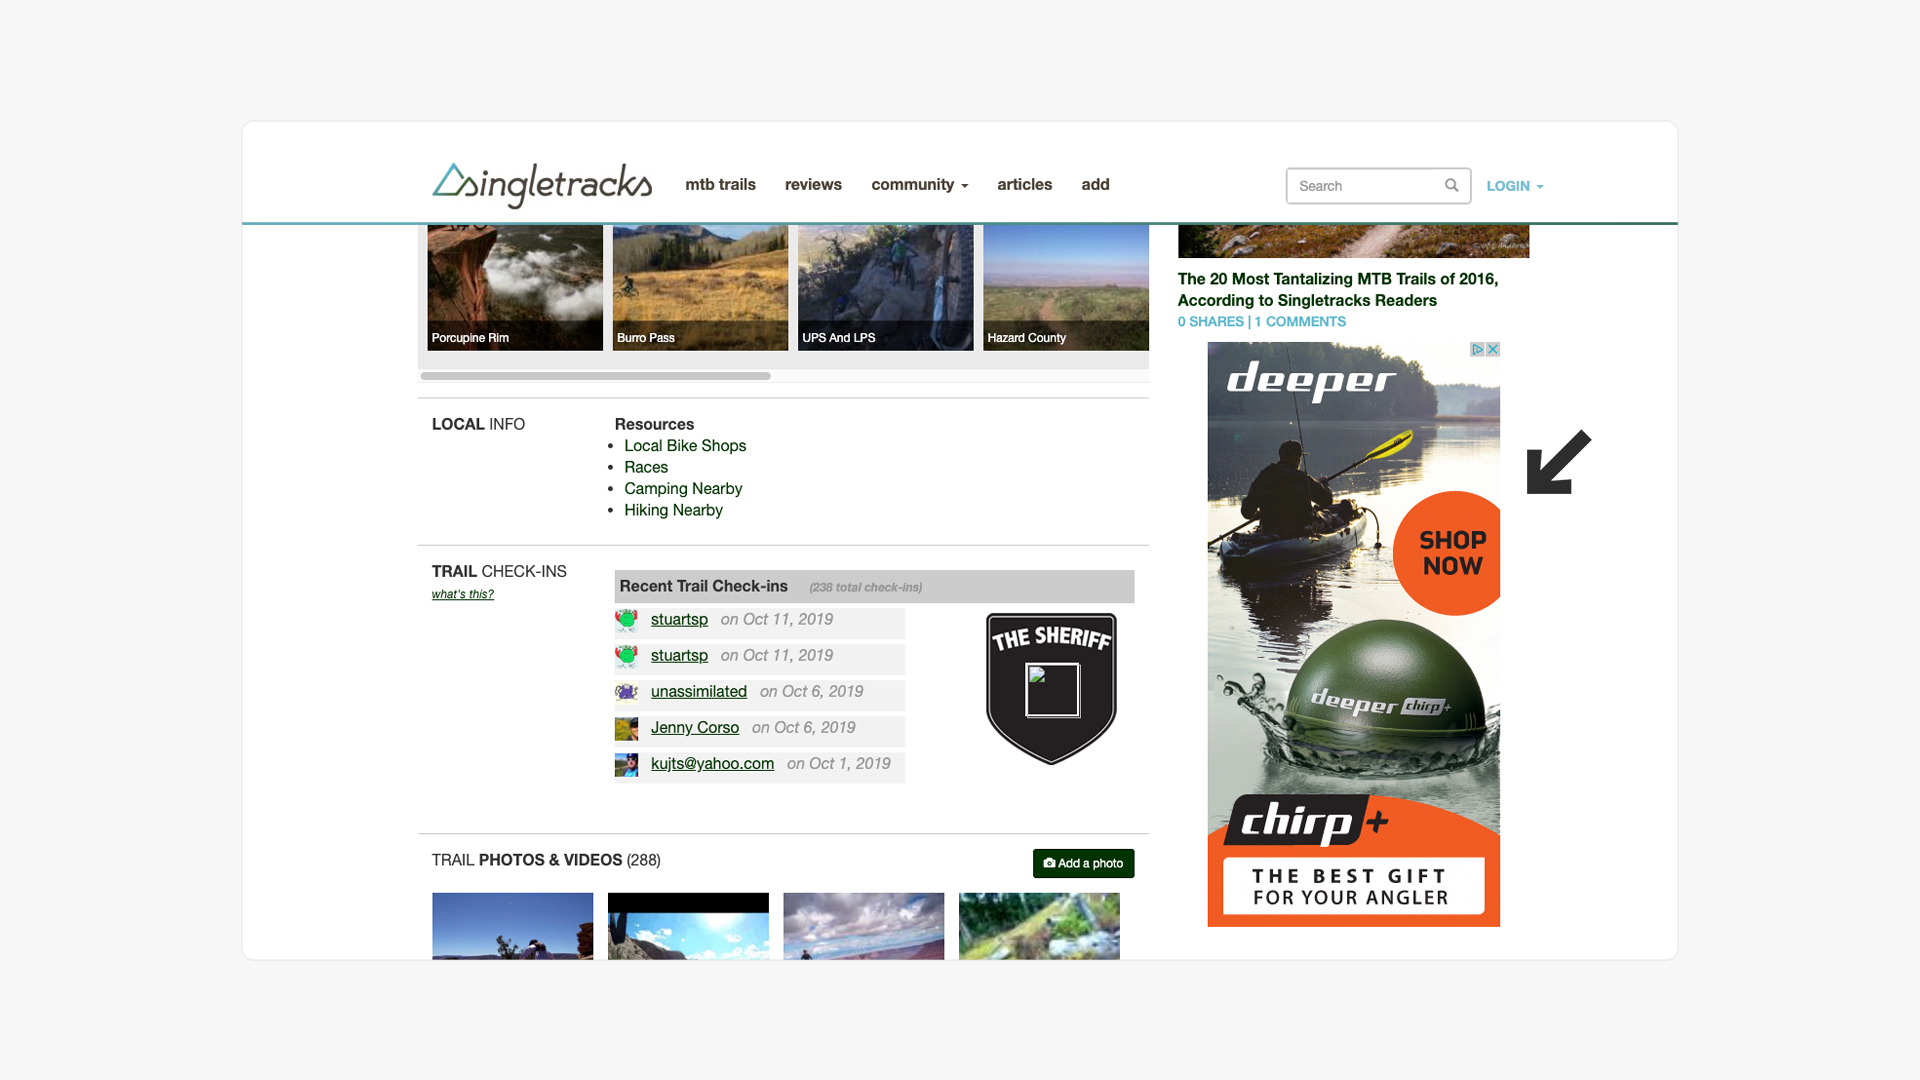
If I’m selling fishing gear, I might select the topic of “Adventure travel”, because I’m looking for fishing enthusiasts that are traveling to find great fishing spots.
Then on a site that Google lists as part of that topic, singletracks.com (a site with the best mountain bike routes in the world), my ad shows:
Placements
With Keywords and Topics, you indirectly indicate to Google which website you want to appear on.
With Placements, you can select the specific websites and apps you want your ads to appear on.
Staying with the fishing example, here are a few websites that I can advertise on:
Audience segments
All the previous options were “placement” based, now we’re going to look at how to use those data-rich profiles that Google has on all its users.
The first one of those is the Audiences targeting option.
These are groups that Google has categorized in different ways:
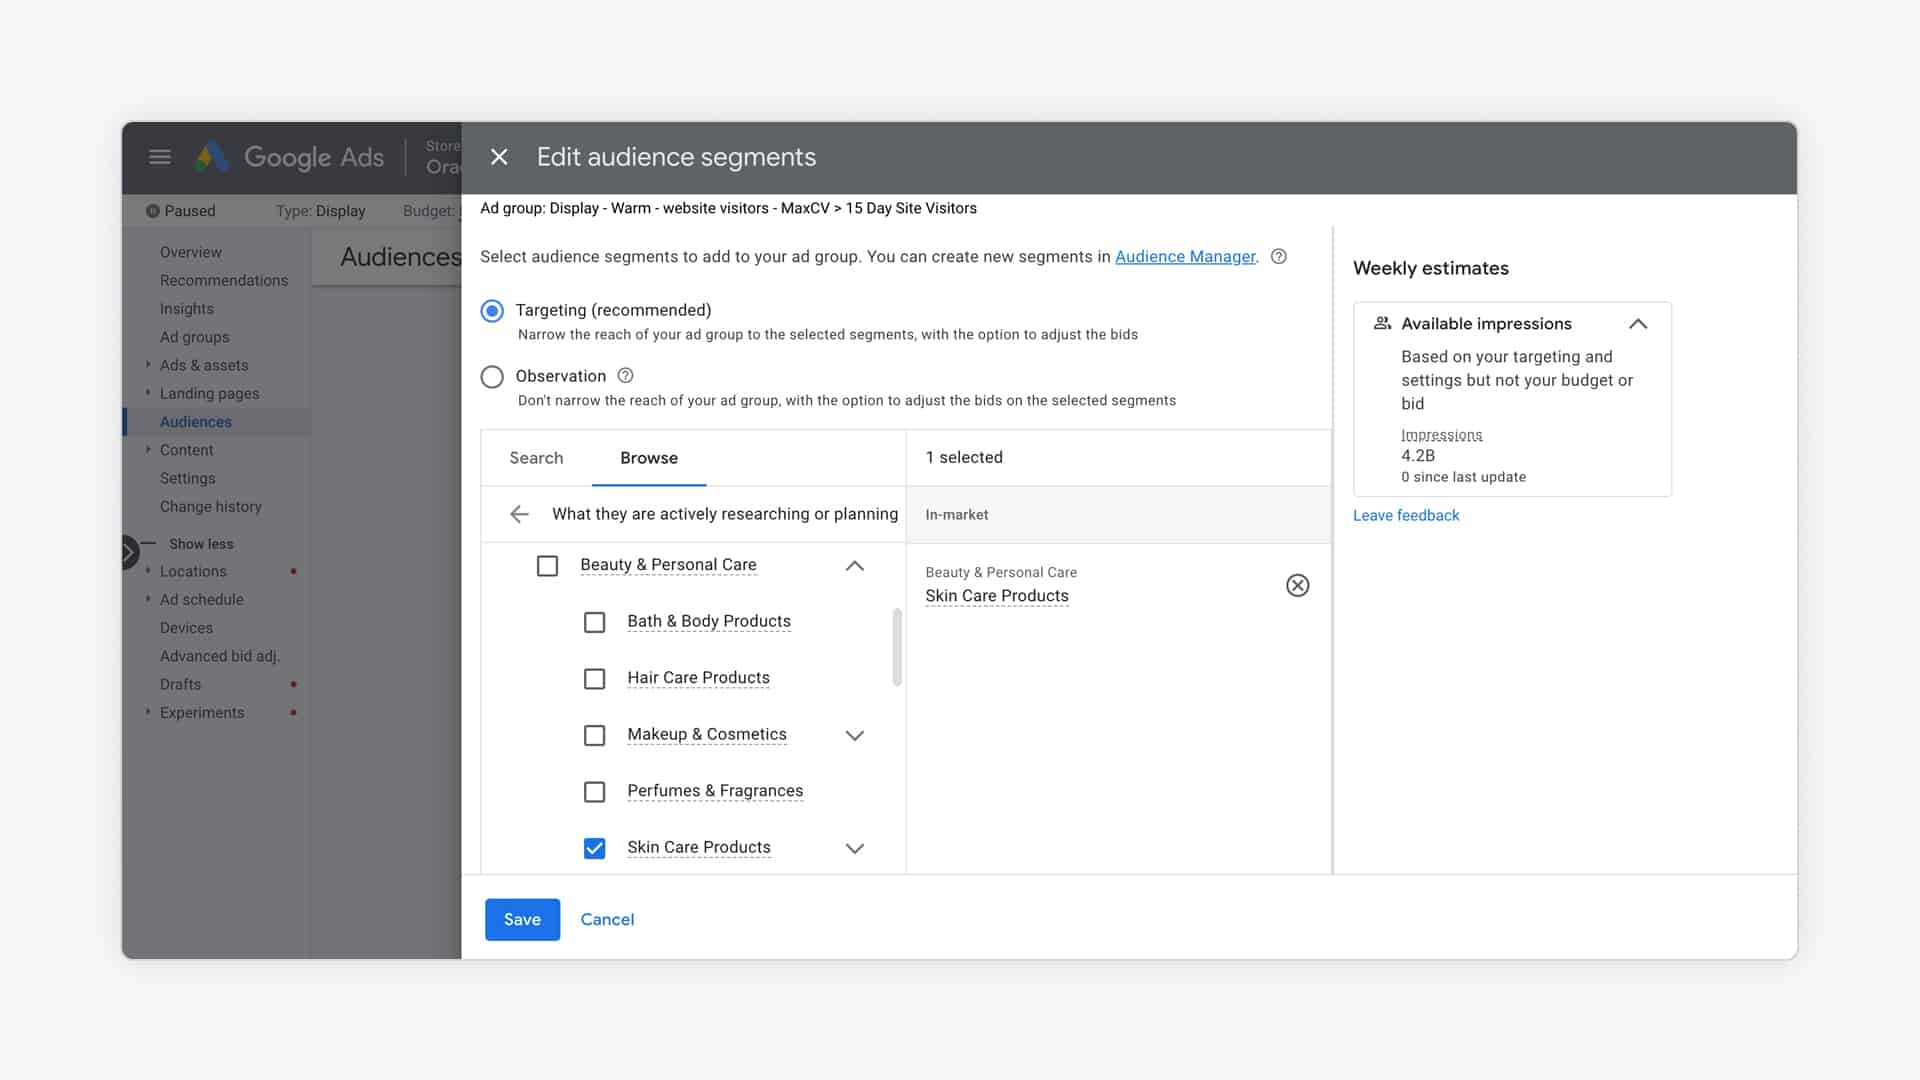
If you drill down into each of these options, you’ll find more options:
- Detailed demographics
- Affinity: Groups of people based on their lifestyles, buying habits, and long-term interests
- In-market and life events: People actively researching products or services
- Your data segments: People who previously interacted with your business
Here is a handy list of all targeting options put together by the folks at ZATO.
As you can see, just listing the different options already takes a long time. So which ones should you use?
Apart from the Remarketing Audiences, I probably use in-market and affinity audiences most often.
But finding a great match between your ads and an audience is the key to success with display advertising.
So you’ll need to test which audiences deliver you the best results. I’ve often found an audience type that works for one advertiser but does nothing for the others.
Display campaign structure (Intermediate)
In the previous section, you might have gotten a bit overwhelmed with all of the targeting options.
I told you to test many of them to find the ones that work best for you.
And to efficiently test, the structure of your campaigns once again comes into play.
Because if you mix all sorts of audiences together, you have no idea what’s working and what isn’t.
So similar to the approach with Shopping and Search Ads, you want to structure your campaigns in a way that allows you to isolate all of the different parts.
Have different campaigns with targeting options and within have different ad groups with more specific things.
Here is an example of the structure of Display campaigns:
Campaign#1: Display – retargeting
- Ad group #1: Product viewers (targeting: remarketing audience)
- Ad group #2: Checkout abandoners (targeting: remarketing audience)
Campaign #2: Display – in-market audience
- Ad group #1: Outdoor Recreational Equipment (targeting: in-market audience)
- Ad group #2: Fitness Products & Services (targeting: in-market audience)
- Ad group #3: Sporting Goods (targeting: in-market audience)
As always, the more budget you have to spend, the more tests you can run to really determine which audiences perform best for you, and the more granular you can make your campaigns.
high to ensure a high enough return.
YouTube Ads For Ecommerce
YouTube is such a massive platform, and YouTube Ads allow you to tap into this potential.
But it’s not easy to do.
Your success in running YouTube campaigns depends on how well you can bridge the gap between why a user is on YouTube and your advertisement.
Let’s take a look at how you can do that.
YouTube Ads Campaign subtypes (Beginner)
The first important thing to realize is that there is no single YouTube Ad campaign or a “YouTube Ad” format.
There are many different campaign subtypes and Google is constantly tinkering with the available options and features inside of those campaigns, especially for the campaigns that are focused on “Awareness”.
In Google Ads, when you create a new video campaign (without picking a goal), you have the following options:
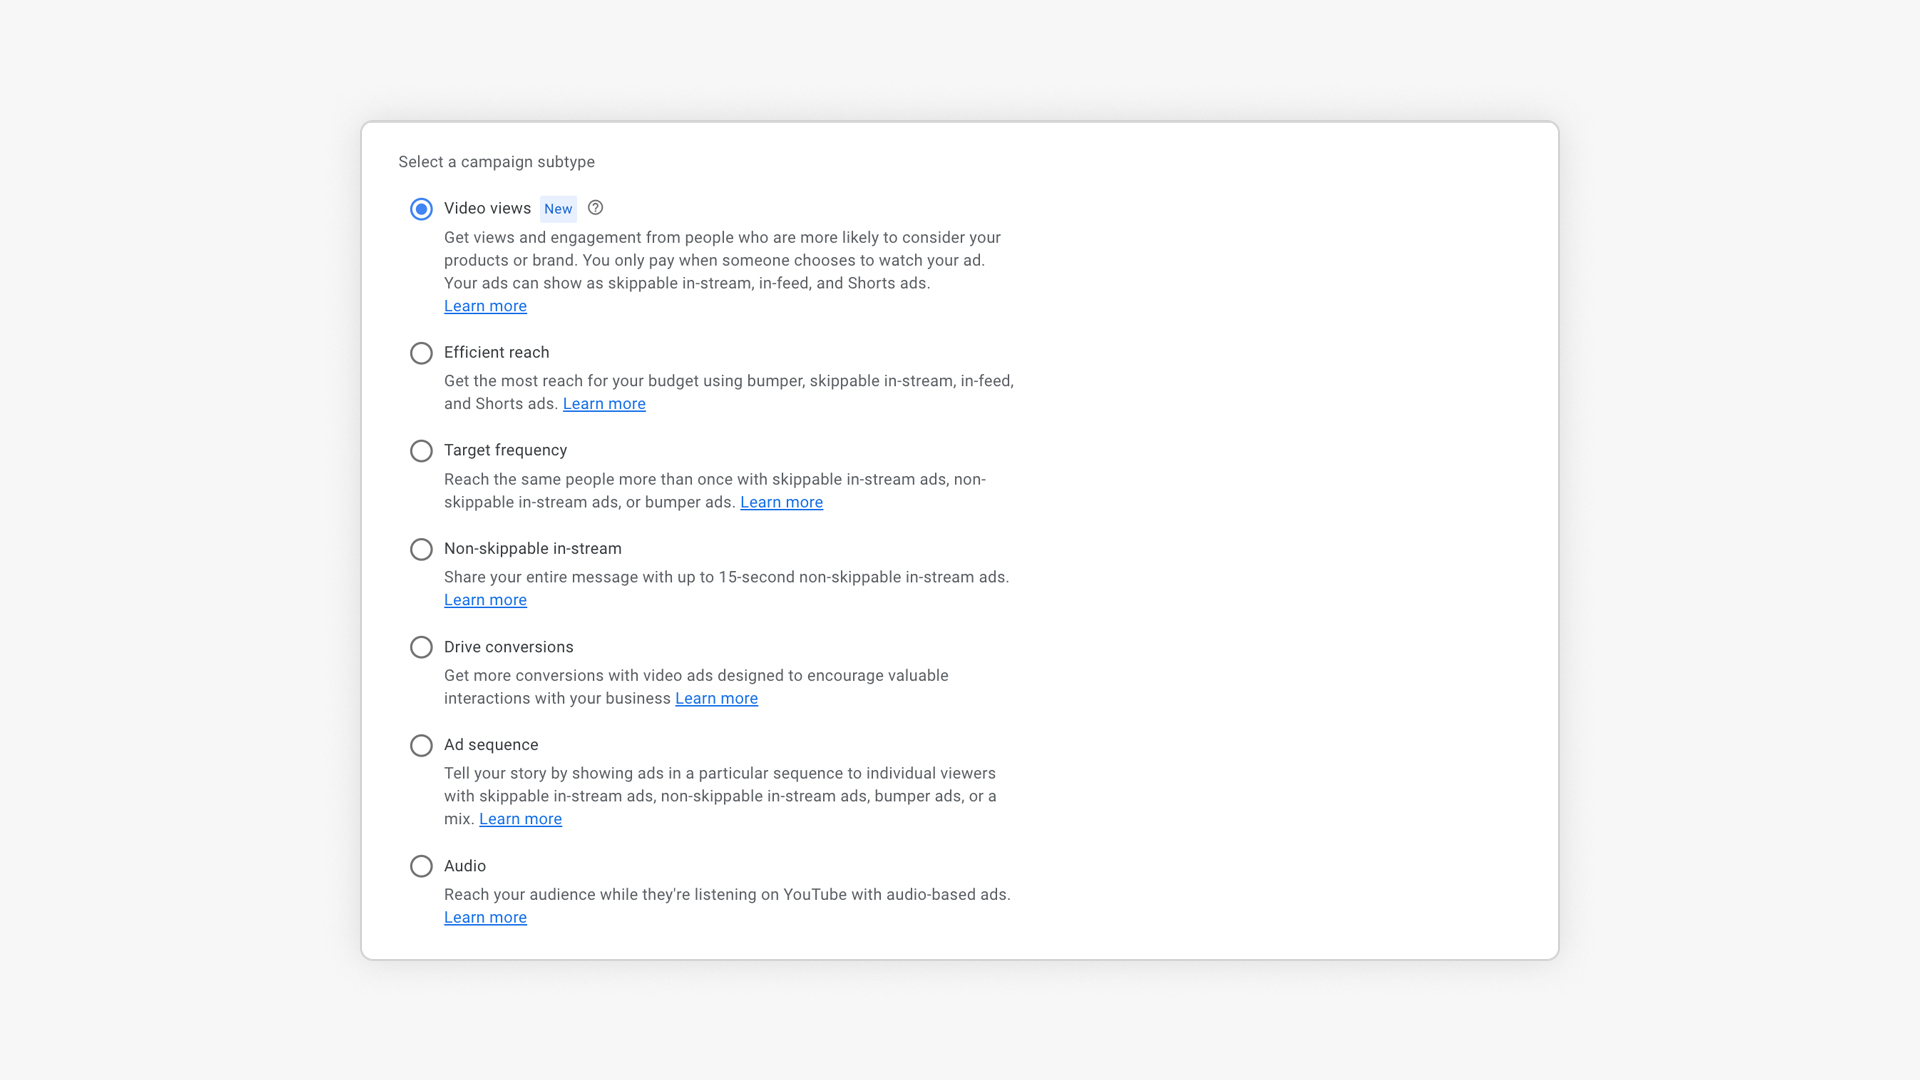
I won’t go into each campaign subtype, but it’s important to know that whatever option you pick, it has important consequences to what the campaign will optimize for, where your ads can show, and which bid strategy you can use.
For most advertisers, the “Drive conversions” subtype will be the best option.
If you’re looking for a more in-depth review of the pros and cons of each campaign subtype, check out our in-depth tutorial.
YouTube Video Ad Formats (Beginner)
As I mentioned in the previous section, the campaign subtype will decide where your ads can show.
With some campaign subtypes, you’re able to select a specific ad format, but most campaigns will opt you into multiple ad formats, and decide on their own where to show you
I’ll do a quick rundown of the different video ad formats to pick from:
- Skippable in-stream ads: these ads appear before, during or after another video and can be skipped after 5 seconds
- Non-skippable in-stream ads: these ads cannot be skipped and play for 15 seconds (or less)
- Shorts Ads: these are vertical Shorts Ads that appear in the Shorts feed
- In-feed video ads: these are image ads that appear in the various feed on YouTube: homepage, suggested video, etc.
- Bumper ads: ads that are 6 seconds or less that can’t be skipped
- Outstream ads: these are video ads that run outside of YouTube on the Google Video Partners network
- Masthead ads: ads that take over the YouTube homepage (massive reach)
Take a look at this article to find more details on all the different types of ad formats and when to use them.
High Budget Creative (Expert)
People visit YouTube for 2 reasons: entertainment or education.
So if you want to succeed with YouTube Ads, you have to keep this in mind with creating ads.
The poster child of doing YouTube Ads well is a company called Purple Mattresses.
Here is an example of one of their most successful ads:
Creating a video like this isn’t cheap, probably in the range of $250-500k.
That’s just for producing the video shoot. As a result of spending that type of money, you have a bunch of different videos out of that material (different intros/CTAs/sequencing, etc.)
Then you have to start spending to test different variations and run the winners on a large enough audience to see an impact and a high enough ROI.
For a company like Purple, they spend somewhere in the neighborhood of $1-2M per month, just on ads.
So If you can afford to get professional help, you can tap into all of the expertise they’ve built up creating these videos.
Low budget Creative (Intermediate)
For most businesses, spending 6 figures on video production is quite a leap.
So what can you do with YouTube Ads if you can’t shell out that kind of cash upfront?
There are a lot of different approaches you can take. The most common alternative is to do as well as you can but with a lot fewer resources.
Most companies take this route, but it’s one that’s very hard to do well.
Here is a great example from that same company, but this one being much cheaper:
This video was created by one of their customers, they simply slapped on the logo and done.
I’ll be the first to admit that not every UGC (user-generated content) video will be a hit, but this type of video is accessible to most companies.
Also leveraging video ads that you created for other platforms like TikTok or Instagram could work.
Let’s take a look at some more creative ideas.
If you don’t want to shell out $$$ for production, you’ll need to put in the time to make great ads. My approach would be to create a ton of variations and different kinds of videos, to find a style that resonates with your audiences.
Create educational content
Instead of trying to create a viral video on a shoestring budget, you can also try to be super helpful.
- Example 1: if you’re selling products to clean bikes, create ads with bike maintenance tips.
- Example 2: if you’re selling a couple of different types of air humidifiers, create a product review video comparing a couple of different models.
Some extra resources:
- YouTube tutorial: How to make good videos without breaking the bank
- Tips for better YouTube Ecommerce Ads by Brett Curry
Targeting (Beginner)
A lot of the targeting options available with YouTube Ads are the same as on the Display Network.
But on YouTube, you get access to a couple of interesting ones:
- More detailed demographics: education, marital status, homeownership
- Competitor channels (a type of placement)
- Life events: people that are in the middle of life milestones like moving, graduating from college, or getting married
- Retarget people who have interacted with your channel
For more details check this complete list of YouTube targeting options.
Bidding (Beginner)
In Shopping and Search, the center metric is the click. With YouTube Ads, it’s mostly about the view.
So when it comes to deciding how much to pay, there are different bidding strategies available.
These also depend on the ad format your campaign is using. For some video ads, you will get charged no matter what, for other videos, you’ll only pay when someone doesn’t skip and watches more than 30 seconds.
All the YouTube bidding strategies can be divided into three big groups:
- Conversion-based bidding: Maximize conversions, Target CPA
- CPM (Cost per mile) bidding: Target CPM, Maximum CPM, and Viewable CPM
- CPV (Cost per view) bidding: Maximum CPV
Which one you pick depends on your campaigns and objectives. While most advertisers will be inclined to use a conversion-based strategy (you want to make sales right), it might not be the best one to start out.
As with all of the above, test to find what works for you.
Build Your Channel (Beginner)
YouTube Ads are part of the whole YouTube ecosystem of channels, subscribers, comments, and likes.
One aspect of YouTube Ads that doesn’t get mentioned a lot is that of Earned Views and Likes. This means that when someone watches your YouTube Ad, they come to your channel to watch more videos.
To facilitate this, you have to put some time into making your channel look good. That will help turn more people into subscribers.
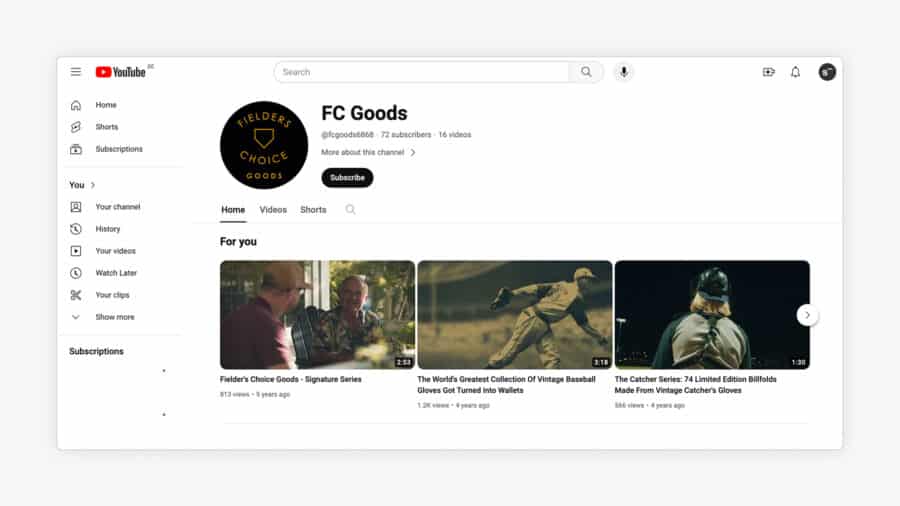
Compare the channel of FC Goods:
With that of its competitor, Bellroy:
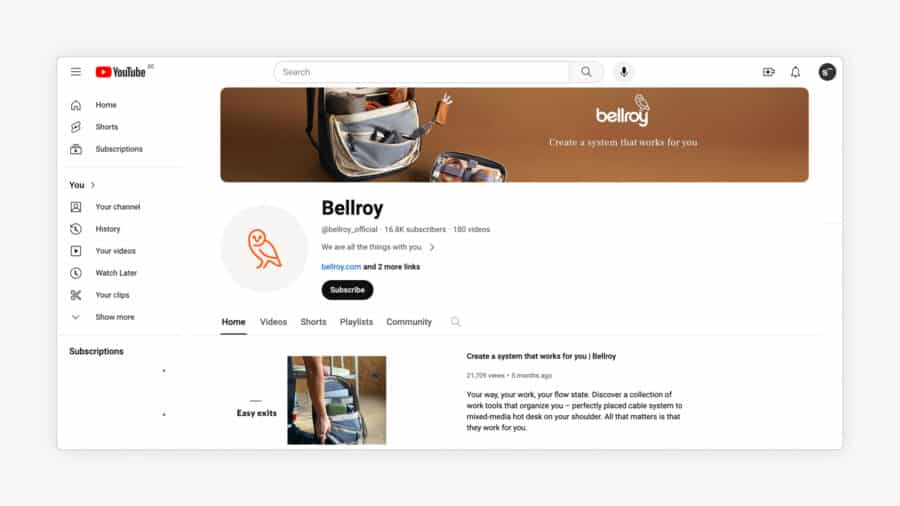
Quite a difference, and it doesn’t take too long to make it look like that:
- Header image
- Add a channel intro video
- Add links to your website or socials
- Organize your videos into playlists
You can find more detailed instructions to configure your YouTube channel in this article.
Product feeds & YouTube Ads (Intermediate)
If we’re talking about YouTube Ads for ecommerce stores, it’s important to discuss the role of the product feed.
When you enable your product feed with YouTube Ads, your products will feature alongside your video ads in some placements.
Here is what that looks like for watch retailer MVMT:
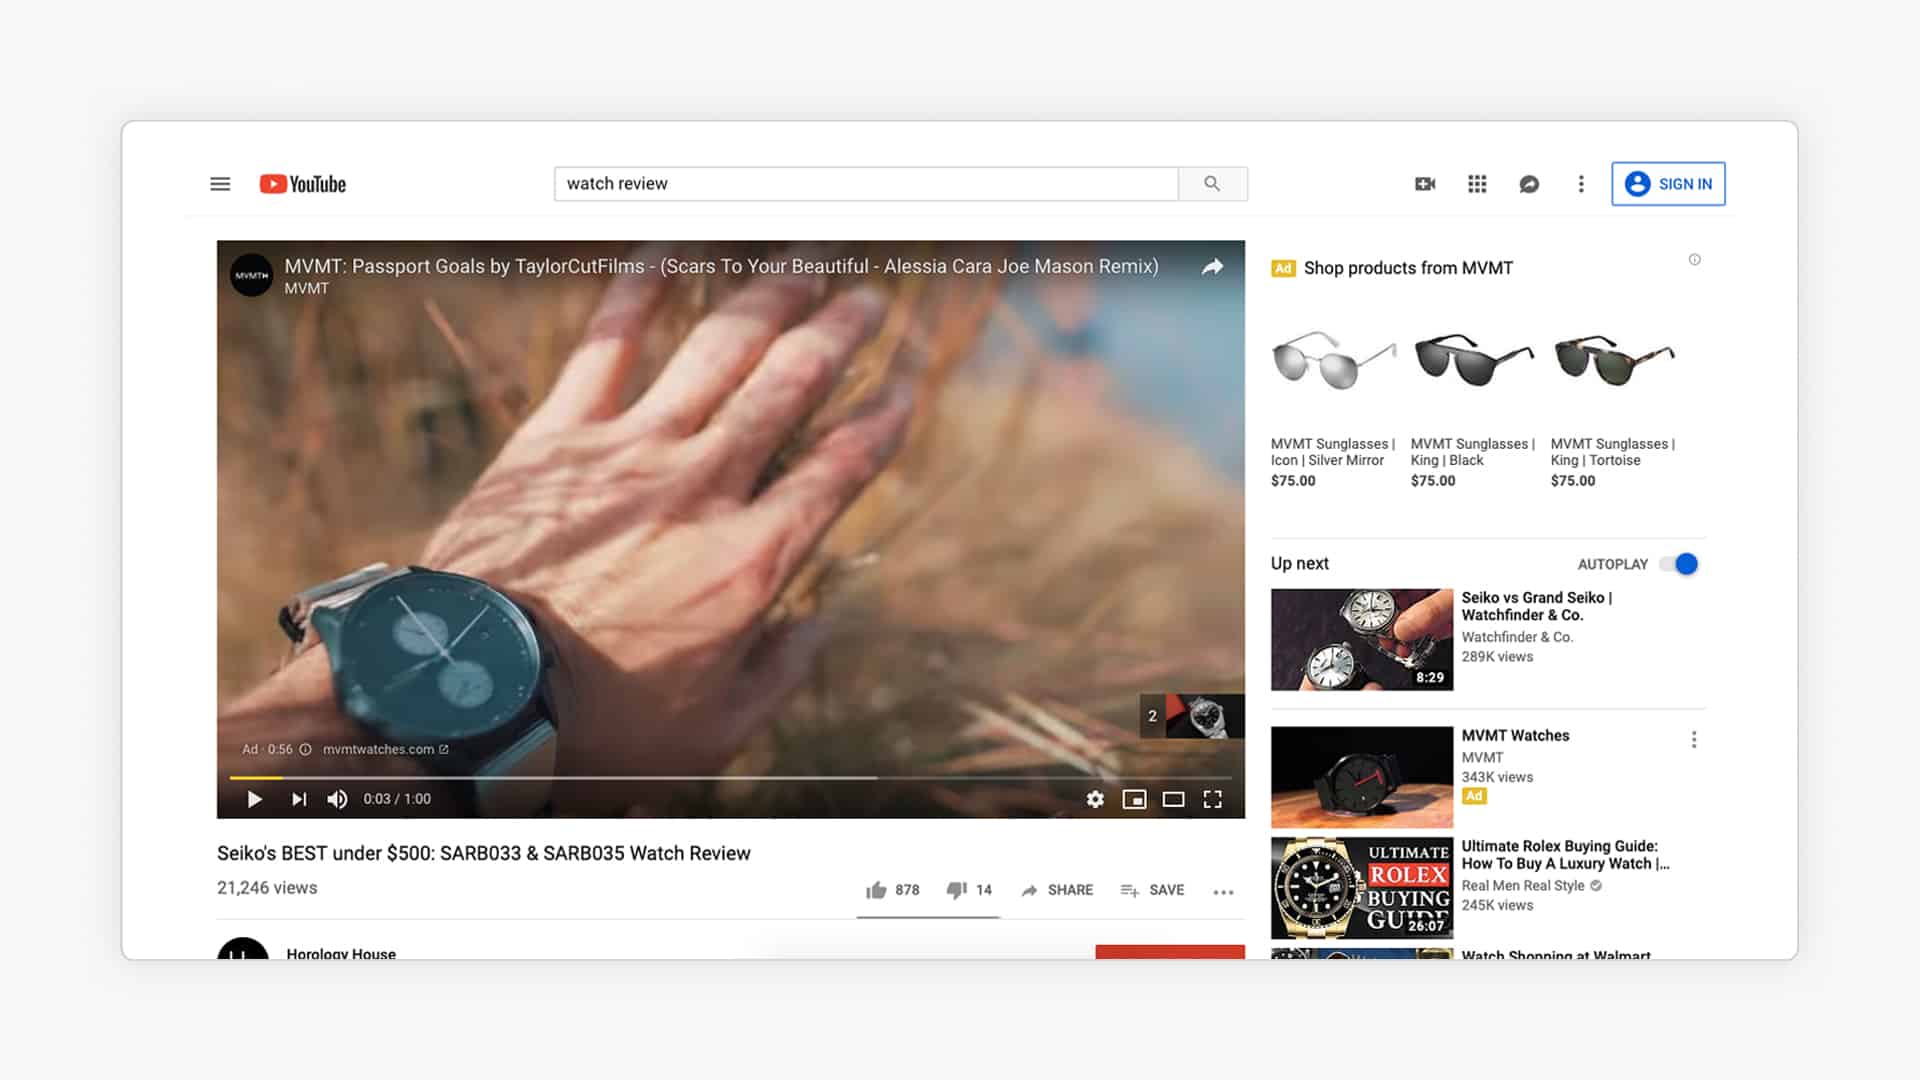
These are great to link a video with some actual products, so be sure to check them out.
What to focus on right now
This guide has a ton of action items to implement. If you’ve gone through it, your to-do list is probably exploding.
I hope though, that with using the approach outlined at the start, as well as the focus point depending on your skill level, it’s clear what to focus on next.
Using those guidelines, you’ll have a better time looking for more information and also knowing what to pay attention to right now, and what to shelf for later.
To help you do that, I’ve put together a guide of this whole article that includes an overview of the different campaign types and skill levels, to help guide your learning.
